


Editorial review: October 29, 2026. Scope: E0 Saber, practical F2P equipment and Fate teams with or without Gilgamesh. Banner history records confirmed announcements; check the in-game Warp notice for live availability.
The best Saber build in HSR depends on who is feeding her Energy and which attacks your team is amplifying. Her Excalibur Ultimate is central to the rotation, while Gilgamesh adds a Joint Follow-Up ATK that changes her damage mix and equipment choices. Start with that team decision, then choose relics, CRIT stats and Speed.
Contents
- 1 🚀 Quick Answer: What Is the Best Saber Build?
- 2 1. ⚙️ Saber Build Overview & Core Mechanics
- 3 2. 🧩 Best Relics for Saber
- 4 3. 🌌 Best Planar Ornaments for Saber
- 5 4. 📊 Saber Main Stats, Substats and CRIT Targets
- 6 5. 💡 Best Light Cones for Saber
- 7 6. ⚡ Saber Speed Tuning: SPD Boots or ATK Boots?
- 8 7. 🔋 Saber Rotation and Energy Timing
- 9 8. 🤝 Best Saber Teams and Fate Pairings
- 10 9. 📈 Saber Trace Priority and Farming Route
- 11 10. 📜 Saber Character and Light Cone Banner History
- 12 11. 💎 Should You Pull Saber or Save?
- 13 12. ✅ Common Mistakes and Final Saber Build Checklist
- 14 13. ❓ Saber Build FAQ
- 14.1 13.1 🧩 What Is the Best Relic Set for Saber?
- 14.2 13.2 🎯 How Much CRIT Rate Does Saber Need?
- 14.3 13.3 👟 Should Saber Use SPD Boots or ATK Boots?
- 14.4 13.4 🔋 Does Saber Need an Energy Regeneration Rate Rope?
- 14.5 13.5 💡 Is A Thankless Coronation Required?
- 14.6 13.6 👑 Does Saber Need Gilgamesh?
- 14.7 13.7 🏹 Can Saber and Archer Be Used Together?
- 14.8 13.8 📅 When Does Saber’s Banner End or Rerun?
- 15 14. 🌐 Sources
🚀 Quick Answer: What Is the Best Saber Build?
Recommended starting build
Build Saber with Scholar Lost in Erudition, Cosmic Life Sciences Institute, a CRIT body, team-dependent boots, a Wind DMG or ATK% sphere, and an ATK% rope. Aim near 100% combat CRIT Rate. Use A Thankless Coronation or F2P On the Fall of an Aeon. For Fate teams, start with Saber + Gilgamesh, then add a suitable support and sustain.
Choose the team before committing to a relic domain. Wavestrider needs actual targeting, while Scholar works without that setup. The recommendations below explain the tradeoffs instead of assigning one set to every account.
1. ⚙️ Saber Build Overview & Core Mechanics
| Category | Recommended direction | Reason |
|---|---|---|
| Rarity / Type / Path | 5-star Wind Destruction | An ATK-scaling CRIT damage dealer. |
| Damage profile | Ultimate, Skill, Enhanced Basic; Joint Follow-Up with Gilgamesh | The team changes which bonuses cover the largest share of damage. |
| Relics | Scholar for consistency; Wavestrider with reliable targeting | Use the set whose conditions your rotation actually meets. |
| Planar set | Cosmic Life Sciences Institute | Her 360 Max Energy meets its full 32% DMG bonus. |
| Main stats | CRIT / SPD or ATK% / Wind DMG or ATK% / ATK% | Body / boots / sphere / rope. |
| CRIT goal | Approach 100% CRIT Rate in combat | Include her Trace, team and conditional set bonuses. |
| Team priority | Energy, useful buff coverage and enough actions | An extra Ultimate can matter more than a small sheet-stat gain. |
1.1 🧠 Core Resonance and Mana Burst
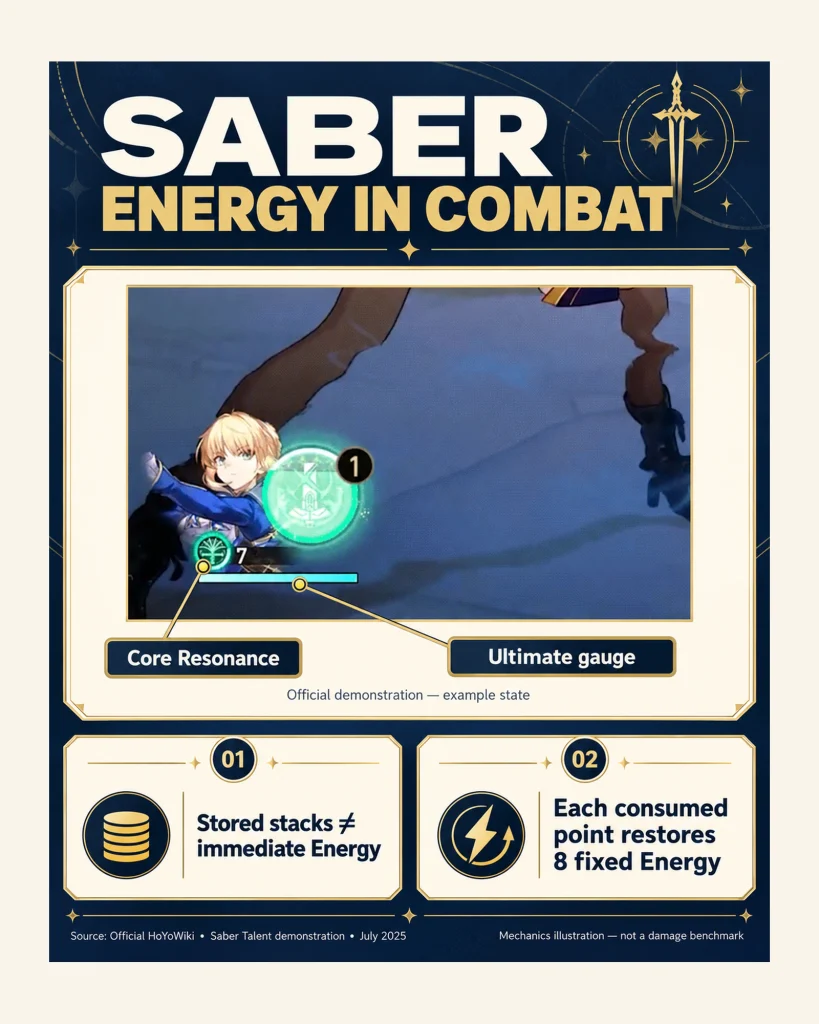
Saber uses Core Resonance to reach her 360-Energy Ultimate. Her Talent grants three stacks when an ally, including Saber herself, uses an Ultimate. Each consumed stack restores a fixed eight Energy. Three stacks therefore represent 24 potential Energy, which arrives when she consumes them. They are not an immediate 24-Energy deposit.
Her Skill has two outcomes: it consumes Core Resonance when doing so can finish filling her Energy, or it builds three more stacks. Her Knight of the Dragon Trace adds 20% CRIT Rate and enables Mana Burst, which can advance her action and recover a Skill Point when the Energy condition is satisfied.
After Excalibur, her next available attack is the Enhanced Basic ATK. That attack also supplies Core Resonance. Her other major Traces provide Energy overflow storage and CRIT DMG, so unlocking the full kit changes how smoothly she plays.
Practical rule
Watch Energy, Core Resonance and the action bar together. Reaching the Mana Burst condition can bring Saber forward before a planned buff refresh. A rotation that looks tidy on paper can still waste its strongest attack if those buffs expire.
2. 🧩 Best Relics for Saber
2.1 📘 Scholar Lost in Erudition: A Consistent Starting Point
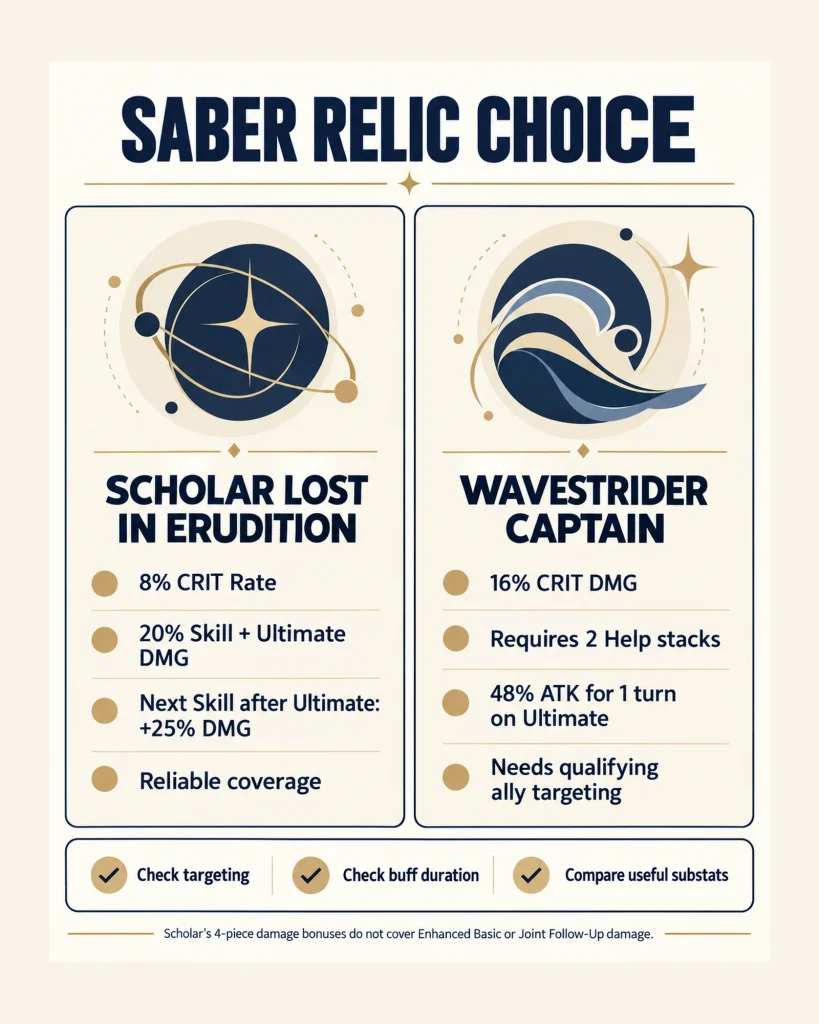
4-piece Scholar Lost in Erudition is a practical recommendation when you want predictable Skill and Ultimate coverage. It gives 8% CRIT Rate, 20% Skill and Ultimate DMG, and an extra 25% DMG bonus for the next Skill after using Ultimate. The Enhanced Basic between those actions does not turn into a Skill.
Scholar is especially convenient when the team cannot maintain Wavestrider’s targeting requirement. It also comes from Path of Uncertainty, alongside Sacerdos’ Relived Ordeal, which can make the farming budget useful for an allied support.
2.2 🌊 Wavestrider Captain: Strong When the Team Activates It
Wavestrider Captain grants 16% CRIT DMG from two pieces. Its four-piece effect requires Saber to receive two qualifying abilities from other allies. Her next Ultimate consumes those Help stacks for 48% ATK lasting one turn. Check that this happens before the Ultimate you are trying to strengthen.
| Relic setup | Best use case | What can go wrong |
|---|---|---|
| 4-piece Wavestrider Captain | A team with consistent ally targeting and planned Ultimate timing | Gilgamesh’s presence alone does not supply its two Help stacks. A short buff window or missed targeting reduces its value. |
| 4-piece Scholar Lost in Erudition | Reliable Skill / Ultimate damage; strong existing pieces; less targeting setup | Its damage bonuses do not directly cover Enhanced Basic or Joint Follow-Up damage. |
| 2-piece Scholar + 2-piece ATK%, Wind DMG or CRIT DMG | A temporary build with stronger main stats and useful substats | Lower set ceiling, but often a better account choice than a badly rolled four-piece. |
| 4-piece Eagle of Twilight Line | A deliberately planned action-advance rotation | The 25% self-advance after Ultimate changes the turn sequence; use only after checking a full rotation. |
Best use case
Keep a strong Wavestrider set if your actual team activates it. Choose Scholar when that condition is unreliable. Gilgamesh supplies substantial ATK and adds Joint Follow-Up damage, so old rankings based only on Saber’s launch-era hypercarry rotation are not a universal comparison.
Before replacing good pieces, use the same evaluation principles in our relic scoring guide: useful stats and working conditions matter together.
3. 🌌 Best Planar Ornaments for Saber
3.1 🎯 Cosmic Institute, Izumo and Salsotto
| Planar Ornament | Recommendation | Activation / caveat |
|---|---|---|
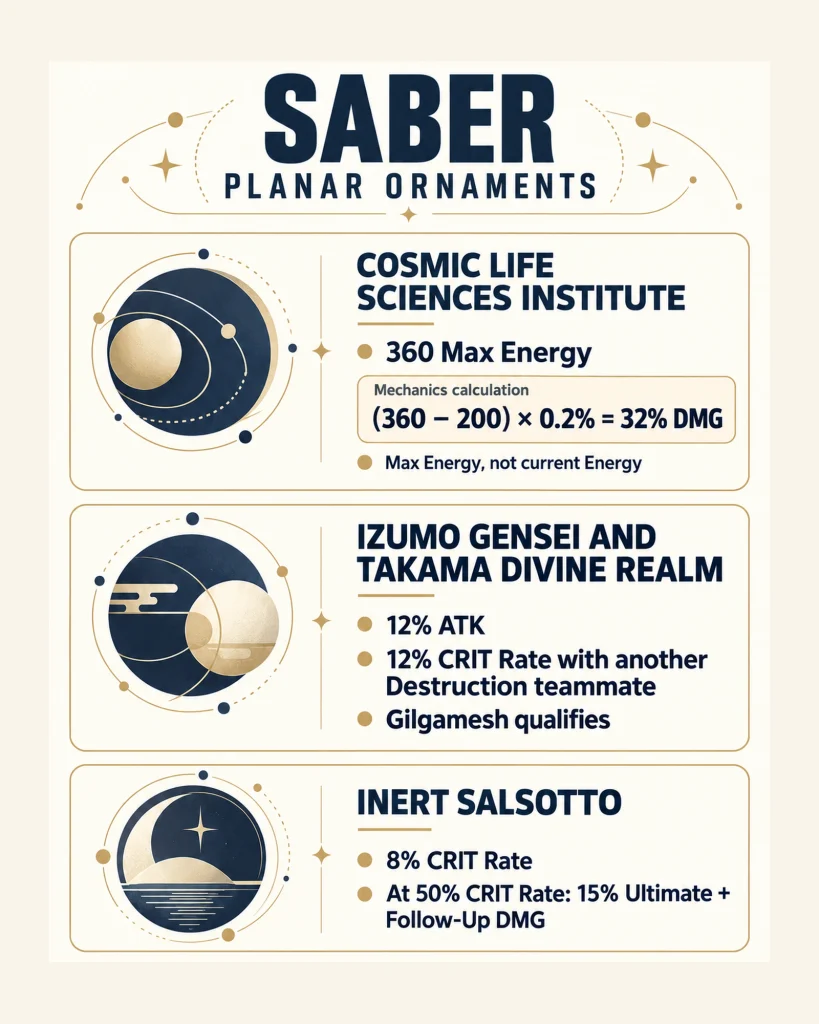
| Cosmic Life Sciences Institute | Strong general target for the completed build | At battle entry, Max Energy above 200 provides 0.2% DMG per excess point, capped at 32%. Saber reaches that cap at 360. |
| Izumo Gensei and Takama Divine Realm | Useful with Gilgamesh or another Destruction teammate | 12% ATK plus 12% CRIT Rate when entering battle with another character on the same Path. Recalculate CRIT when changing the team. |
| Inert Salsotto | Reliable existing-set alternative | 8% CRIT Rate; at 50% current CRIT Rate, 15% Ultimate and Follow-Up ATK DMG. Its coverage also helps the Gilgamesh Joint Follow-Up. |
| Space Sealing Station | Early or temporary ATK option | 12% ATK, plus another 12% at 120 SPD. Do not assume the second bonus is active on a slow build. |
Read Max Energy correctly
Cosmic Institute scales from Max Energy. For Saber: (360 − 200) × 0.2% = 32% DMG. Filling or emptying the Energy gauge does not change that calculation, and the 120-Energy overflow allowance is not added to her Max Energy.
For F2P players, a good existing Salsotto pair can carry the build while other upgrades catch up. Follow the Planar Ornament farming route when you are ready to replace it.
4. 📊 Saber Main Stats, Substats and CRIT Targets
4.1 🧥 Main Stats by Slot
| Slot | Main stat | How to decide |
|---|---|---|
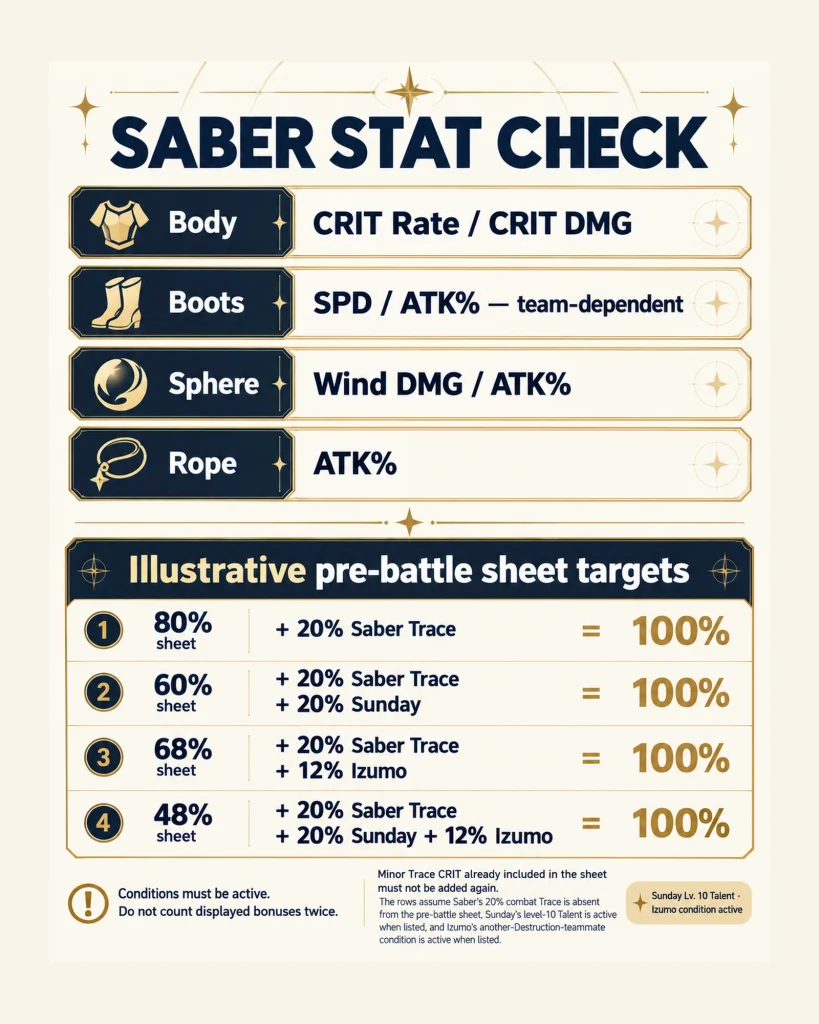
| Body | CRIT DMG or CRIT Rate | Fill the remaining CRIT Rate budget first; choose CRIT DMG when the team already brings her close to the cap. |
| Boots | SPD or ATK% | SPD for natural actions or a tuned support pairing; ATK% when the team supplies enough action advances. |
| Planar Sphere | Wind DMG or ATK% | Wind DMG is a straightforward target. Compare ATK% with better substats and the actual team buffs. |
| Link Rope | ATK% | Default damage option. An ERR rope needs a demonstrated rotation improvement to justify losing ATK. |
4.2 🎯 CRIT Rate Budget and Practical Targets
Aim to bring Saber close to 100% CRIT Rate during her important attacks, then improve CRIT DMG and ATK without breaking the action plan. Her own 20% Trace bonus makes copying another damage dealer’s sheet target unreliable.
| Active combat bonuses beyond the pre-battle sheet | Illustrative sheet CRIT Rate goal | Assumption |
|---|---|---|
| Saber’s 20% Trace only | 80% | The Trace bonus is absent from the sheet being compared. |
| Saber’s Trace + Sunday’s 20% Talent | 60% | Sunday’s level-10 Talent buff covers the relevant attack. |
| Saber’s Trace + Izumo’s 12% condition | 68% | Another Destruction teammate activates Izumo. |
| Saber’s Trace + Sunday + Izumo | 48% | All three effects are active together. |
Avoid counting the same bonus twice
These examples use a pre-battle sheet and assume the listed combat bonuses are not already included. Saber’s 12% CRIT Rate from small Traces is already on the ordinary sheet. When checking in-battle details, count only bonuses still missing; do not add displayed relic or Trace stats again.
A useful developed-build reference is roughly 150–180%+ pre-battle CRIT DMG, after solving CRIT Rate and turn order. This is a planning range rather than a minimum requirement. Her own CRIT DMG Trace and Gilgamesh’s buffs can make an impressive combat screenshot much easier to achieve than the sheet suggests.
Substat order: enough SPD for the chosen rotation → CRIT Rate to effective cap → CRIT DMG and ATK%. HP and DEF rolls can help survival, but Break Effect and Effect Hit Rate are not primary damage stats for this build. Our CRIT and Speed optimization guide covers how to compare a usable roll against a wasted one.
5. 💡 Best Light Cones for Saber
5.1 👑 A Thankless Coronation: Her Signature Option
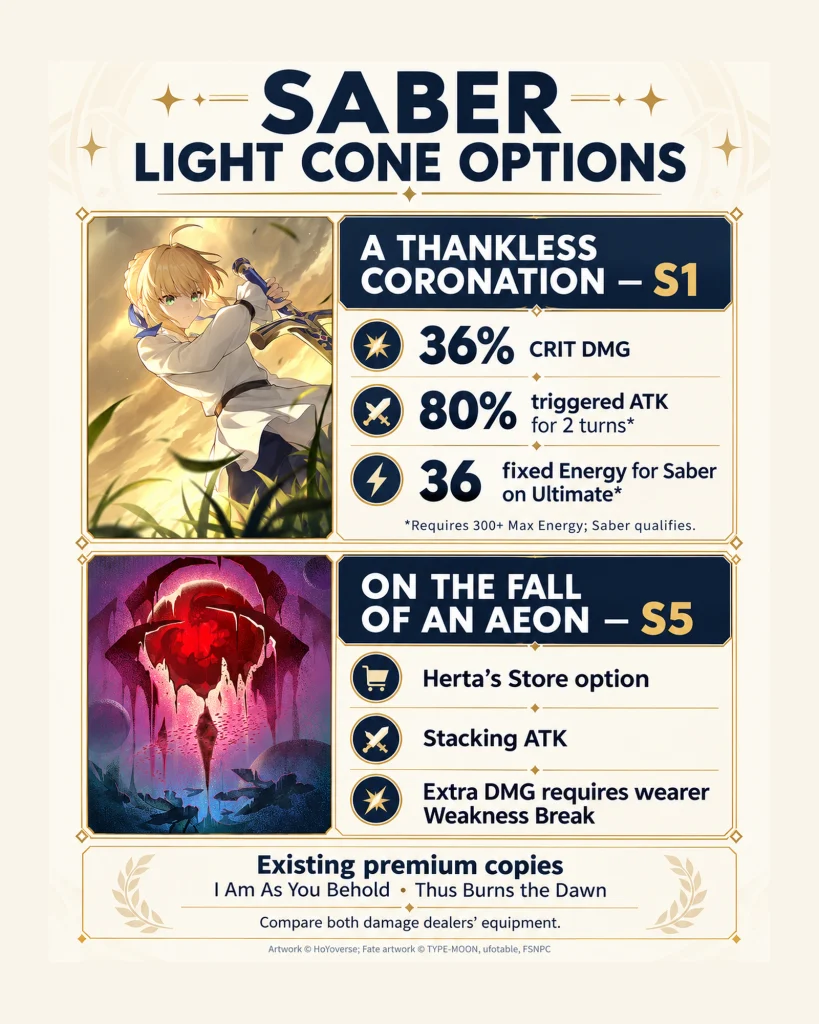
A Thankless Coronation at S1 gives 36% CRIT DMG. Using Ultimate grants 40% ATK; with at least 300 Max Energy, it adds another 40% ATK and restores a fixed 10% of Max Energy. Saber meets the condition, so the refund is 36 Energy and the total triggered ATK bonus is 80% for two turns.
The important benefit is the combination of damage and rotation help. That 36 Energy can change when her next Core Resonance cash-out becomes available. Treat it as part of the cycle rather than adding it only to a damage spreadsheet.
5.2 🆓 F2P and Spare Premium Options
| Light Cone | Who should use it? | Key condition |
|---|---|---|
| A Thankless Coronation (S1) | Players investing specifically in Saber | Her tailored damage and fixed-Energy option. S1 gives 36% CRIT DMG, not the higher-superimposition value. |
| On the Fall of an Aeon (S5) | The main F2P recommendation from Herta’s Store | Builds ATK across attacks. Its additional DMG buff requires Saber herself to inflict Weakness Break. |
| I Am As You Behold (S1) | An existing-copy alternative after considering Gilgamesh’s equipment | Provides ATK, ERR, Ultimate DMG and team CRIT DMG. It does not reproduce Saber’s signature fixed-Energy refund. |
| Thus Burns the Dawn (S1) | Players who already own a spare copy | Strong premium effects, but its base-SPD change requires a fresh turn-order check. |
| A Trail of Bygone Blood | Players who already purchased the relevant Battle Pass option | CRIT Rate plus Skill / Ultimate damage; check for overcapping. This is a paid option. |
| A Secret Vow | A temporary option while better equipment is unavailable | Its additional HP-comparison condition is not consistently reliable for Saber. |
For F2P players
Start with On the Fall of an Aeon, level it properly and finish the team’s Energy plan. If Saber and Gilgamesh share one account, assign the available Destruction cones to both together. Moving a premium cone between them can shift total team damage even if Saber’s own number improves.
Check the acquisition routes in our Herta’s Store Light Cone guide before spending resources on a temporary replacement.
6. ⚡ Saber Speed Tuning: SPD Boots or ATK Boots?
6.1 👟 Tuning Saber with Sunday
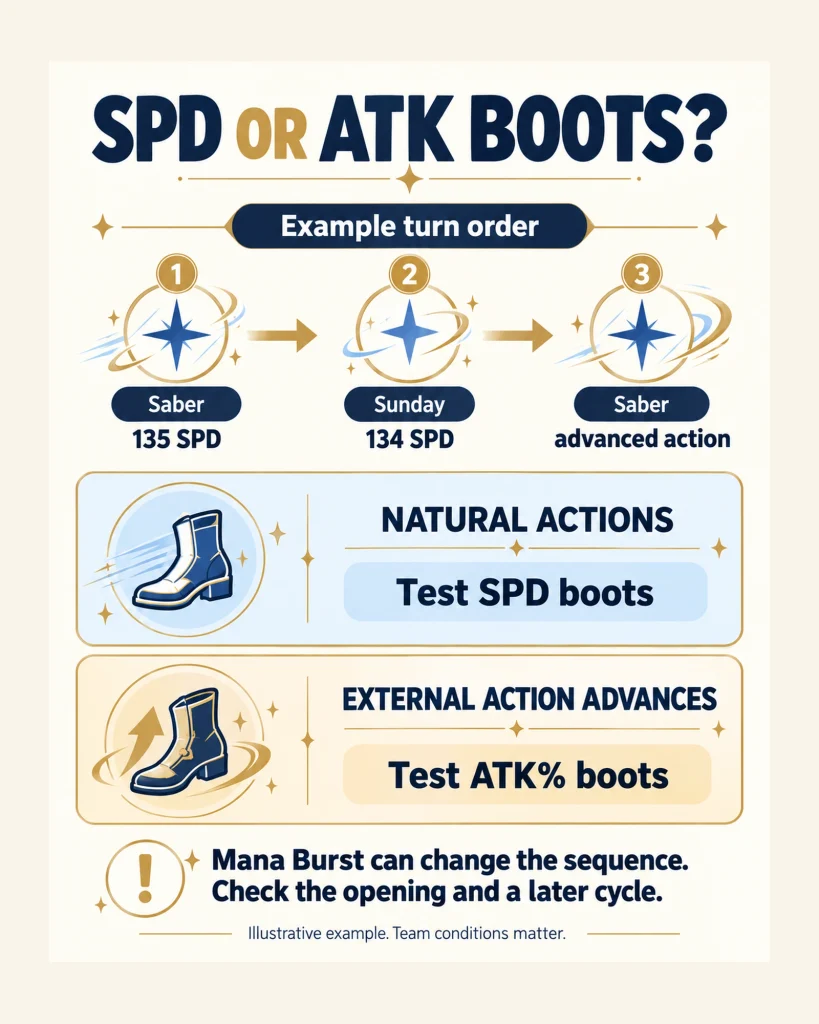
For a conventional setup where Saber takes a natural turn and Sunday advances her afterward, keep Saber slightly faster than Sunday. A common starting pair is approximately 135 SPD Saber / 134 SPD Sunday. This is a relative-order example, not a universal stat requirement.
ATK boots become more attractive when a fast support supplies most of Saber’s turns. In that case, forcing 134 SPD onto her can cost offensive stats without delivering the intended extra natural action. Her Mana Burst advance also means the opening order will not necessarily repeat unchanged.
If this is your chosen pairing, set the support up using our Sunday build and speed tuning guide, then check Saber’s combat order with the actual team.
6.2 🤝 Speed in Gilgamesh Teams
| Team pattern | Boots to test first | What you are testing |
|---|---|---|
| Saber acts just before Sunday | SPD | Enough natural actions while retaining Saber → Sunday order. |
| Fast action advancer repeatedly brings Saber forward | ATK% | Whether external advances replace the natural turns lost from lower SPD. |
| Saber + Gilgamesh + Remembrance Trailblazer | ATK% or SPD according to actual Mem advances | How often Saber acts and contributes to the pair’s attack tally. |
| Saber + Gilgamesh with less frequent external advance | SPD | Whether an additional natural action improves the shared rotation. |
The number on the character screen is only the starting point
Hidden Speed decimals, team buffs, Gilgamesh’s changing action order and Saber’s Mana Burst can alter the sequence. Record the opening and one later Ultimate cycle. A single 135/134 screenshot cannot prove the full rotation works.
7. 🔋 Saber Rotation and Energy Timing
7.1 🧮 What Actually Restores Energy?
| Source / mechanic | Useful number | How to read it |
|---|---|---|
| Ultimate cost | 360 Energy | The requirement for Excalibur. |
| Blessing of the Lake opening floor | 60% = 216 Energy | Raises opening Energy to that level if it starts lower; not a recurring refill every cycle. |
| Core Resonance | 8 fixed Energy per consumed point | Three points represent 24 potential Energy when cashed out. |
| E0 overflow allowance | Up to 120 excess Energy | Stored overflow is returned after Ultimate; it does not increase Max Energy. |
| A Thankless Coronation S1 | 36 fixed Energy on Ultimate | Requires the 300+ Max Energy condition, which Saber meets. |
| Sunday or Huohuo at 20% Max Energy restoration | 72 Energy for Saber | Apply according to the relevant ability and target restrictions. |
| Gilgamesh Joint Follow-Up interaction | 120 fixed Energy to Saber | Can move her into the Mana Burst condition unexpectedly. |
An ERR rope improves eligible action Energy, but it does not multiply every fixed restoration in this table. This is why an expensive Ultimate does not automatically make ERR her best main stat. Compare whether the rope actually saves an action or aligns a stronger buff window.
7.2 🎮 A Manual Battle Checklist
- Before entering: use Saber’s Technique when appropriate and confirm the intended support buffs and SP supply.
- During setup: track which allies can use Ultimates, how much Core Resonance Saber has and whether Mana Burst is available.
- Before Excalibur: confirm important buffs, enemy debuffs and any Wavestrider stacks. Use her own turn for the short Wavestrider window when the planned rotation allows it.
- After Excalibur: account for the locked Enhanced Basic and the resources it returns. Continue watching the Energy threshold.
- With Gilgamesh: watch the pair’s attack tally and prepare for the 120-Energy restoration before it changes Saber’s position in the action bar.
A repeatable cycle beats an opening-only showcase
Compare the same fight across at least two Ultimate cycles. Keep enemy phase, team equipment and buffs consistent. If an improvement relies on a particular hit, kill or external Energy proc, record that condition before treating the rotation as repeatable.
8. 🤝 Best Saber Teams and Fate Pairings
8.1 👑 Saber + Gilgamesh: The Dedicated Fate Core
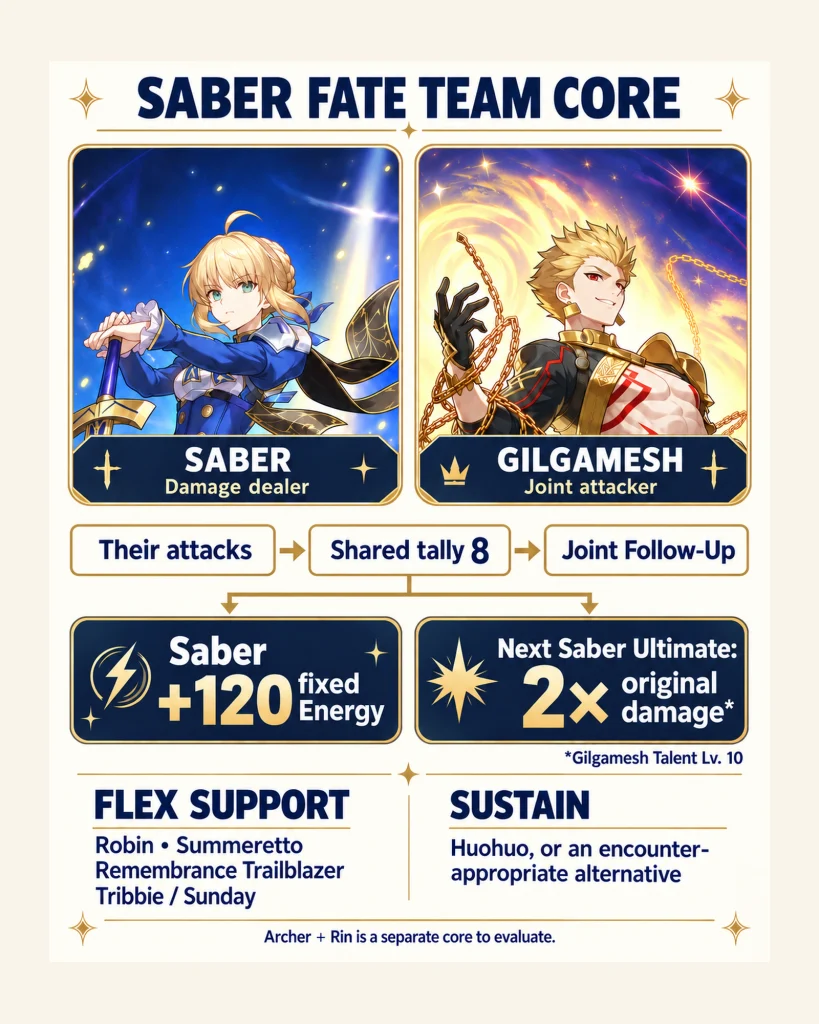
Gilgamesh has a named interaction with Saber. Their attacks build a shared tally. Reaching eight and resolving the trigger produces a Joint Follow-Up ATK, restores 120 fixed Energy to Saber and makes her next Ultimate deal 200% of its original damage at the referenced level-10 Talent. That means twice the original damage, not an additional 200%.
Gilgamesh’s Hegemon’s Strife Trace scales its field buffs with each ally’s Max Energy. Saber reaches the full 120% ATK and 120% CRIT DMG bonuses while he is on the field. Both characters contribute damage, and the Energy influx can accelerate her next action. Prefer a flex character whose buffs and advances still make sense after accounting for those extra attacks.
| Team | What it does well | What to check |
|---|---|---|
| Saber + Gilgamesh + Robin • Summeretto + Huohuo | A current premium Fate-team example, also listed by Game8 in its October 2026 update | Build the support’s actual released kit; Robin • Summeretto is a different unit from the original Robin. |
| Saber + Gilgamesh + Remembrance Trailblazer + Huohuo | Dedicated Fate duo, Mem support / advances and percentage Energy restoration | Mana Burst timing, Mem advances and whether the team supplies enough Skill Points. |
| Saber + Gilgamesh + Tribbie + Huohuo | Two damage dealers with broad amplification and Energy support | An offensive flex changes the number of external advances; reconsider boots. |
| Saber + Gilgamesh + Sunday + Huohuo | Focused Saber action advance and direct Energy restoration | Saber-focused buffs do not automatically amplify Gilgamesh equally; audit turn-based buff expiry. |
The Gilgamesh build guide covers the other half of this pairing, including his equipment and changing action order.
8.2 🔄 Saber Teams Without Gilgamesh
| Available roster | Example team | Practical tradeoff |
|---|---|---|
| Sunday available | Saber + Sunday + Tingyun + a reliable sustain | Strong focus on Saber’s turns and Energy, with no Gilgamesh Joint Follow-Up. |
| More accessible support core | Saber + Tingyun + Remembrance Trailblazer + Lynx or Gallagher | Useful budget framework; adjust SP use and healing to the encounter. |
| Established launch-era premium supports | Saber + Sunday + Robin + Huohuo | Still a coherent hypercarry option, but do not copy its old rankings onto every newer Fate team. |
Roster upgrades before perfect relics
For F2P players, a properly built sustain and functioning Energy support can improve consistency sooner than a small CRIT DMG increase. Gallagher can help an SP-focused rotation; Lynx can provide accessible healing and cleansing. Choose the one that keeps this encounter stable.
Saber and Archer can be played together for a Fate theme, but they compete for offensive support slots and Skill Points. Archer is a Quantum Hunt damage dealer; he does not substitute for Gilgamesh’s specifically named Saber interaction. Rin’s collaboration association also does not automatically make her the correct flex for Saber.
For account planning, begin with Saber + Gilgamesh as one core and evaluate Archer + Rin separately. A four-Fate lineup should be treated as a theme challenge with an encounter-specific survival and SP plan.
9. 📈 Saber Trace Priority and Farming Route
9.1 📚 Trace Upgrade Order
| Priority | Upgrade | Why it matters |
|---|---|---|
| Unlock first | All three major Traces | Knight of the Dragon enables Mana Burst and combat CRIT; Blessing of the Lake handles opening / overflow Energy; Crown of the Star supplies CRIT DMG. |
| First damage investment | Ultimate | The main burst attack and a central part of the Fate rotation. |
| Next | Skill and Talent | Improve meaningful Skill hits and her Talent damage buff rather than leaving either at a token level. |
| Then finish | Basic ATK levels | The mandatory Enhanced Basic is real damage and benefits from its associated scaling. |
| Along the way | Relevant small Traces | Take CRIT Rate and Wind DMG nodes; remember sheet stats already include unlocked small nodes. |
9.2 🛠️ Where to Spend Trailblaze Power
- Bring Saber and her chosen Light Cone to an appropriate endgame level, and unlock the major Traces.
- Secure correct main stats and a usable CRIT Rate budget with existing pieces.
- Farm the chosen relic domain only after deciding whether the team can activate Wavestrider.
- Finish a functional planar pair, then improve substats while keeping the rotation stable.
- Upgrade the support and sustain if late Ultimates, SP shortages or deaths are the actual bottleneck.
| Goal | Destination / resource | Account-planning note |
|---|---|---|
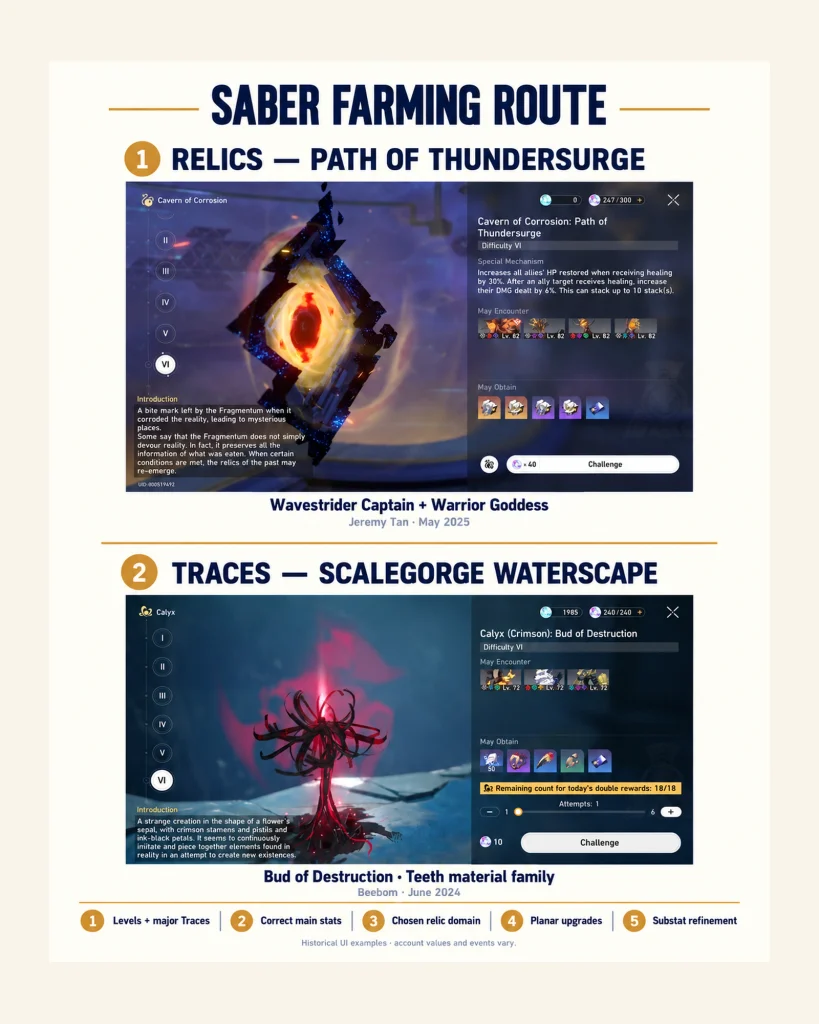
| Scholar Lost in Erudition | Cavern of Corrosion: Path of Uncertainty | Also drops Sacerdos’ Relived Ordeal. |
| Wavestrider Captain | Cavern of Corrosion: Path of Thundersurge | Also drops Warrior Goddess of Sun and Thunder. |
| Saber Trace materials | Calyx (Crimson): Bud of Destruction — Scalegorge Waterscape | Borisin Teeth / Lupitoxin Sawteeth / Moon Rage Fang. Confirm the missing item through its in-game acquisition shortcut. |
| Character / Light Cone levels | EXP and credit sources, including relevant Calyx stages | Use existing inventory before spending Power. |
| Planar upgrades | The relevant Planar Ornament Extraction stage | Confirm the selected stage’s reward list before using Immersifiers or Power. |
From a planning perspective, stop farming a domain when the next useful improvement is elsewhere. The ascension and Trace planner helps separate guaranteed upgrades from another round of substat rolls.
10. 📜 Saber Character and Light Cone Banner History
Availability note — checked against official announcements
Saber belongs to the Fate[UBW] Collaboration Warp. The July 2026 official notice lists her existing banner and states that this collaboration Warp has no scheduled end date. That announcement does not turn her into a standard-pool character or guarantee permanent availability. Check the current in-game notice before spending.
10.1 🎟️ Character Banner History
| Record | Date / period | Warp | What is confirmed |
|---|---|---|---|
| Original debut | July 11, 2025, 12:00 server time; Version 3.4 | Excalibur Excelsior | Saber’s original Character Collaboration Warp launch. |
| 2026 collaboration notice | July 3, 2026 notice; roster additions from July 24, 2026, 12:00 server time | Excalibur Excelsior remains listed | The official notice names Saber’s already available Warp while adding Rin Tohsaka and Gilgamesh. This is a continuation record, not a new Saber rerun date. |
10.2 💠 Light Cone Banner History
| Record | Date / period | Warp / featured Light Cone | What is confirmed |
|---|---|---|---|
| Original debut | July 11, 2025, 12:00 server time; Version 3.4 | Birth of a King — A Thankless Coronation | The signature Light Cone’s original collaboration launch. |
| 2026 collaboration notice | July 3, 2026 notice; roster additions from July 24, 2026, 12:00 server time | Birth of a King remains listed | The notice retains this Light Cone Warp alongside the expanded Fate lineup; no scheduled end date is stated for the collaboration Warp. |
Pity planning: the Fate character collaboration banners share their character guarantee counter. Fate Light Cone collaboration banners share a separate Light Cone counter. Both are independent of other Warp types. The July 2026 notice also specifies no featured four-star rate-ups in these collaboration banners.
Use the character and Light Cone banner archive for the wider timeline. A regular event-banner schedule is not a substitute for the Fate collaboration notice.
11. 💎 Should You Pull Saber or Save?
| Your account / goal | Decision | Reason |
|---|---|---|
| You want Saber and can field her Energy / sustain core | Consider E0 first | You get the character and can test the playstyle before buying vertical upgrades. |
| You own Saber and Gilgamesh with unfinished equipment | Build the team before more pulls | Levels, major Traces, correct main stats and functioning rotations offer clear improvements. |
| You own Saber but lack Gilgamesh | Evaluate his acquisition route and roster value first | The named Saber interaction changes the team’s damage and Energy plan. Confirm current event conditions. |
| You have E0 Saber, good supports and Aeon S5 | Signature is optional | A Thankless Coronation helps, but the account can already run a functioning build. |
| You need another team or a reliable sustain more urgently | Save for the missing role | A stronger single character does not fill every account gap. |
| You are pulling because someone says the banner ends soon | Check the official notice first | The verified collaboration notice has no scheduled end date; use an actual announcement rather than an invented countdown. |
| You want Archer / Rin as another core | Compare separate team budgets | Sharing the collaboration character pity counter does not make the team-building cost disappear. |
11.1 🪙 E0, Signature or Eidolons?
A practical order is the character you want → functional teammates and equipment → optional signature → optional Eidolons. This is an account-planning order, not a promise that one purchase always produces the largest damage gain.
Check the collaboration reward before spending on Gilgamesh
The official 2026 promotion offers a choice of Gilgamesh or Archer from July 24 until the end of Version 4.6. Check the current Travel Log for your eligibility and claim status. This reward period is separate from the collaboration Warp’s open-ended schedule, and Saber is not one of the two selectable characters.
Saber’s E1 increases Ultimate damage and adds Core Resonance after Basic ATK or Skill; E2 adds stacking DEF ignore and improves the Core-based Skill multiplier. Both are vertical upgrades. Compare them with an entire missing team member before committing that budget.
Record your guaranteed status and currency using the pull planning guide, and select the correct collaboration Warp counter rather than borrowing your regular event-banner pity.
Pull decision in one sentence
Pull for Saber when you want her playstyle and can support the team; invest further after checking what actually limits the account. A speculative banner deadline should not decide the budget.
12. ✅ Common Mistakes and Final Saber Build Checklist
| Mistake | Better check |
|---|---|
| Treating every Fate character as an automatic Saber teammate | Look for an actual mechanic or useful role; Gilgamesh has the named joint interaction. |
| Equipping Wavestrider without two Help stacks | Inspect the stacks before Excalibur. |
| Chasing more than 100% effective CRIT Rate | Count her combat Trace, ally buffs and conditional planars. |
| Using an ERR rope only because 360 looks expensive | Check fixed restores separately and test whether the rope saves a meaningful action. |
| Calling the Enhanced Basic a Skill or regular follow-up | Match each attack with the bonuses that actually cover its damage type. |
| Copying a 135/134 setup without watching Mana Burst | Review the opening and a later cycle with actual buffs and Energy gains. |
| Treating 120 overflow Energy as extra Max Energy | Keep the overflow allowance separate from the 360 Max Energy value. |
| Presenting old launch-era damage percentages as a modern team comparison | Compare the same current team, enemy and equipment conditions. |
Ready-to-play checklist
- ☐ All major Traces are unlocked and the equipped Light Cone is levelled.
- ☐ Body, boots, sphere and rope match the chosen team plan.
- ☐ CRIT Rate approaches the effective combat cap without double-counting buffs.
- ☐ Wavestrider or Izumo conditions are actually satisfied if those sets are equipped.
- ☐ The team survives and has enough Skill Points across a later rotation.
- ☐ Important buffs cover Excalibur and the pair’s Joint Follow-Up windows.
- ☐ Banner availability and pity are checked in the relevant collaboration Warp screen.
13. ❓ Saber Build FAQ
13.1 🧩 What Is the Best Relic Set for Saber?
Scholar Lost in Erudition is a consistent general recommendation. Wavestrider Captain is strong when the team reliably gives Saber two Help stacks before her Ultimate. Keep excellent existing pieces and compare the activation conditions before refarming.
13.2 🎯 How Much CRIT Rate Does Saber Need?
Aim near 100% CRIT Rate during important attacks. With only her own 20% combat Trace beyond the pre-battle sheet, that suggests roughly 80% sheet CRIT Rate. Sunday, Izumo and other active combat bonuses reduce the remaining requirement. Her minor CRIT Traces are already included in the sheet.
13.3 👟 Should Saber Use SPD Boots or ATK Boots?
Use SPD boots when they produce useful natural actions or place Saber just ahead of a tuned Sunday. Test ATK boots when external action advances supply enough turns. Gilgamesh’s attack tally and Saber’s Mana Burst make the correct answer team-dependent.
13.4 🔋 Does Saber Need an Energy Regeneration Rate Rope?
ATK% is the default rope for this damage build. ERR can be worth testing for a specific rotation, but Core Resonance and several other fixed-Energy sources are not simply multiplied by ERR. Keep it only when it creates a useful timing improvement.
13.5 💡 Is A Thankless Coronation Required?
No. Her signature offers damage and a valuable 36 fixed-Energy refund at S1, while On the Fall of an Aeon S5 is a strong accessible alternative. Finish the team and trace upgrades before assuming the signature is the only way to improve the build.
13.6 👑 Does Saber Need Gilgamesh?
Saber can function without him, using Energy and action-advance supports. Gilgamesh adds a specifically designed Joint Follow-Up interaction, fixed Energy and an empowered next Ultimate, so a 2026 Fate-team recommendation should account for him. His value is more than a generic buff slot.
13.7 🏹 Can Saber and Archer Be Used Together?
Yes, but treat it as a theme team rather than the default efficient composition. They compete for support slots and Skill Points. If you are building the other Fate carry, use the Archer build guide to plan his own equipment and support needs.
13.8 📅 When Does Saber’s Banner End or Rerun?
The verified July 2026 official Fate[UBW] notice states that the collaboration Warp has no scheduled end date and lists Saber’s existing banner. That is not a fixed promise of permanent availability. Check the in-game notice for changes; this guide does not invent an end date or a separate rerun cycle.
14. 🌐 Sources
Last editorial verification: October 29, 2026. Official kit entries and announcements are prioritized for mechanics and availability. Community guides are used for build cross-checks. Calculated examples here are arithmetic illustrations, not measured damage tests or a claim of hands-on account testing.
- Official HoYoWiki — Saber — Character kit, Traces and official skill demonstration media.
- Official HoYoWiki — Gilgamesh — Named Saber interaction, attack tally and level-dependent Joint Follow-Up effects.
- Official Character Preview — Saber — Official character presentation and artwork, July 8, 2025.
- Official Keeping Up With Star Rail — Saber — Official gameplay explanation and a potential footage source; July 7, 2025.
- Official Fate[UBW] Collaboration Warp Details — July 2026 roster expansion, continued Saber / signature banners, pity categories and no scheduled end date.
- Official original collaboration Warp announcement — Original July 11, 2025 collaboration launch notice.
- Official Gilgamesh announcement and selector dates — Gilgamesh or Archer free-selection period, distinct from Warp availability.
- Official HoYoWiki Talent demonstration — Saber — Genuine combat UI crop showing Saber’s portrait, Ultimate gauge and a Core Resonance count of 7; an illustration, not a rotation benchmark.
- Official HoYoWiki Saber splash art — Official character asset for the cover production card.
- Path of Thundersurge gameplay — Jeremy Tan — Creator gameplay source candidate for the Cavern menu; retain creator credit and inspect the selected frame.
- Beebom — Firefly material route and Calyx screenshot — Source candidate for a real Scalegorge Waterscape teeth-family Calyx screenshot; retain its publisher credit. This is an image reference, not evidence for Saber’s build.
- Official Version 3.3 update details — Path of Thundersurge and its relic rewards.
- Prydwen — Saber build reference — Equipment and stat cross-check. Its review and calculation labels should be read separately from newer profile additions.
- Prydwen — Gilgamesh guide — Current Fate interaction and team-rotation cross-check.
- Game8 Japan — Saber guide — Relic, combat-CRIT and team cross-reference; page displayed an October 26, 2026 update.
- Game8 Japan — Cosmic Life Sciences Institute — Exact Max Energy scaling and 32% cap.
- Mobalytics — Saber guide — Independent signature Light Cone and kit cross-check.
- HSR Wiki — Scholar Lost in Erudition — Set wording and Path of Uncertainty acquisition.
- HSR Wiki — A Thankless Coronation — Superimposition-specific effect wording.
- KQM — Relics overview — General relic mechanics and Inert Salsotto cross-check.