

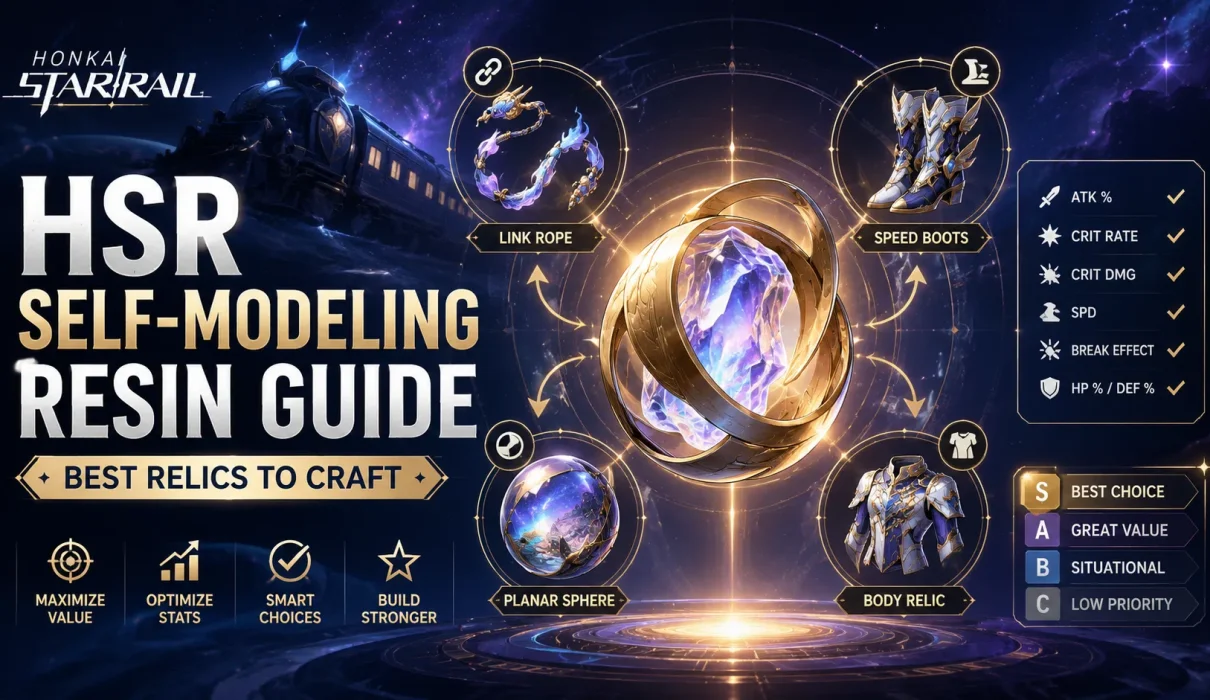
Self-Modeling Resin is one of the most valuable relic resources in Honkai: Star Rail, but it is also one of the easiest to waste.
It is not a shortcut to a perfect relic. It guarantees selected starting stats during synthesis, but it does not control where enhancement rolls land. Its real value is removing a specific build bottleneck: a missing Energy Regeneration Rate rope, Speed boots, correct Planar Sphere main stat, or essential Body piece.
In practice, the highest-value craft is usually the piece that immediately fixes a rotation, reaches a real Speed target, completes a usable build, or lets you stop farming an inefficient Cavern or Planar set.
Quick Answer
Use Self-Modeling Resin on the relic that removes an immediate build bottleneck. The best targets are usually an Energy Regeneration Rate Rope that changes an Ultimate rotation, Speed Boots that reach a real action-order target, the correct Planar Sphere main stat, or an essential CRIT, Effect Hit Rate, or healing Body.
For most F2P players, one-Resin main-stat crafts offer the best account-wide value. Avoid spending five Resin on two selected substats unless the character, set, slot, and stat goals are already confirmed.
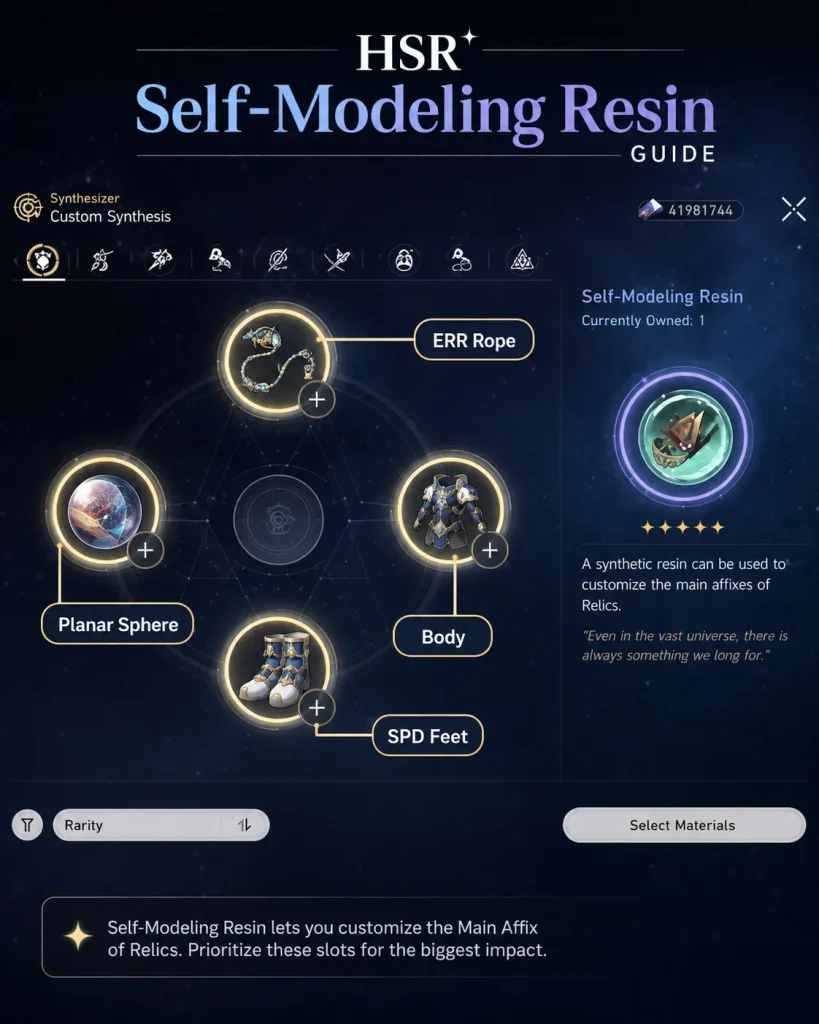
Image: Honkai: Star Rail © HoYoverse
Contents
- 1 🧪 What Is Self-Modeling Resin in HSR?
- 2 💰 Self-Modeling Resin Costs Explained
- 3 🏆 Best Relics to Craft with Self-Modeling Resin
- 4 🧭 Best Self-Modeling Resin Craft by Build Bottleneck
- 5 ✅ Seven-Question Self-Modeling Resin Checklist
- 6 ❌ What Not to Waste Self-Modeling Resin On
- 7 🎯 Is Selecting One or Two Substats Worth It?
- 8 💎 Best Self-Modeling Resin Strategy for F2P Players
- 9 🎲 When Variable Dice Is Worth It
- 10 🛠️ Four Practical Self-Modeling Resin Examples
- 11 📌 Final Self-Modeling Resin Priority Checklist
- 12 ❓ HSR Self-Modeling Resin FAQ
- 12.1 What is the best relic to craft with Self-Modeling Resin?
- 12.2 How much Self-Modeling Resin does each craft cost?
- 12.3 Is selecting one or two substats worth it?
- 12.4 Should I craft an ERR Rope or Speed Boots first?
- 12.5 Can Self-Modeling Resin guarantee a good relic?
- 12.6 Should I convert Self-Modeling Resin into Variable Dice?
- 13 📖 Sources & Update Notes
🧪 What Is Self-Modeling Resin in HSR?
Self-Modeling Resin is a relic synthesis material used in Custom Synthesis. It lets you choose the main stat of a five-star Relic or Planar Ornament, and the current system also allows additional Resin to select one or two starting substats.
A normal relic synthesis costs 100 Relic Remains and lets you choose the set and slot, but the result keeps a random main stat. Adding Self-Modeling Resin is most valuable when the random main-stat pool is the main reason your build is stuck.
Before spending Resin, review how relic slots, main stats, substats, and enhancement rolls interact in the complete Honkai Star Rail relics guide.
🔄 What Changed in Version 3.5?
Old crafting guides may be outdated.
Version 3.5 removed Wishful Resin and transferred its substat-selection function to Self-Modeling Resin. Existing Wishful Resin was converted into Self-Modeling Resin at a 1:1 ratio.
Custom Synthesis now has three practical cost levels:
- One Resin: select the main stat.
- Two total Resin: select the main stat and one substat.
- Five total Resin: select the main stat and two substats.
The five-Resin option gives a better starting point, but it does not guarantee a better finished relic. Five separate main-stat crafts can often complete more characters than one premium craft.
⚠️ What Self-Modeling Resin Can and Cannot Guarantee
Selected main stats and substats are guaranteed to appear on the synthesized relic. Everything after that still contains important RNG.
- It does not control which substat receives enhancement rolls.
- It does not guarantee high substat roll values.
- It does not guarantee that all remaining random substats will be useful.
- It cannot change the main stat of a relic you already own.
- Head and Hands have fixed main stats, so there is no main stat to customize on those slots.
Core rule:
Self-Modeling Resin improves the starting conditions of a relic. It does not create a finished endgame piece.
💰 Self-Modeling Resin Costs Explained
| Craft Type | Relic Remains | Total Self-Modeling Resin | What You Control | Best Use |
|---|---|---|---|---|
| Standard synthesis | 100 | 0 | Set and slot | Head, Hands, or low-cost set targeting |
| Main-stat craft | 100 | 1 | Set, slot, and main stat | Best default value for most accounts |
| Main stat + one substat | 100 | 2 | Main stat and one chosen substat | Important breakpoint or long-term build |
| Main stat + two substats | 100 | 5 | Main stat and two chosen substats | Premium craft for a confirmed long-term target |
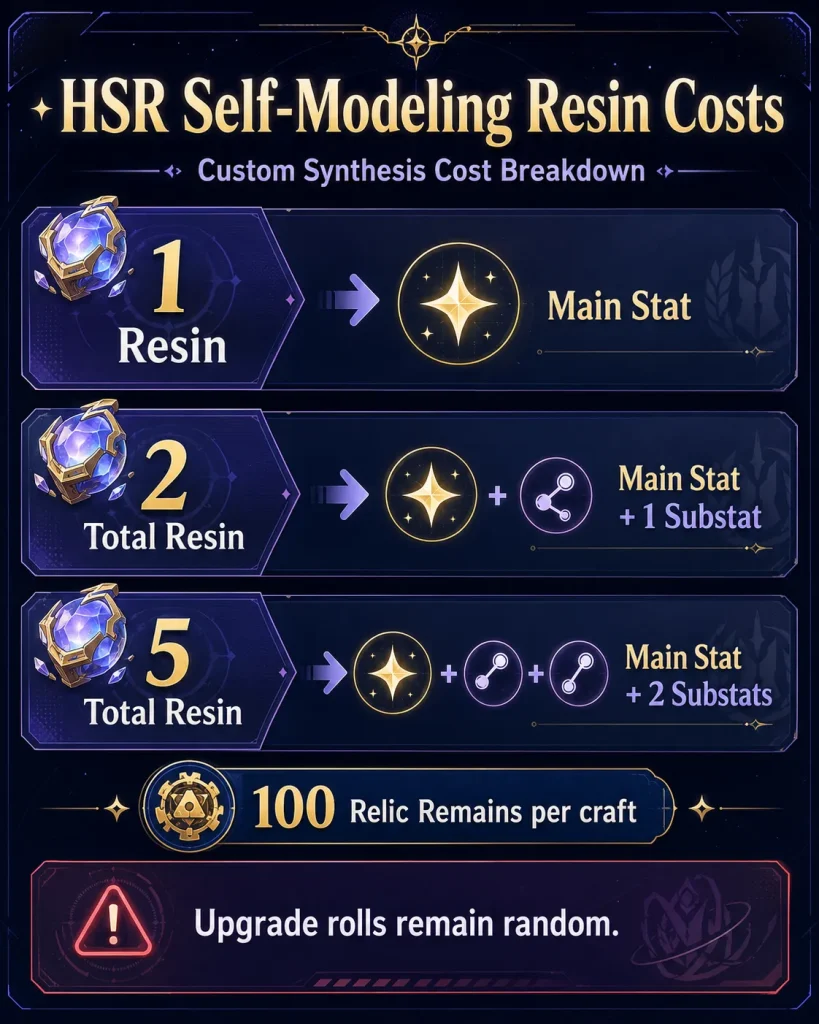
Image: Honkai: Star Rail © HoYoverse
🎲 Variable Dice and Interference Key
Three Self-Modeling Resin can be converted into one Variable Dice. A Variable Dice rerolls the enhancement distribution and roll values of a level-15 five-star relic without changing its existing main stat or substat types.
After the reroll, you can compare the new result with the original and keep whichever version you prefer. The Dice is still consumed, but a worse reroll does not force you to replace the original relic.
When an Interference Key is available, it can be used with a Variable Dice to block one unwanted substat from receiving enhancement rolls during that reroll.
🎁 How to Get More Self-Modeling Resin
Self-Modeling Resin is distributed through selected events, Nameless Honor rewards, endgame or shop rewards, and the Omni-Synthesizer exchange. Exact quantities and monthly limits can change, so verify the current version in-game before planning around a fixed number.
Because the exchange consumes a large amount of salvage currency, read what to do with Relic Remains before converting every unwanted five-star relic.
🏆 Best Relics to Craft with Self-Modeling Resin
The correct target is determined by impact, not by slot rarity alone. Ask whether the craft changes a rotation, action order, stat threshold, or build viability immediately.
| Priority | Craft | Craft It When | Do Not Craft It When | Default Cost |
|---|---|---|---|---|
| S | ERR Link Rope | It reduces the actions or turns needed for the intended Ultimate rotation | The character reaches the same practical rotation without it | 1–2 Resin |
| S | SPD Feet | It fixes action order or reaches a meaningful SPD target | The character performs better with ATK%, HP%, or DEF% Feet | 1–2 Resin |
| A | Correct Planar Sphere | The required set and main-stat combination has not dropped | You have not confirmed whether the character wants Elemental DMG, ATK%, HP%, or DEF% | 1–2 Resin |
| A | Essential Body Main Stat | CRIT, EHR, healing, or scaling requirements are blocking the build | The current off-set Body is already strong and functional | 1–2 Resin |
| B | Break Effect Rope | It reaches a confirmed Break Effect target | The character already receives enough Break Effect from other sources | 1 Resin |
| B | ATK%, HP%, or DEF% emergency piece | It immediately completes an actively used character | It is only a minor on-set upgrade | 1 Resin |
| C | Main stat + two substats | The character, set, slot, and stat goals are long-term commitments | Core characters still lack required main stats | 5 Resin |
Check the exact main-stat and substat pools in the HSR relic stats guide before committing limited materials.
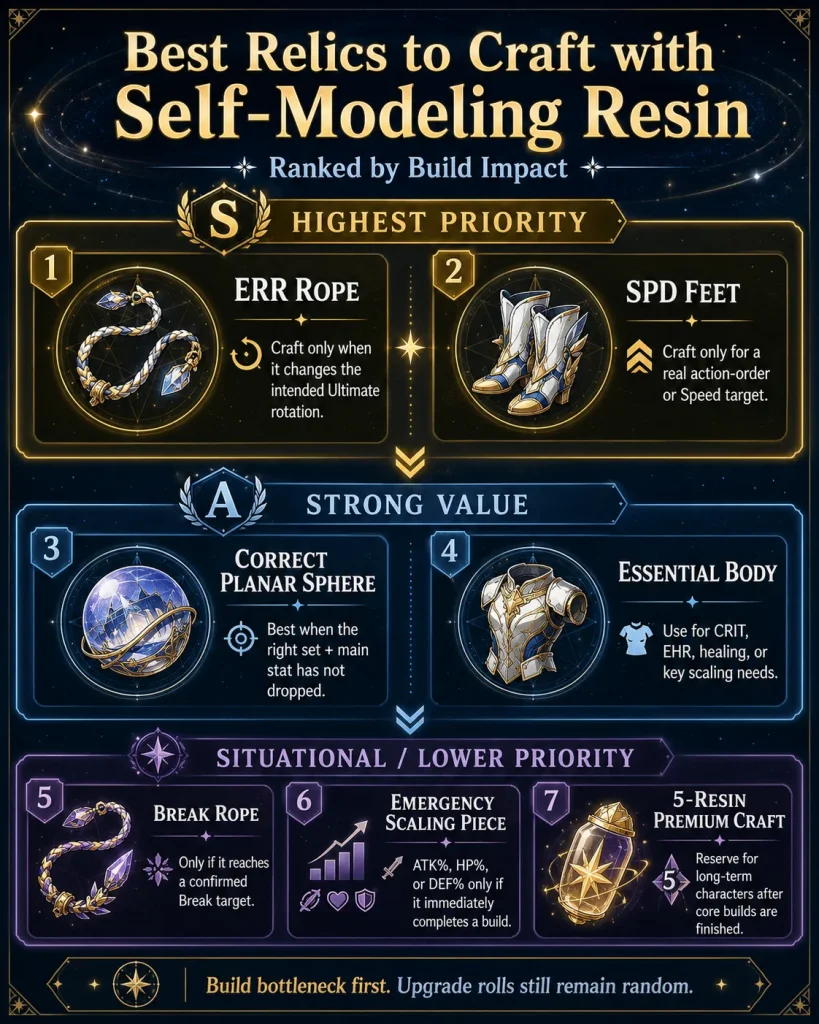
Image: Honkai: Star Rail © HoYoverse
1. 🔋 Energy Regeneration Rate Link Rope
An ERR Rope is valuable only when it changes the character’s practical Ultimate timing. Before crafting one, confirm that the extra Energy Regeneration actually reduces the actions or turns required for the intended rotation.
If the Ultimate arrives at the same useful point with or without ERR, Speed, survivability, or another scaling stat may produce more real value. Do not craft ERR automatically just because the character is a support.
Best use case:
Craft an ERR Rope when it moves an Ultimate into the intended rotation and you do not already own an acceptable on-set or off-set alternative.
2. 👢 Speed Feet
Speed Feet can fix action order, Skill Point generation, healing frequency, buff timing, and cycle performance. They are especially valuable when one craft reaches a meaningful target such as 134, 143, or 160 SPD, or another character- and team-specific requirement.
Some builds target 145 SPD to activate a specific set effect, but 145 is not a universal action breakpoint. Confirm the reason for the target before crafting.
Use the HSR Speed breakpoints guide to distinguish real action-order goals from arbitrary stat chasing.
3. 🌐 Correct Planar Sphere Main Stat
Planar Spheres have a broad main-stat pool, so the correct set-and-stat combination can be difficult to obtain. For traditional damage dealers, the desired stat is often the matching Elemental DMG Bonus. However, some characters prefer ATK%, HP%, or DEF% depending on their scaling, Light Cone, teammates, and external buffs.
Craft the correct Planar Sphere main stat only after confirming the build. Do not assume every DPS wants an Elemental DMG sphere.
4. 🎯 Essential Body Main Stat
Body pieces are strong targets when one main stat fixes a specific problem:
- CRIT Rate when the build is inconsistent despite having high CRIT DMG.
- CRIT DMG when CRIT Rate is already supplied by traces, teammates, Light Cones, or set effects.
- Effect Hit Rate when a debuffer is below the actual application target.
- Outgoing Healing Boost when additional healing meaningfully improves survival.
- HP%, DEF%, or ATK% when the character’s kit scales directly from that stat.
A strong off-set Body can remain better than a weak on-set craft. The set bonus should not override functional stats.
5. 💥 Break Effect Link Rope
A Break Effect Rope is worthwhile when it reaches a confirmed Break Effect target or enables the intended build. It is not automatically required for every Break character because traces, Light Cones, set effects, and teammates may already supply enough Break Effect.
🧭 Best Self-Modeling Resin Craft by Build Bottleneck
Choosing by the current bottleneck is safer than choosing by Path, role label, or a generic tier list.
| Build Bottleneck | Best Craft | Why It Helps | Verify Before Crafting |
|---|---|---|---|
| Ultimate arrives one action or turn too late | ERR Rope | May fix the intended rotation | Confirm the rotation actually changes |
| Support acts after the DPS | SPD Feet or a SPD substat craft | Corrects action order | Check buffs and action advance in the full team |
| DPS has an unusable CRIT ratio | CRIT Body | Improves consistency | Include combat buffs and conditional CRIT |
| Debuff application is unreliable | EHR Body or EHR substat | Helps reach the real EHR target | Do not build excess EHR after the target |
| Break unit misses a required threshold | Break Effect Rope | Completes the build target | Count traces, teammates, and Light Cone bonuses |
| Correct Planar main stat has not dropped | Planar Sphere | Removes a large RNG combination | Confirm Elemental DMG versus ATK%, HP%, or DEF% |
| Character dies before performing its job | HP%, DEF%, or healing piece | Improves practical clear consistency | Use the stat that actually scales the kit or survival need |
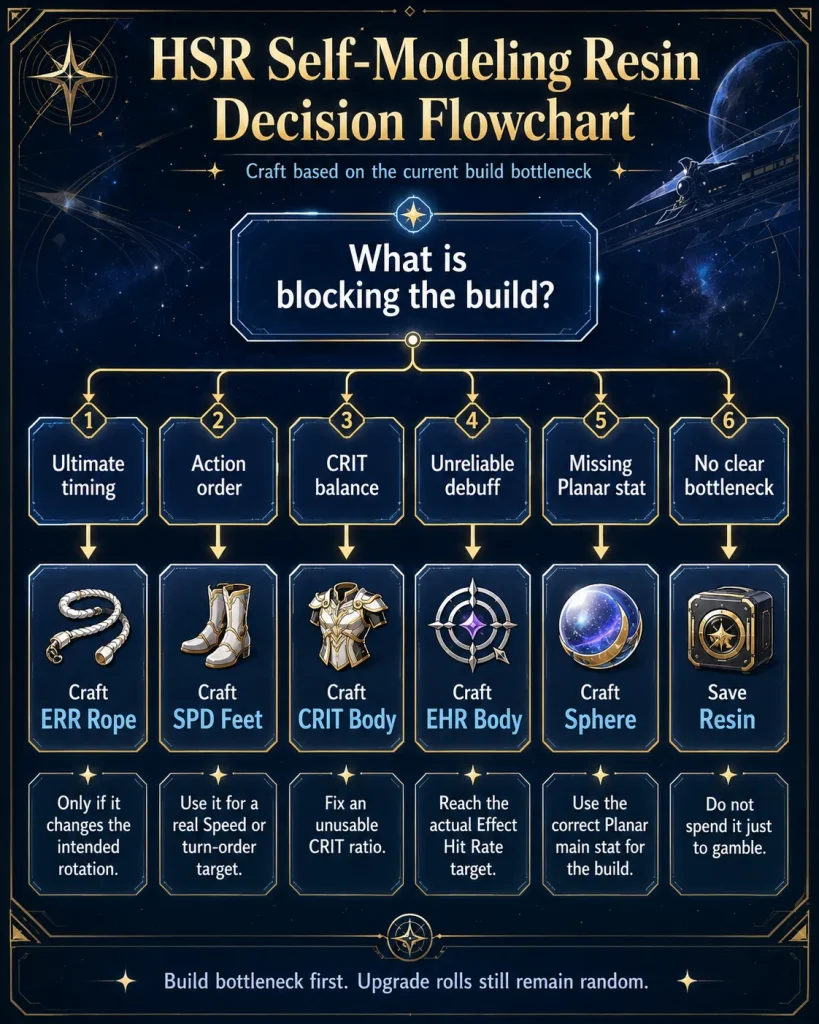
Image: Honkai: Star Rail © HoYoverse
✅ Seven-Question Self-Modeling Resin Checklist
Before confirming Custom Synthesis, answer these questions:
- Do I actively use this character? A craft for a benched or hypothetical character produces no immediate account progress.
- Does the main stat materially change the build? Prioritize rotation, action order, application consistency, survival, or a required damage threshold.
- Is my current replacement genuinely bad? A correct off-set piece with strong stats may already be better than an on-set craft.
- Have I confirmed the final main stat? Planar Sphere, Feet, and Body choices can change with scaling, Light Cone, teammates, and buffs.
- Is the farming domain inefficient for my account? Resin gains value when it lets you leave a Cavern or Planar set whose other drops are poor for your roster.
- Will the set remain useful? Avoid five-Resin crafts for temporary or highly uncertain setups.
- Would another character gain more? Compare one luxury upgrade against completing several unfinished supports or sustains.
Craft now when:
The piece fixes an active character, completes a confirmed build, and changes real combat performance. Save when the target is speculative, already adequate, or chosen mainly to improve an external score.
When several upgrades compete for Trailblaze Power, use the HSR farming guide to finish guaranteed traces and levels before chasing luxury relic gains.
❌ What Not to Waste Self-Modeling Resin On
1. Head or Hands Main Stats
Head always has flat HP and Hands always has flat ATK. Use standard synthesis if you need those slots; Self-Modeling Resin provides no main-stat benefit there.
2. An Unowned Character or Unconfirmed Final Build
Do not spend five Resin on a character you may not obtain, a set that may change after testing, or a stat plan that depends on an undecided Light Cone and team.
Do not premium-craft for an unowned character.
Save five-Resin crafts until you own the character and have confirmed the final relic set, Light Cone, team, and Speed requirements. A one-Resin main-stat craft is much safer during early testing.
When acquisition is uncertain, confirm pity and guarantee status with the HSR Pull Tracker before converting scarce relic resources into a speculative build.
3. A Common Main Stat Without an Immediate Need
ATK%, HP%, and DEF% can be correct, but they should not automatically outrank a missing ERR Rope, Speed Feet, or required Planar main stat. Craft them when they immediately complete an active build, not merely because the piece is on-set.
4. A Perfect Set Bonus with Worse Functional Stats
Do not lose Speed, CRIT balance, Effect Hit Rate, Break Effect, or survival just to force a four-piece or two-piece bonus. A strong mixed set can outperform a complete set with weak individual pieces.
5. A Relic Chosen Only to Raise Its Score
Relic scoring tools are useful for comparison, but their score is not combat value. A support piece with Speed and Effect RES can be more useful than a high-scoring piece filled with irrelevant CRIT.
Use the HSR Relic Scorer guide to interpret scores according to the character’s real role.
6. A Five-Resin Craft Without a Long-Term Commitment
Selecting two substats costs five Resin in total. Avoid that investment when the set may change, the current piece is already serviceable, or core characters still lack essential main stats.
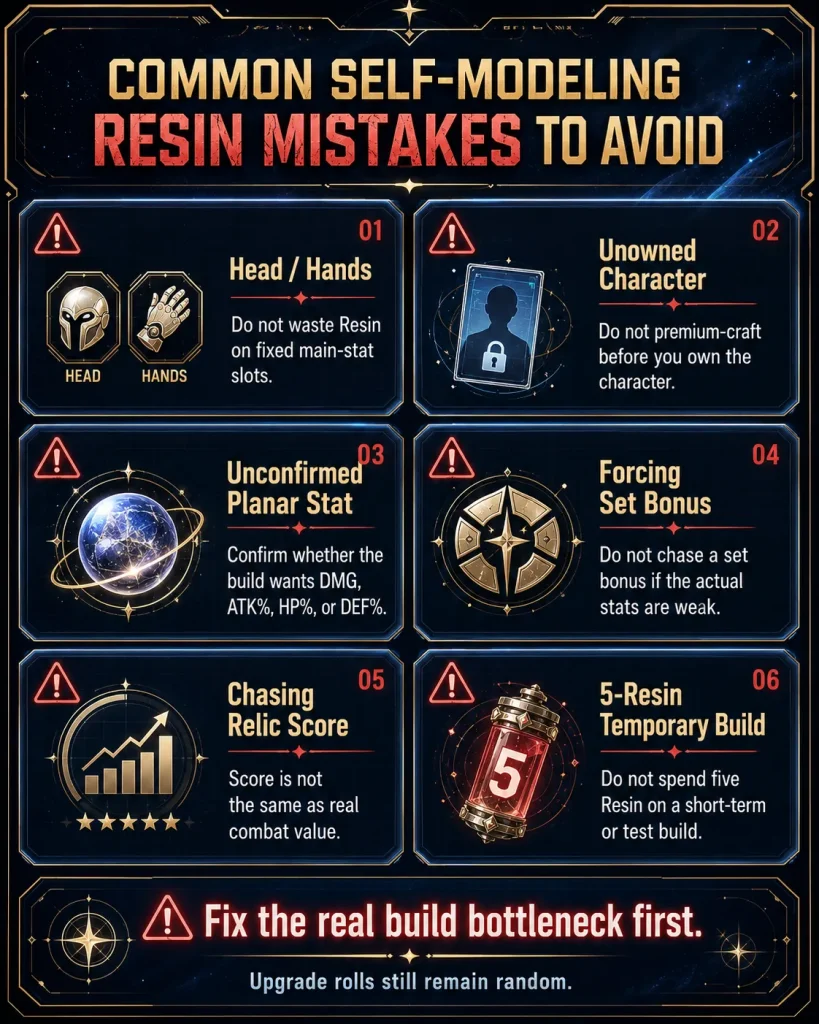
Image: Honkai: Star Rail © HoYoverse
🎯 Is Selecting One or Two Substats Worth It?
Substat selection raises the quality of the starting relic, but the cost rises much faster than certainty.
| Craft | Total Resin | Best For | Main Risk | Verdict |
|---|---|---|---|---|
| Main stat only | 1 | Completing functional builds | All substats are random | Best default choice |
| Main stat + one substat | 2 | A key SPD, EHR, Break Effect, or CRIT need | Upgrade rolls can avoid the selected stat | Good when one substat has clear practical value |
| Main stat + two substats | 5 | A confirmed long-term character and slot | Bad remaining stat or poor upgrades can still ruin the result | Luxury craft only |
When One Selected Substat Makes Sense
Two total Resin is reasonable when one substat directly supports a known target, such as Speed for action order, Effect Hit Rate for reliable debuffs, Break Effect for a confirmed threshold, or CRIT Rate for an imbalanced DPS build.
When Two Selected Substats Make Sense
A five-Resin craft should require all of the following:
- The character is already owned and actively used.
- The final set and slot are confirmed.
- The main stat remains correct across the intended team and Light Cone options.
- Both selected substats provide real value.
- The current relic is a clear weakness rather than a minor imperfection.
- Other core characters already have functional main stats.
Before locking a premium craft, compare your final weapon options in the HSR Light Cones guide because a Light Cone can change Speed, Effect Hit Rate, Energy, CRIT, or survivability requirements.
💎 Best Self-Modeling Resin Strategy for F2P Players
For F2P accounts, breadth usually creates more value than one high-ceiling relic. The following is an editorial account-management framework, not an official threshold.
| Account Stage | Recommended Resin Strategy | Avoid |
|---|---|---|
| Building the first endgame team | Use one-Resin crafts for essential main stats on the carry, support, and sustain | Five-Resin substat crafts |
| Building the second endgame team | Fix rotation and action-order gaps before improving already functional DPS pieces | Spending everything on one character |
| Two teams are functional | Consider selective one-substat crafts for important long-term pieces | Replacing good off-set relics for small set gains |
| Mature account with spare Resin | Consider one premium craft for a confirmed long-term slot | Assuming selected substats will receive good upgrade rolls |
Recommended F2P Priority
- Complete the required main stats for the primary sustain.
- Fix support rotations and action order with ERR or Speed where necessary.
- Give the main damage dealers functional CRIT, Break, DoT, or scaling stats.
- Complete the second endgame team.
- Improve weak Planar pieces.
- Only then spend five Resin on a premium substat-selected relic.
Practical F2P rule:
Keep enough Resin to solve a future main-stat emergency. Spend beyond that reserve only when the craft has a confirmed character, set, slot, and performance goal.
For future-unit planning, check the HSR Banner History before deciding whether an unowned character is close enough to justify pre-farming ordinary materials. Premium relic crafting should still wait until the build is confirmed.
🎲 When Variable Dice Is Worth It
Variable Dice is best used on a relic that is already difficult to replace but received poor enhancement distribution.
Good Variable Dice candidate:
Correct main stat, three or four useful substats, full level 15 investment, and several enhancement rolls landing in the least valuable stat.
Bad Variable Dice candidate:
Only one or two useful substats, a temporary set, an uncertain main stat, or a relic that would still be average even after a better reroll.
Because you can keep the original result, the relic itself is protected from becoming permanently worse. The resource cost is not protected: the Variable Dice is consumed even when you reject the reroll.
An Interference Key improves the reroll conditions by blocking one unwanted substat from receiving enhancement rolls. Save Keys for high-quality relics where the blocked stat is clearly the main failure point.
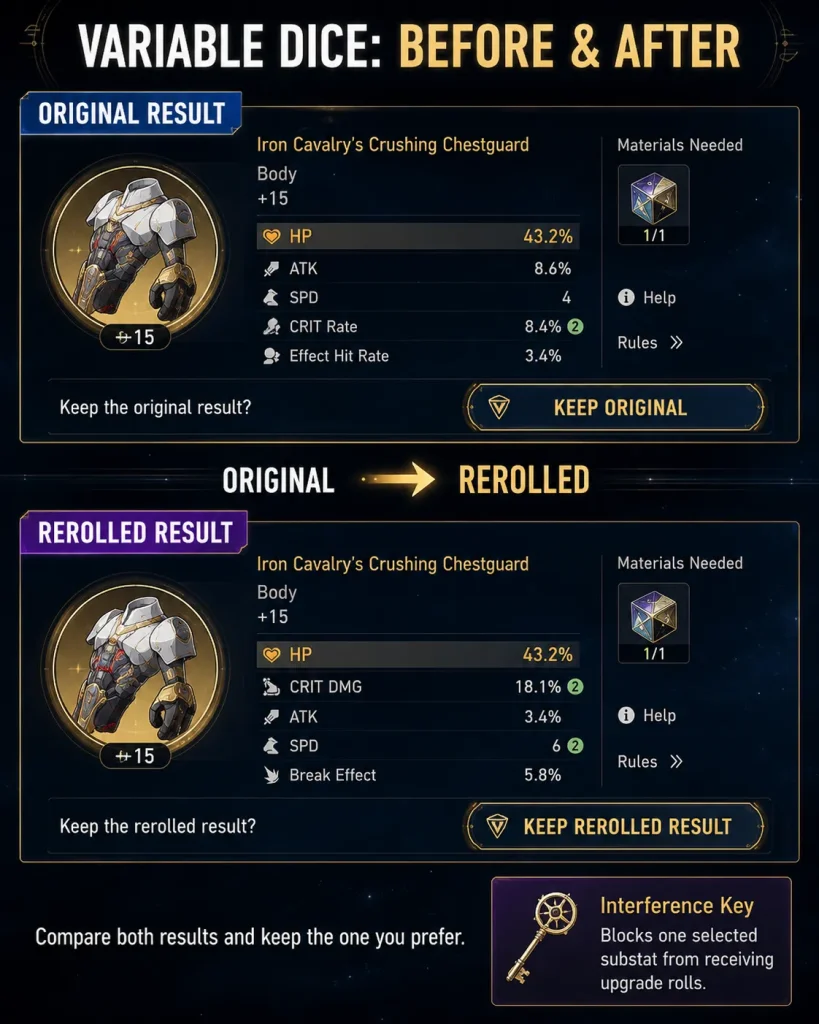
Image: Honkai: Star Rail © HoYoverse
🛠️ Four Practical Self-Modeling Resin Examples
Example 1: ERR Rope Changes the Rotation
Situation: A support reaches its Ultimate one action too late with the current rope. Testing or a reliable rotation calculation confirms that ERR moves the Ultimate into the intended cycle.
Decision: Craft a one-Resin ERR Rope.
Why: The main stat changes team function immediately. Average substats can still be acceptable.
Example 2: DPS Has an Unusable CRIT Ratio
Situation: A DPS has very high CRIT DMG but insufficient CRIT Rate after accounting for all combat buffs.
Decision: Craft a CRIT Rate Body, or use two total Resin if one specific substat is especially important.
Why: The craft fixes consistency instead of chasing a higher theoretical damage ceiling.
Example 3: The Planar Sphere Main Stat Is Not Confirmed
Situation: A newly obtained DPS could use Elemental DMG, ATK%, HP%, or DEF% depending on scaling, team buffs, and Light Cone choice.
Decision: Use a temporary piece or wait for testing. Do not spend five Resin.
Why: A premium craft made before confirming the main stat can become obsolete immediately.
Example 4: Excellent Relic Rolled into the Wrong Stat
Situation: A level-15 relic has the correct main stat and four useful substats, but most enhancement rolls went into the least useful one.
Decision: Consider Variable Dice, preferably with an Interference Key when available.
Why: The base relic is strong enough that redistributing upgrades has meaningful upside, and the original result can be retained.
📌 Final Self-Modeling Resin Priority Checklist
Craft first:
An ERR Rope that changes Ultimate timing; Speed Feet that fix action order; the confirmed Planar Sphere main stat; or a Body piece that solves CRIT, EHR, healing, or scaling requirements.
Save Resin when:
The character is unowned, the final build is uncertain, the current piece is already functional, the goal is only a higher relic score, or the five-Resin craft would delay essential main stats for other characters.
Self-Modeling Resin is most efficient when it removes one clear layer of RNG from an immediate problem. Treat one-Resin crafts as account-building tools, two-Resin crafts as targeted upgrades, and five-Resin crafts as rare long-term investments.
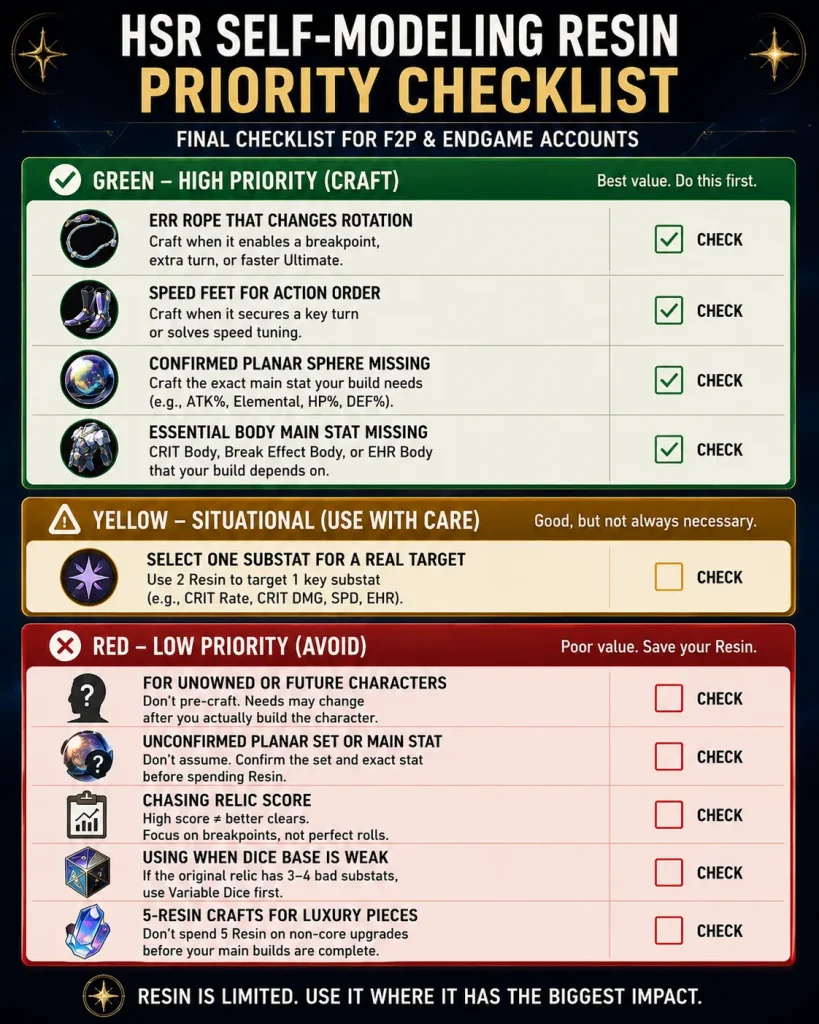
Image: Honkai: Star Rail © HoYoverse
❓ HSR Self-Modeling Resin FAQ
What is the best relic to craft with Self-Modeling Resin?
The best craft is the piece that removes the account’s current bottleneck. An ERR Rope is excellent only when it changes Ultimate timing; Speed Feet are excellent when they fix action order; and a confirmed Planar Sphere or Body main stat can be best when it completes a damage or utility requirement.
How much Self-Modeling Resin does each craft cost?
A main-stat craft costs one Self-Modeling Resin. Selecting the main stat and one substat costs two Resin in total. Selecting the main stat and two substats costs five Resin in total. Each synthesis also consumes 100 Relic Remains.
Is selecting one or two substats worth it?
One selected substat can be worth two total Resin when it supports a real Speed, EHR, Break Effect, or CRIT target. Two selected substats are a luxury option because the five-Resin craft still cannot control the remaining substats or enhancement distribution.
Should I craft an ERR Rope or Speed Boots first?
Choose the piece that changes practical performance. Craft ERR when it shortens the intended Ultimate rotation. Craft Speed when it fixes action order or reaches a meaningful team-specific target. If neither changes the rotation, save the Resin or address a different bottleneck.
Can Self-Modeling Resin guarantee a good relic?
No. It guarantees selected starting stats, not a strong final relic. The random substats, starting substat count, roll values, and enhancement distribution can still produce a weak result.
Should I convert Self-Modeling Resin into Variable Dice?
Only for a level-15 five-star relic with the correct main stat and several useful substats that rolled poorly. You can keep the original result after rerolling, but the Variable Dice is consumed even when the new distribution is rejected.
📖 Sources & Update Notes
- HoYoverse — Version 3.5 Update Radio: Self-Modeling Resin and Wishful Resin system changes.
- HoYoverse — Version 3.0 Update: Variable Dice and the keep-original-result mechanic.
- HoYoverse — Version 3.6 Update: Interference Key mechanics.
- Honkai: Star Rail Wiki: Self-Modeling Resin costs, synthesis, and acquisition reference.
Editorial update policy:
Recheck crafting costs, exchange limits, acquisition sources, Variable Dice behavior, and Interference Key behavior whenever HoYoverse changes the relic system. Character-specific main-stat recommendations should be reviewed after official kits and post-release testing are available.