

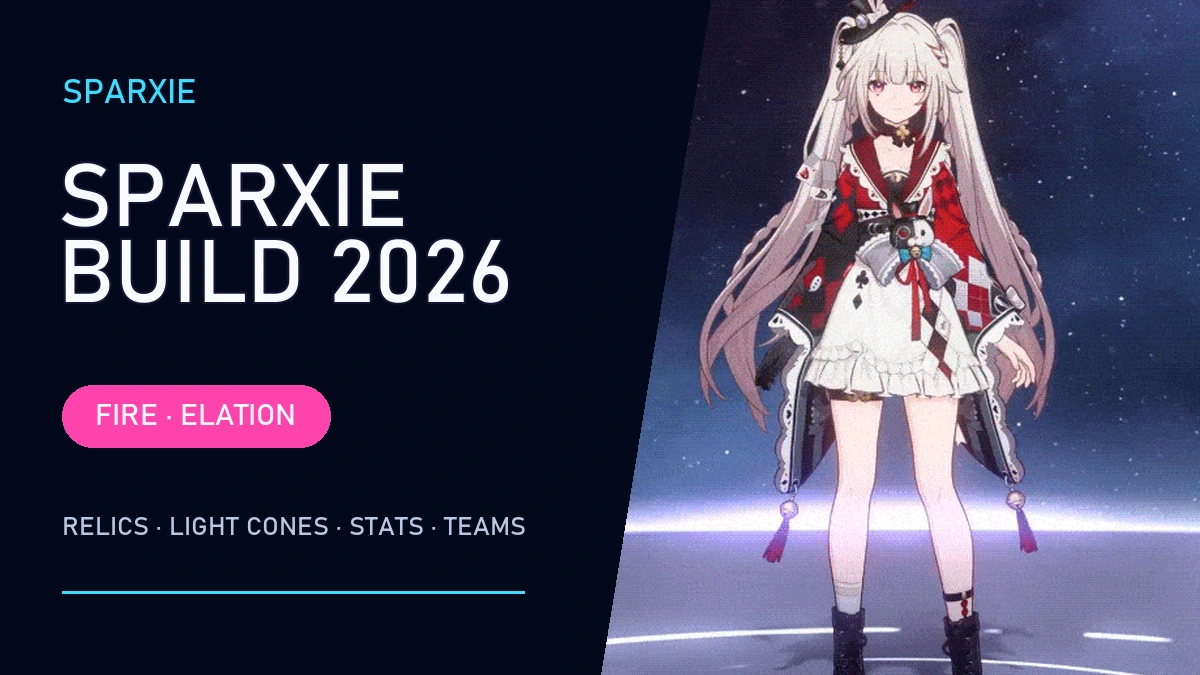
Sparxie is a 5-star Fire character on the Path of Elation who converts Skill Points into a stronger Enhanced Basic ATK, Punchline generation, and multi-hit Elation damage. She can lead a hypercarry team or support a second Elation damage dealer, but every effective Sparxie build in HSR must solve the same problem: how to fund her SP-heavy turns without breaking the next team rotation.
This guide explains her best relics, Planar Ornaments, Light Cones, main stats, stat targets, traces, rotations, teams, Eidolons, and current pull value. Fixed kit effects are separated from account-dependent recommendations, and conditional choices—such as an Energy Regeneration Rate Rope or a specific sustain—are labeled instead of presented as universal best-in-slot answers.
Contents
- 1 🚀 Quick Answer: Best Sparxie Build
- 2 📊 Sparxie Build at a Glance
- 3 🎭 How Sparxie Works
- 4 🧩 Best Relics for Sparxie
- 5 🌌 Best Planar Ornaments for Sparxie
- 6 💡 Best Light Cones for Sparxie
- 7 📈 Sparxie Best Stats and Benchmarks
- 8 🌟 Sparxie Trace Priority and Materials
- 9 👥 Best Sparxie Teams in HSR
- 10 🔁 Sparxie Rotation and Skill Point Rules
- 11 ✨ Sparxie Eidolons and Investment Priority
- 12 🏆 Sparxie in Endgame Modes
- 13 🎟️ Is Sparxie Worth Pulling in Version 4.4?
- 14 📅 Sparxie Banner History
- 15 ❌ 10 Common Sparxie Build Mistakes
- 15.1 1. Equipping a Fire DMG Sphere
- 15.2 2. Overcapping ATK
- 15.3 3. Chasing CRIT DMG Before CRIT Rate
- 15.4 4. Forcing 134 SPD in Every Team
- 15.5 5. Spending Every Skill Point
- 15.6 6. Treating Mushy Shroomy as a Limited Event Light Cone
- 15.7 7. Counting Every ATK Buff Toward A2
- 15.8 8. Farming Perfect Relics Before Guaranteed Upgrades
- 15.9 9. Copying Premium-Team Stats Into an F2P Team
- 15.10 10. Pulling E1 Without an E2 or Roster Plan
- 16 ✅ Final Sparxie Build Checklist
- 17 ❓ Sparxie Build FAQ
- 17.1 What is the best Sparxie build in HSR?
- 17.2 Does Sparxie need 3,600 ATK?
- 17.3 Does Fire DMG Boost increase Sparxie’s Elation damage?
- 17.4 Does Sparxie need Speed Boots?
- 17.5 What is Sparxie’s best F2P Light Cone?
- 17.6 Is Dazzled by a Flowery World worth pulling?
- 17.7 Can Sparxie work without Yao Guang?
- 17.8 Is Sparxie a main DPS or sub-DPS?
- 17.9 What is Sparxie’s trace priority?
- 17.10 Should I pull Sparxie E1 or her S1 Light Cone?
- 18 📚 Sources
🚀 Quick Answer: Best Sparxie Build
The best Sparxie build uses 4-piece Ever-Glorious Magical Girl, Tengoku@Livestream, and Dazzled by a Flowery World. Use a CRIT Rate Body, ATK% Feet, ATK% Sphere, and usually an Energy Regeneration Rate Rope after reaching 3,600 qualifying ATK in combat; use an ATK% Rope until that cap is secure. Aim for 95–100% CRIT Rate in combat, 140–180%+ CRIT DMG before combat buffs, and base Speed in Sparkle or action-advance teams.
Best guaranteed F2P Light Cone: Mushy Shroomy’s Adventures S5, available from the Light Cone Manifest for 200 Lucent Afterglow per copy. Best core: Sparxie + Yao Guang + Sparkle or Trailblazer · Elation + a sustain. Level her Elation Skill and Talent first, then Basic ATK, Skill, and Ultimate.
Version 4.4 banner status: At this guide’s August 1 fact check, Sparxie is available from the Indelible Coterie rerun pool until August 5, 2026 at 11:59 server time. Her next rerun has not been announced.
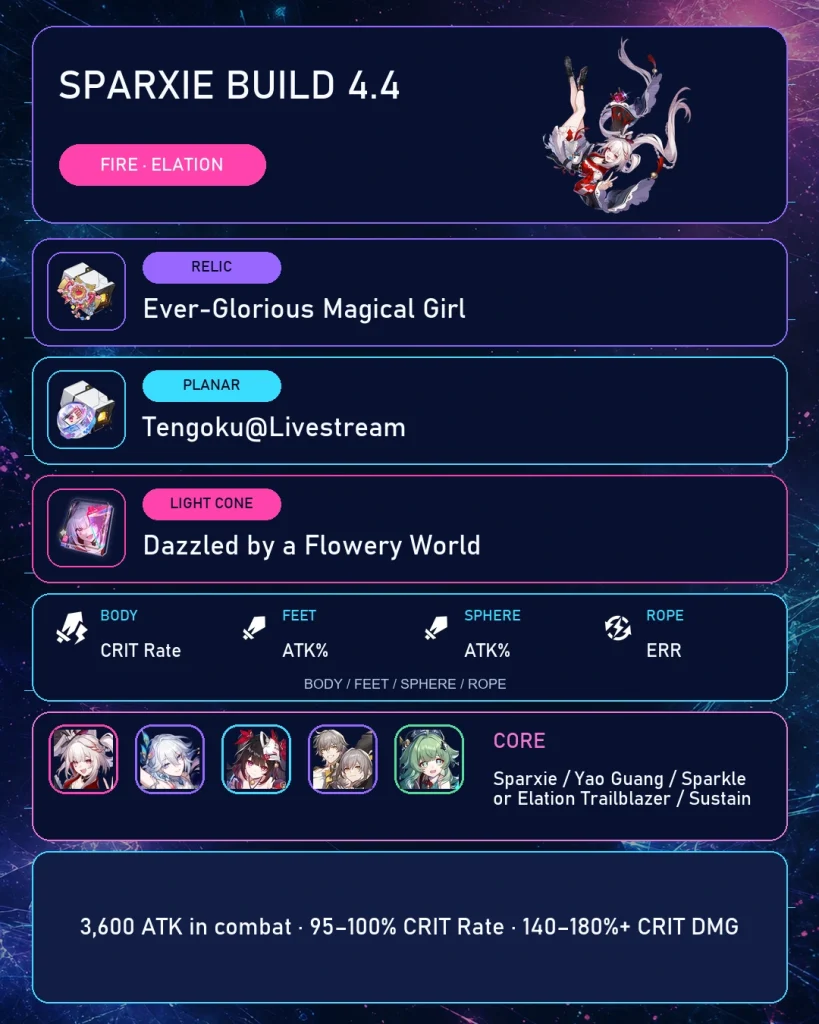
Image: Honkai: Star Rail © HoYoverse
📊 Sparxie Build at a Glance
| Build Slot | Best Choice | When to Change It |
|---|---|---|
| Role | Main DPS / Elation sub-DPS | Use her as a Punchline battery beside Silver Wolf Lv.999 |
| Cavern Relics | 4pc Ever-Glorious Magical Girl | Use 2pc + 2pc only while the mixed pieces have clearly better stats |
| Planar Ornaments | Tengoku@Livestream | BananAmusement Park with DHPT; Izumo in double-Elation teams |
| Light Cone | Dazzled by a Flowery World S1 | Today’s Good Luck for Battle Pass; Mushy Shroomy’s Adventures for F2P |
| Main Stats | CRIT Rate / ATK% / ATK% / ERR | Use ATK% Rope until 3,600 qualifying in-combat ATK is secure |
| Substats | ATK to cap → CRIT Rate ≥ CRIT DMG | Add SPD only for a tested turn-order target |
| Trace Priority | Elation Skill / Talent | Basic = Skill = Ultimate afterward |
| Best Core | Sparxie + Yao Guang + Sparkle + sustain | Trailblazer · Elation is the key free support replacement |
The practical rule: a correct relic setup cannot compensate for a broken Skill Point economy. Judge the build by whether the team can fund Sparxie’s next livestream, not only by the size of the first Enhanced Basic ATK.
🎭 How Sparxie Works
Sparxie is not a conventional Fire carry who presses Skill once per turn. Her Skill begins a livestream and converts her Basic ATK into Bloom! Winner Takes All. Repeated Engagement Farming activations consume resources, raise the final Enhanced Basic multiplier, and roll either Straight Fire or Unreal Banger. Straight Fire grants Punchline and refunds Skill Points; Unreal Banger grants Punchline without the refund.
Her damage is split between conventional ability damage and Elation damage. Elation damage can CRIT, but ordinary DMG Boost effects do not increase it. That is why CRIT, Elation, DEF ignore, RES PEN, vulnerability, Punchline, and SP generation matter more than a generic Fire DMG% build. If the Path terminology is unfamiliar, read the HSR Paths and Elements guide first.
⚙️ Core Mechanics That Change the Build
| Mechanic | What It Does | Build Consequence |
|---|---|---|
| Engagement Farming | Consumes SP or Thrill to strengthen the Enhanced Basic and generate Punchline | Team SP economy directly changes damage and future Aha value |
| Punchline | Feeds Aha Instant and powers several Elation effects | Dedicated Elation teammates outperform generic buffs more often |
| Thrill | Offsets Sparxie’s SP consumption and counts as consumed SP | Improves rotation comfort and still triggers relevant consumption effects |
| A2 ATK conversion | For every 100 ATK above 2,000, grants 5% Elation, up to 80% | The conversion caps at 3,600 qualifying ATK |
| A4 team check | Ultimate gains 2/4/8 Punchline with 1/2/3+ Elation characters and grants more Thrill at the top tier | Double- and triple-Elation teams change her resource flow |
| A6 team buff | Each current Punchline grants all allies 8% CRIT DMG, up to 80% | Sparxie retains value as an Elation sub-DPS and enabler |
🔄 Simple Gameplay Loop
- Use Sparxie’s Technique before combat when possible to begin with two recovered Skill Points.
- Apply important buffs, debuffs, shields, and SP recovery before her damage turn.
- Use Skill to start the livestream.
- Trigger Engagement Farming only as many times as the full-team SP budget allows.
- Confirm the Enhanced Basic to cash out the turn and recover 40 Energy.
- Use Ultimate inside the team’s amplification window and keep building Punchline toward Aha Instant.
- During Aha Instant, use her Elation Skill to deal AoE plus bounce damage and gain Thrill for a later SP-heavy turn.
Do not automatically spend every available SP. A larger cash-out can finish a wave, but reserving one point may be worth more if the next sustain or support turn otherwise fails. Budget one team rotation, not one Sparxie action.
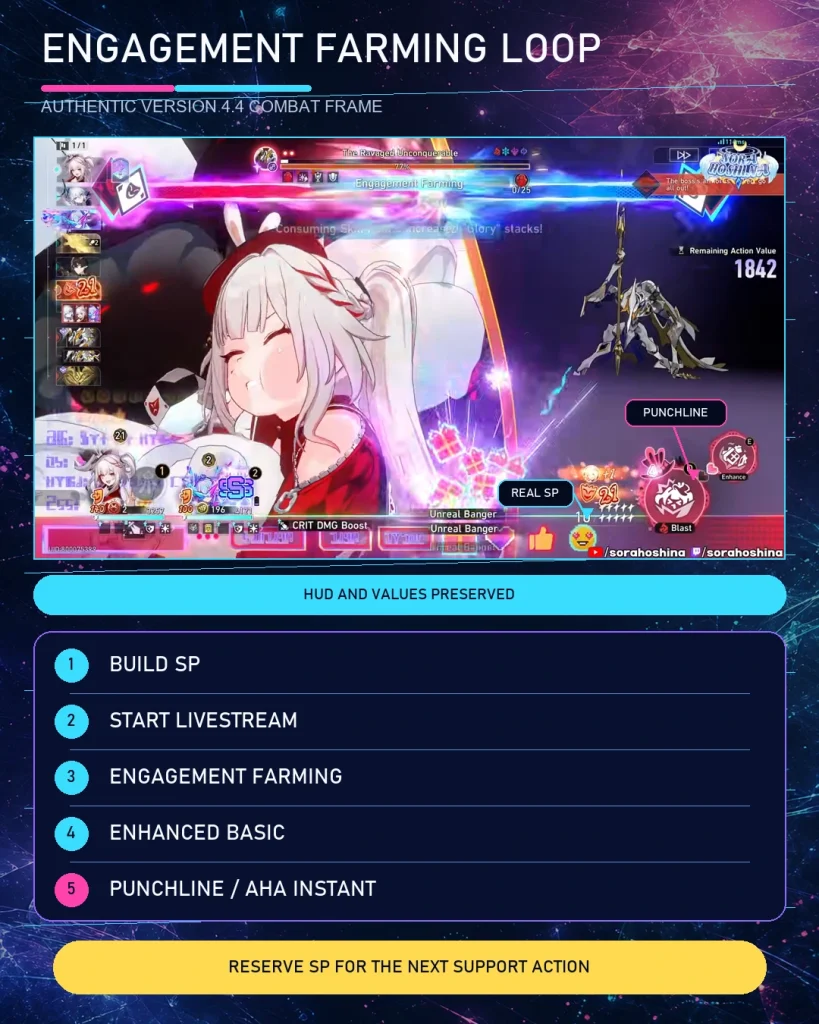
Image: Honkai: Star Rail © HoYoverse
🧩 Best Relics for Sparxie
4-piece Ever-Glorious Magical Girl is Sparxie’s best Cavern Relic set. The 2-piece bonus grants 16% CRIT DMG. The 4-piece effect makes the wearer’s Elation damage ignore 10% DEF, then adds 1% more DEF ignore for every five accumulated Punchline allies gain, stacking up to ten times. At full value, the set supplies 20% DEF ignore to her Elation damage.
The set is strong because Sparxie naturally produces the resource it tracks, but main stats and substats still matter. A four-piece build with poor CRIT Rate can lose to a temporary mixed setup with better rolls. The HSR relic stats guide explains why a complete stat line matters more than the set name alone.
🛠️ Best Transitional and Mixed Sets
| Priority | Relic Setup | Use Case |
|---|---|---|
| 1 | 4pc Ever-Glorious Magical Girl | Endgame target once the main stats and CRIT Rate are functional |
| 2 | 2pc Scholar Lost in Erudition + 2pc World-Remaking Deliverer | Strong bridge when these pieces have better CRIT/ATK rolls |
| 3 | 2pc Scholar Lost in Erudition + 2pc Wavestrider Captain | Another practical mixed setup while farming |
| 4 | 2pc Scholar Lost in Erudition + 2pc Ever-Glorious Magical Girl | Simple CRIT-focused transition |
Farming rule: keep the mixed set until the four-piece build reaches similar CRIT consistency. The best-in-slot bonus amplifies a good build; it does not repair a bad one.
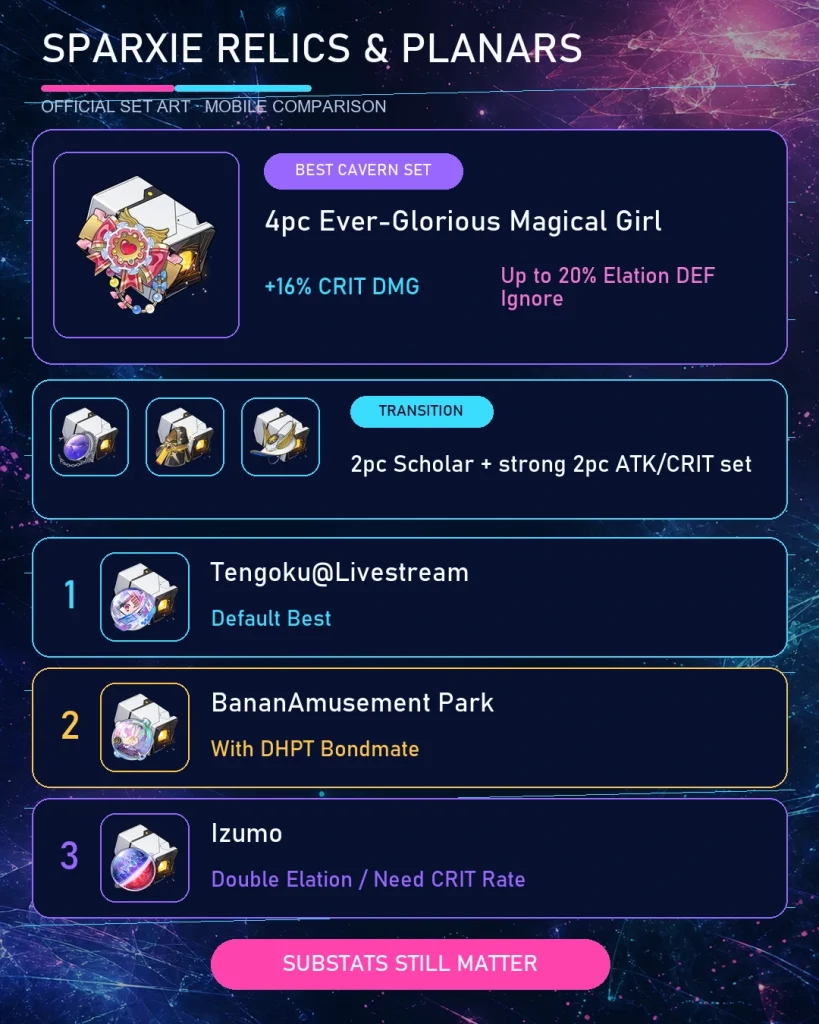
Image: Honkai: Star Rail © HoYoverse
🌌 Best Planar Ornaments for Sparxie
| Planar Set | Why It Works | Condition |
|---|---|---|
| Tengoku@Livestream | 16% CRIT DMG plus another 32% after consuming at least three SP in one turn | Default choice; Sparxie triggers it naturally |
| The Wondrous BananAmusement Park | Can provide the same total 48% CRIT DMG | Requires Dan Heng · Permansor Terrae and Sparxie as Bondmate |
| Izumo Gensei and Takama Divine Realm | 12% ATK and 12% CRIT Rate | Requires another Elation teammate |
Tengoku@Livestream is the default best choice. Sparxie’s normal damage turn meets the three-SP trigger, and the extra CRIT DMG lasts for three turns. BananAmusement Park is equally strong only when the summon condition from DHPT is active. Izumo can solve CRIT Rate, but its ATK becomes less valuable after Sparxie reaches the A2 conversion cap.
💡 Best Light Cones for Sparxie
Elation has fewer Light Cone options than older Paths, so access and Superimposition matter. An off-Path Light Cone can be equipped, but its passive will not activate unless the wearer follows the matching Path. See the HSR Light Cones guide for the wider equipment and pull-value rules.
| Light Cone | Access | Best Use | Verdict |
|---|---|---|---|
| Dazzled by a Flowery World S1 | Limited Warp | Personal damage, larger SP bank, and team Elation | Best overall |
| Today’s Good Luck S5 | Nameless Honor / Battle Pass | 20% CRIT Rate and stacking personal Elation | Best high-investment 4-star |
| Mushy Shroomy’s Adventures S5 | Light Cone Manifest | Personal Elation plus enemy Elation vulnerability | Best guaranteed F2P option |
| Today’s Good Luck S1 | Nameless Honor / Battle Pass | Useful CRIT Rate on a low-spend account | Strong paid bridge |
| Sneering / Lingering Tear | 3-star Warp pool | Early progression only | Replace with a functional 4-star |
⭐ Dazzled by a Flowery World — Signature Light Cone
At S1, Dazzled by a Flowery World grants 48% CRIT DMG. For every Elation character in the team, it raises the Skill Point upper limit by one, up to three. Each SP Sparxie consumes lets her Elation damage ignore 5% DEF, stacking four times. Consuming four or more SP in one turn also grants a 20% teamwide Elation buff.
The extra SP capacity is as important as the raw stats. It lets the team bank more points before Sparxie’s turn, produces more Punchline opportunities, and remains useful when she becomes a sub-DPS beside another Elation carry. Pull it for an account committed to this archetype—not because an E0 build is incomplete without it.
🆓 Best F2P and 4-Star Light Cones
- Mushy Shroomy’s Adventures: At S5, grants 20% Elation and makes all enemies take 10% more Elation damage for two turns after the wearer uses an Elation Skill. It is permanently exchangeable from the Light Cone Manifest for 200 Lucent Afterglow per copy, making S5 a realistic F2P target.
- Today’s Good Luck: Grants CRIT Rate and stacking Elation after an Elation Skill. It is excellent at S5, but it is a paid Battle Pass option and may require several passes to maximize.
- Sneering: A temporary 3-star option that concentrates value during Aha Instant.
- Lingering Tear: A temporary 3-star option whose CRIT DMG passive requires at least ten Punchline.
Do not mix up “free” and “limited.” Mushy Shroomy’s Adventures is a permanent shop Light Cone, not a past event reward. Today’s Good Luck is the option with paid access.
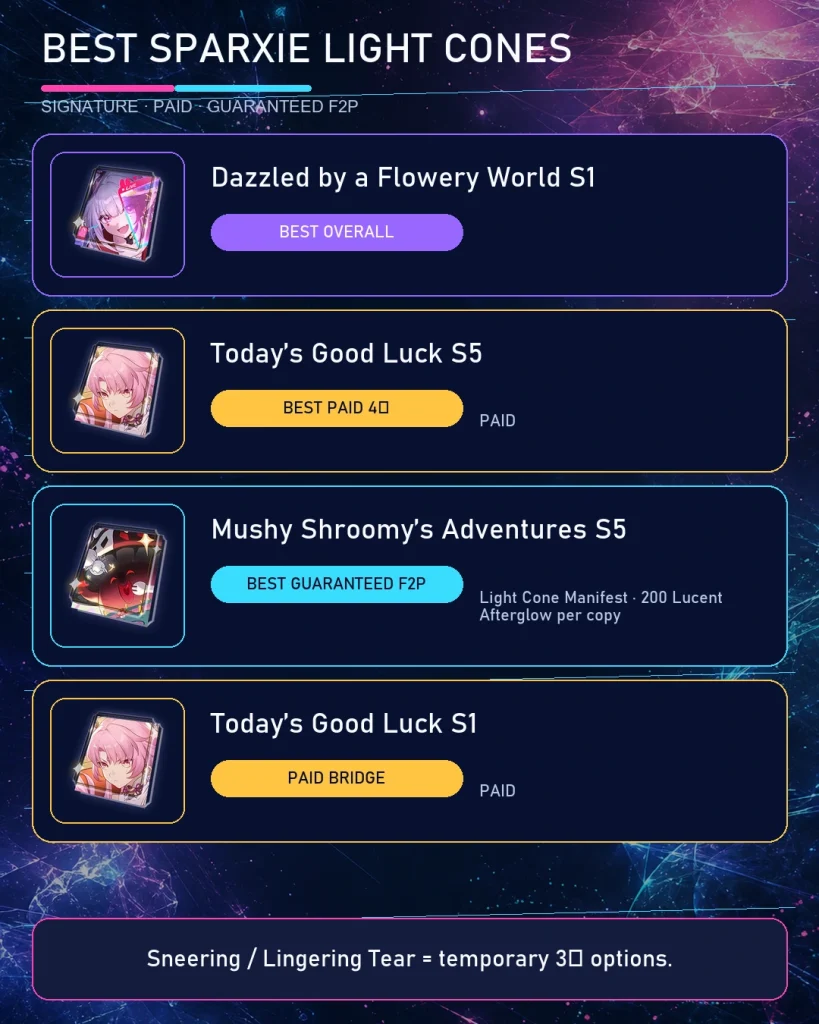
Image: Honkai: Star Rail © HoYoverse
📈 Sparxie Best Stats and Benchmarks
🎯 Best Main Stats
| Slot | Recommended Main Stat | Why |
|---|---|---|
| Body | CRIT Rate | Sparxie gains substantial CRIT DMG from traces, gear, and teammates |
| Feet | ATK% | Helps reach 3,600 qualifying ATK while action advance handles turns |
| Planar Sphere | ATK% | Supports the A2 cap; Fire DMG Boost does not increase Elation damage |
| Link Rope | ERR after ATK cap | Improves 160-Energy Ultimate timing once more ATK has low value |
Why not a Fire DMG Sphere? Ordinary DMG Boost effects do not amplify Elation damage, which forms most of Sparxie’s important output. ATK% also helps reach her A2 conversion cap and still improves the conventional Fire damage portions of her kit.
📐 Recommended Endgame Targets
| Stat | Target | How to Use It |
|---|---|---|
| ATK | 3,600 in combat after qualifying buffs | Caps the A2 conversion; additional ATK then has lower relative value |
| CRIT Rate | 95–100% in combat | Prioritize consistency across her multi-hit attacks |
| CRIT DMG | 140–180%+ before combat buffs | Do not sacrifice CRIT Rate to inflate this number |
| SPD | Base Speed in advance teams | Use a higher target only when testing proves it adds a useful action |
| Energy | ERR Rope when ATK is solved | Helps align Ultimate with Aha and team amplification windows |
Substat priority: qualifying ATK to 3,600 in combat → CRIT Rate → CRIT DMG → required SPD → survivability. Generic 134 SPD advice does not automatically apply: advanced Aha tuning can depend on extremely fast Yao Guang and specific Light Cones. Use the HSR Speed Breakpoints guide to check whether a Speed target changes the number or timing of actions in your actual content.
ATK conversion warning: scaled or transferred ATK effects such as DHPT’s or Robin’s do not count toward Sparxie’s stat-conversion Trace. Check the in-battle character panel with your real team. Common percentage-based buffs such as Sparkle’s ATK buff can help, but the final qualifying value is what matters.
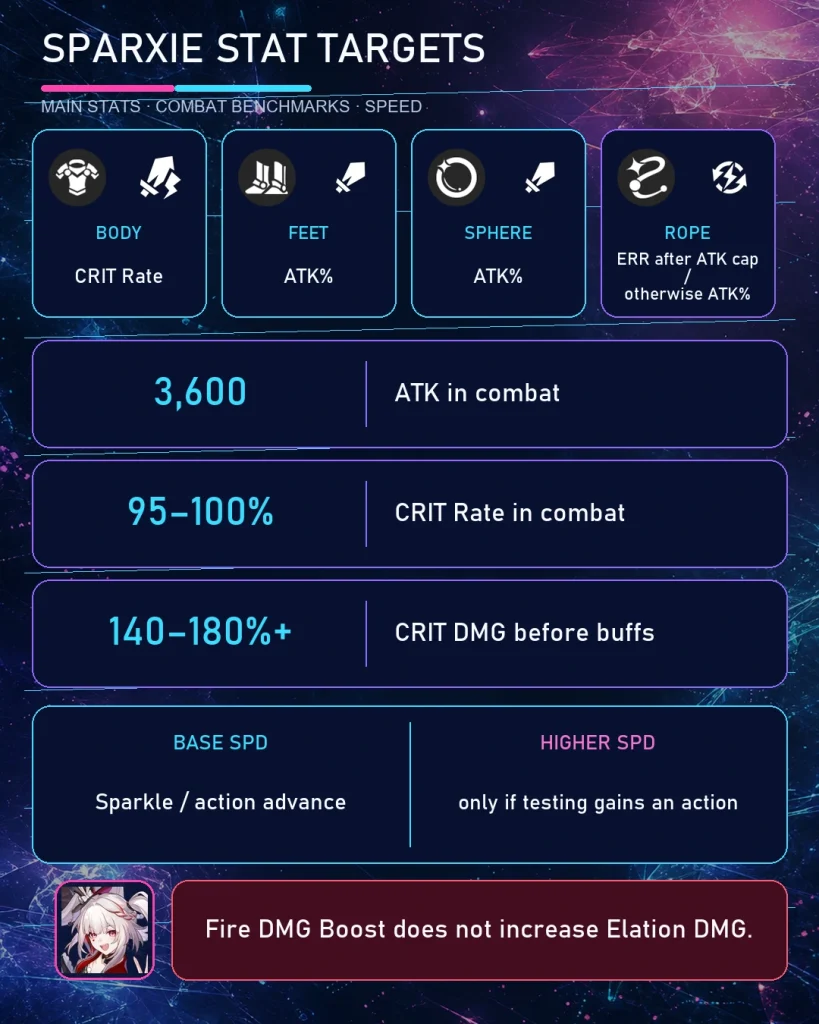
Image: Honkai: Star Rail © HoYoverse
🌟 Sparxie Trace Priority and Materials
| Priority | Trace | Reason |
|---|---|---|
| 1 | Elation Skill | Core Aha Instant damage and Thrill generation |
| 1 | Talent | Scales the Elation damage attached to her attacks |
| 2 | Basic ATK | Improves the Enhanced Basic cash-out |
| 2 | Skill | Improves Engagement Farming multiplier growth |
| 2 | Ultimate | AoE damage, Punchline generation, and Elation damage under Certified Banger |
Major Trace order: Dazzling! Persona Kaleidoscope (A4) → Frenzy! Palette of Truth and Lies (A6) → Sweet! Punchline Signing (A2). Unlock all three for an endgame build; the order only helps when early materials are limited.
📦 Level 1–80 Materials
| Material | Total |
|---|---|
| Credit | 887,800 |
| Traveler’s Guide | 289 |
| Adventure Log | 3 |
| Travel Encounters | 3 |
| Whimsy Wax | 15 |
| Dreamweave Steel | 15 |
| Lucid Awl | 15 |
| Radiant Prominence | 65 |
🧾 Materials to Max All Traces
| Material | Total |
|---|---|
| Credit | 3,000,000 |
| The Fluffy Hand-drawn Storyboards | 18 |
| The Fluffy Serialization Memorial Issue | 69 |
| The Fluffy Collector’s Edition | 139 |
| Whimsy Wax | 41 |
| Dreamweave Steel | 56 |
| Lucid Awl | 58 |
| Vanquished Flow’s Reticence | 12 |
| Tracks of Destiny | 8 |
Use the HSR Ascension Planner to separate guaranteed upgrades from relic farming. A practical order is Level 80 → Light Cone 80 → A2/A4/A6 → Elation Skill and Talent → correct main-stat relics → remaining offensive traces → substat optimization.
👥 Best Sparxie Teams in HSR
The best Sparxie teams solve three jobs: generate or preserve Skill Points, build Punchline, and amplify Elation damage during Aha windows. Yao Guang is her most important premium partner; Sparkle is the best hypercarry enabler; Trailblazer · Elation is the key free support; and Silver Wolf Lv.999 turns Sparxie into a high-value sub-DPS and Punchline battery.
When replacing a teammate, preserve the job rather than the rarity. The HSR Team Building Guide explains why a stable four-character rotation usually beats a screenshot-focused lineup that cannot repeat its setup.
💎 Premium Sparxie Hypercarry
| Slot | Character | Job |
|---|---|---|
| Main DPS | Sparxie | SP conversion, Punchline, and Elation damage |
| Elation Support | Yao Guang | Forced Aha Instant, Elation sharing, vulnerability, and RES PEN |
| SP / Advance Support | Sparkle | Raises the SP ceiling, restores SP, advances Sparxie, and buffs CRIT/ATK |
| Sustain | Huohuo or DHPT | Huohuo improves Energy flow; DHPT offers shielding, comfort, and Banan synergy |
This is the cleanest base-Speed Sparxie setup. Yao Guang powers the Elation engine while Sparkle prepares a large SP bank and advances Sparxie into the damage window. Choose the sustain by need: Huohuo helps both Sparxie’s 160-Energy Ultimate and Yao Guang’s high-cost Ultimate, while Dan Heng · Permansor Terrae provides shielding and activates The Wondrous BananAmusement Park on Sparxie when she is selected as Bondmate.
🎮 Silver Wolf Lv.999 Elation Team
| Slot | Character | Job |
|---|---|---|
| Main DPS | Silver Wolf Lv.999 | Converts Punchline and Hidden MMR into her Godmode damage state |
| Sub-DPS | Sparxie | Fast Punchline generation, repeated SP consumption, team CRIT DMG, and personal damage |
| Elation Support | Yao Guang | Extra Aha Instant, RES PEN, vulnerability, and Elation sharing |
| Sustain | Huohuo | Team Energy restoration; DHPT or another SP-positive sustain can replace her |
Sparxie does not need to monopolize the carry slot here. Her repeated SP consumption can trigger Silver Wolf’s Top Loot Box engine, while her Punchline generation accelerates Hidden MMR and her A6 grants up to 80% team CRIT DMG. Silver Wolf’s own SP refunds also help fund larger Sparxie turns. This is one of Sparxie’s strongest long-term use cases.
🎉 Three-Elation Team Without Sparkle
| Slot | Character | Job |
|---|---|---|
| Main DPS | Sparxie | Damage and Punchline generation |
| Premium Support | Yao Guang | Teamwide Elation amplification and extra Aha Instant |
| Free Support | Trailblazer · Elation | Single-target CRIT support, Punchline, and another Sparxie Elation Skill trigger |
| Sustain | SP-positive sustain | Protects the SP budget while keeping the team alive |
The third Elation character pushes Sparxie’s A4 Ultimate bonus to its highest tier. Trailblazer · Elation also provides a free archetype piece, although the team loses Sparkle’s action advance and direct SP recovery. Expect a different turn order and use smaller Engagement Farming cash-outs when the sustain needs resources.
🆓 F2P and Low-Cost Sparxie Team
| Slot | Recommended Character | Alternatives |
|---|---|---|
| DPS | Sparxie | Required |
| Elation Support | Trailblazer · Elation | Core free option |
| SP Utility | Hanya | Pela for DEF reduction; Tingyun for Energy if SP remains stable |
| Sustain | Gallagher | Lynx, Natasha, or another owned SP-positive sustain |
Hanya helps repair the SP economy instead of competing with Sparxie’s main turn. Pela is simpler and mostly SP-positive, while Tingyun can improve Ultimate access but needs periodic Skill use. Gallagher generates SP efficiently when the team is safe; Lynx and Natasha trade some speed and utility for accessible healing.
F2P expectation: Sparxie remains functional without Yao Guang, but free supports do not reproduce Yao Guang’s forced Aha Instant, Elation sharing, vulnerability, and RES PEN. Build for reliable clears instead of comparing the team with an E0S1 premium showcase.
🛡️ Which Sustain Should You Use?
| Sustain | Best Reason to Use | Tradeoff |
|---|---|---|
| Huohuo | Team Energy for Sparxie and Yao Guang | Can use more SP than the most passive sustains |
| Dan Heng · Permansor Terrae | Shielding, SP comfort, and BananAmusement Park activation | Transferred/scaled ATK does not count toward Sparxie’s A2 conversion |
| Gallagher | Accessible, fast, and SP-positive | Offers less direct Elation amplification |
| Lynx / Natasha | Free healing for progression | Lower offensive utility and more defensive investment |
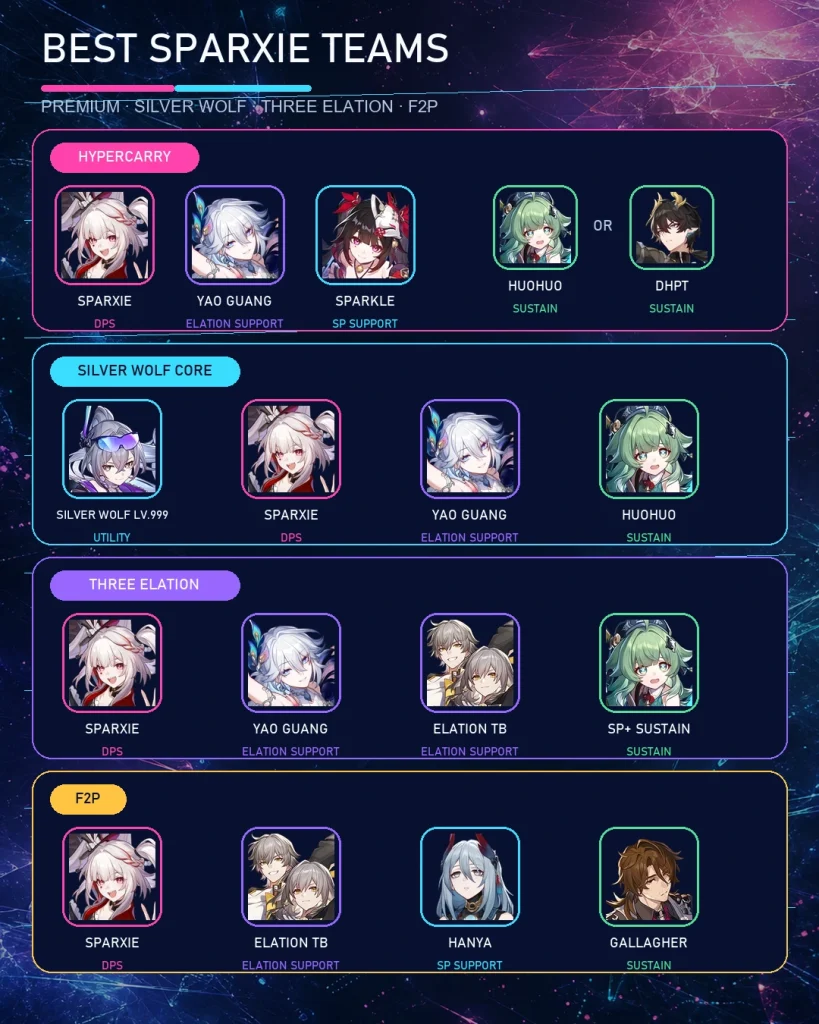
Image: Honkai: Star Rail © HoYoverse
🔁 Sparxie Rotation and Skill Point Rules
✨ Opening Rotation With Sparkle
- Use Sparxie’s Technique before engaging to recover two SP when combat begins.
- Establish Yao Guang’s important field or buff state before the main damage window.
- Let the sustain generate SP when immediate healing or shielding is unnecessary.
- Use Sparkle’s Skill to buff and advance Sparxie; time Sparkle’s Ultimate so its SP recovery expands the available cash-out.
- Start the livestream, then spend at least three SP when possible for Tengoku and four for the signature’s team Elation effect.
- Stop before the next required sustain or support action becomes unaffordable.
- Use Sparxie’s Ultimate during Yao Guang’s amplification window rather than pressing it only because it is available.
⚡ Rotation Without Sparkle
- Build the SP bank with Basic ATKs from the sustain and flex support.
- Apply Trailblazer · Elation’s single-target CRIT buff to Sparxie before the relevant Aha window.
- Use a smaller Engagement Farming cash-out when the next support turn would otherwise fail.
- Treat Thrill as an SP offset, not as permission to ignore the visible SP count.
- Recalculate at each wave transition; finishing a wave can justify spending more than a repeatable boss rotation.
🧠 When Should You Stop Spending SP?
| Situation | Best Decision |
|---|---|
| The extra press ends the wave or boss phase | Spend it |
| The next support buff is optional | Spend if the damage gain is meaningful |
| The sustain must Skill before the enemy acts | Reserve the point |
| Tengoku is not active yet | Reach three consumed SP when the team remains stable |
| Signature team buff is not active | Reach four only if the next rotation still works |
The most common rotation failure is one extra press. The isolated hit looks valuable, but losing a sustain Skill or delaying the next support window can cost more over the full fight.
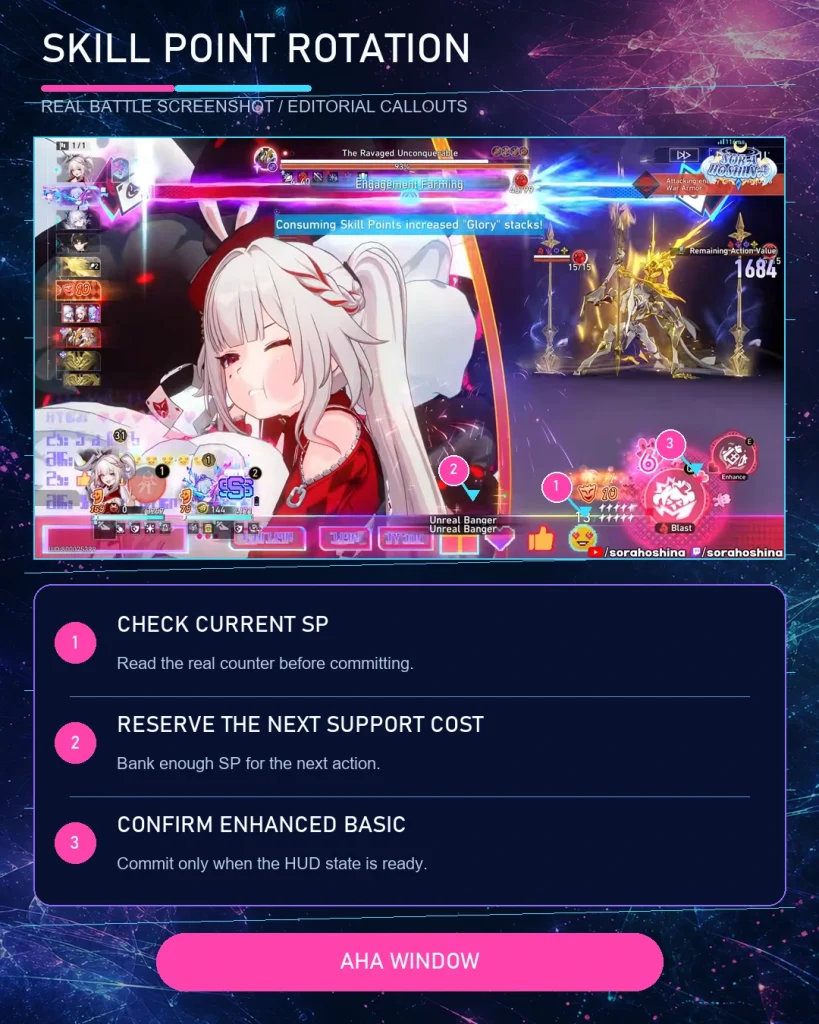
Image: Honkai: Star Rail © HoYoverse
✨ Sparxie Eidolons and Investment Priority
| Eidolon | What Changes | Value |
|---|---|---|
| E1 | Gains five Punchline after Aha Instant and adds up to 15% team All-Type RES PEN | Useful team utility; strongest when continuing to E2 |
| E2 | Grants an extra turn after Aha Instant, two Thrill, and up to 40% CRIT DMG from Thrill use | Best early vertical stopping point |
| E4 | Ultimate adds five Punchline and grants 36% Elation for three turns | Strong but expensive |
| E6 | Adds 20% All-Type RES PEN and 40 extra Elation Skill bounce instances | Whale-level damage and Toughness ceiling |
E0 is complete and functional. E1 is a solid team buff, but E2 is the transformational early breakpoint because it changes turn economy and supplies more Thrill. For most accounts, a missing Yao Guang, Silver Wolf Lv.999, Sparkle, or premium sustain produces more total progress than vertical Eidolons.
General investment order: E0 Sparxie → functional Elation core and sustain → consider S1 → consider E2 after the roster is secure. This is an account-value order, not a pure damage-per-copy calculation.
🏆 Sparxie in Endgame Modes
| Mode | Why She Works | What to Adjust |
|---|---|---|
| Memory of Chaos | Strong Blast damage and ramping elite pressure | Do not empty the SP bank before the next wave |
| Pure Fiction | AoE Ultimate and Elation Skill cover multiple targets | Favor faster wave transitions and consistent Aha activation |
| Apocalyptic Shadow | Multi-hit Elation damage and single-target bounce concentration | Align buffs with vulnerability windows |
| Anomaly Arbitration | High ceiling with a complete premium Elation core | Repeatable SP economy and survival matter more than showcase burst |
Sparxie is not locked to one mode. Bounce damage concentrates effectively against fewer enemies, while her Ultimate and Elation Skill retain AoE coverage. Match the enemy and stage buff before copying a fixed lineup. For boss-window planning, see the Apocalyptic Shadow guide.
🎟️ Is Sparxie Worth Pulling in Version 4.4?
Sparxie is worth pulling for players who want to build Elation as an account archetype. She has high personal output, generates Punchline quickly, supports future or current Elation carries, and remains relevant beside Silver Wolf Lv.999. She is less attractive when the account lacks Yao Guang, has no reliable sustain, or needs a universal low-SP carry.
Before spending Stellar Jade, verify your pity and guarantee with the HSR Pull Tracker guide, then compare the team you can field now—not the team shown in a premium showcase.
| Your Account | Decision | Reason |
|---|---|---|
| You own Yao Guang and want an Elation DPS | Pull | Sparxie completes a strong dedicated core |
| You own or plan to use Silver Wolf Lv.999 | Strong pull | Sparxie is an excellent Punchline generator and SP-consuming partner |
| You own Sparkle and an SP-positive sustain | Pull if you like Elation | Your roster already solves her main rotation demands |
| You only have free supports | Conditional | Trailblazer · Elation works, but the premium ceiling is lower |
| You lack a reliable sustain or second-team core | Save first | Account coverage usually matters more than another specialized DPS |
| You want a low-SP plug-and-play carry | Save | Sparxie is deliberately resource-heavy and team-dependent |
| You own E0 and the premium core | Consider S1 | It adds damage, SP capacity, and team utility |
| You own E0S1 and want vertical investment | Consider E2 | E2 is the meaningful early Eidolon breakpoint |
Current banner: Sparxie’s Version 4.4 rerun ends on August 5, 2026 at 11:59 server time. After that deadline, remove this current-banner box or replace it with the next official HoYoverse announcement; do not predict an unannounced rerun.
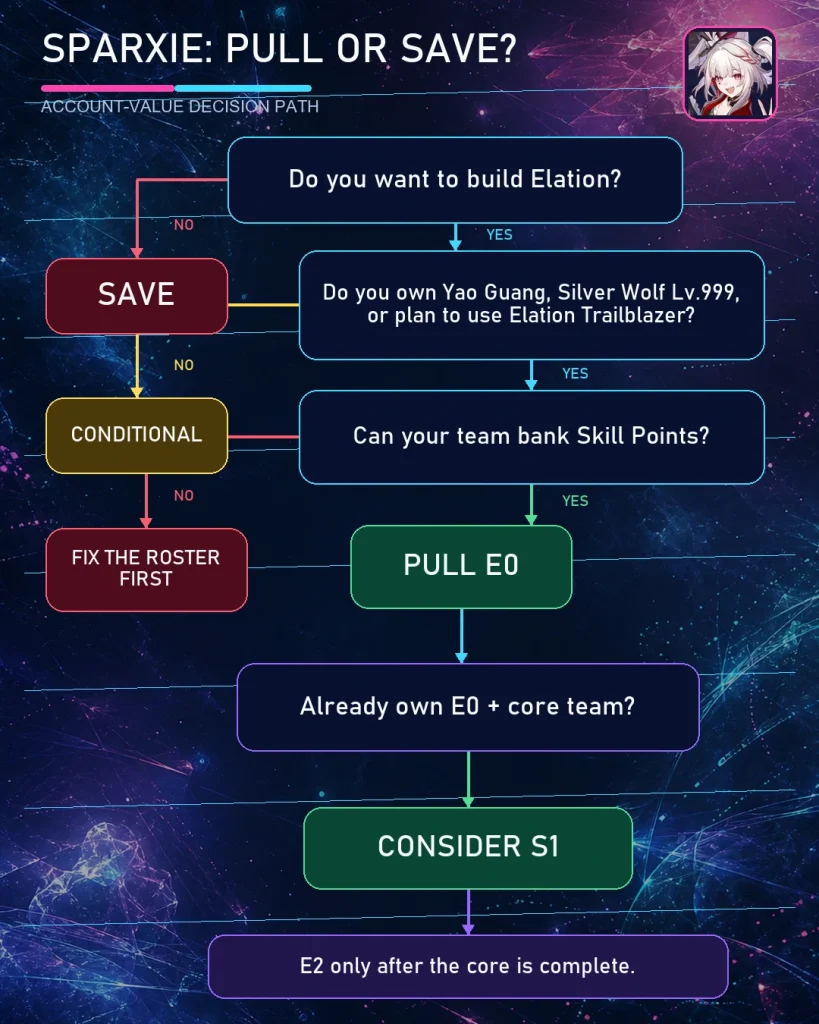
Image: Honkai: Star Rail © HoYoverse
📅 Sparxie Banner History
The tables below separate the character and signature Light Cone history. For the account-wide chronology, see the HSR Banner History.
🎫 Character Event Warps
| Version | Warp | Dates (Server Time) |
|---|---|---|
| 4.0 debut | Project: Party Time | March 3, 2026 12:00 – March 24, 2026 15:00 |
| 4.4 first rerun | Indelible Coterie: Sparxie | After the Version 4.4 update – August 5, 2026 11:59 |
💠 Signature Light Cone Warps
| Version | Warp / Light Cone | Dates (Server Time) |
|---|---|---|
| 4.0 debut | Brilliant Fixation — Dazzled by a Flowery World | March 3, 2026 12:00 – March 24, 2026 15:00 |
| 4.4 rerun | Coalesced Truths — Dazzled by a Flowery World | After the Version 4.4 update – August 5, 2026 11:59 |
Maintenance rule: add another row only after HoYoverse publishes the official Event Warp notice. Keep server-time wording because the visible start time can differ by region.
❌ 10 Common Sparxie Build Mistakes
1. Equipping a Fire DMG Sphere
Fire DMG Boost does not increase Elation damage. An ATK% Sphere helps the A2 conversion, improves the conventional damage portion of her kit, and remains the default choice.
2. Overcapping ATK
Her A2 conversion stops scaling at 3,600 qualifying ATK in combat. Once that value is stable, CRIT, Energy, or a useful turn breakpoint usually has more value than additional ATK.
3. Chasing CRIT DMG Before CRIT Rate
Sparxie gains CRIT DMG from her trace tree, relics, Planar set, signature, and teammates. A CRIT Rate Body is usually correct until her in-combat rate approaches 100%.
4. Forcing 134 SPD in Every Team
Base-Speed Sparxie is intentional with Sparkle and action advance. Keep extra SPD only when it changes a real action, Aha timing point, or mode-specific rotation.
5. Spending Every Skill Point
A larger Enhanced Basic can still lose the fight if the sustain cannot refresh protection or the support misses a critical buff. Budget the entire rotation.
6. Treating Mushy Shroomy as a Limited Event Light Cone
Mushy Shroomy’s Adventures is permanently exchangeable from the Light Cone Manifest. New players can plan for S5 instead of falling back to a 3-star indefinitely.
7. Counting Every ATK Buff Toward A2
Scaled or transferred ATK effects such as DHPT’s or Robin’s do not count toward the conversion Trace. Verify the qualifying in-battle value rather than adding tooltips manually.
8. Farming Perfect Relics Before Guaranteed Upgrades
Level 80, a Level 80 Light Cone, major Traces, and core ability levels come before weeks of chasing one more CRIT roll. Use the HSR Relic Optimizer guide to compare complete builds.
9. Copying Premium-Team Stats Into an F2P Team
ATK buffs, action advance, SP recovery, CRIT buffs, and Light Cone effects change the required relic line. Inspect Sparxie’s combat panel with the team you actually use.
10. Pulling E1 Without an E2 or Roster Plan
E1 is useful, but E2 changes the rotation more dramatically. If E1 prevents you from obtaining Yao Guang, Silver Wolf Lv.999, Sparkle, or a needed sustain, the roster upgrade is usually more valuable.
✅ Final Sparxie Build Checklist
| Category | Recommendation |
|---|---|
| Relics | 4pc Ever-Glorious Magical Girl |
| Planar | Tengoku@Livestream |
| Signature | Dazzled by a Flowery World S1 |
| Guaranteed F2P Cone | Mushy Shroomy’s Adventures S5 |
| Main Stats | CRIT Rate / ATK% / ATK% / ERR or ATK% |
| Targets | 3,600 qualifying ATK · 95–100% CRIT Rate · 140–180%+ CRIT DMG |
| Traces | Elation Skill / Talent → Basic = Skill = Ultimate |
| Hypercarry Core | Sparxie + Yao Guang + Sparkle + sustain |
| F2P Core | Sparxie + Trailblazer · Elation + Hanya/Pela + Gallagher/Lynx |
| Vertical Stop | E2 after the core roster is complete |
Final rule: reach the qualifying ATK cap, build enough CRIT Rate for consistent multi-hit turns, and preserve enough SP to repeat the rotation. Sparxie’s best team funds the next livestream—not only the first one.
❓ Sparxie Build FAQ
What is the best Sparxie build in HSR?
Use 4-piece Ever-Glorious Magical Girl with Tengoku@Livestream and Dazzled by a Flowery World. Equip CRIT Rate Body, ATK% Feet, ATK% Sphere, and an ERR Rope after reaching 3,600 qualifying ATK in combat; otherwise keep an ATK% Rope.
Does Sparxie need 3,600 ATK?
She wants 3,600 qualifying ATK in combat to cap the A2 conversion, which grants up to 80% Elation. Stop prioritizing ATK after the cap and improve CRIT or Energy instead.
Does Fire DMG Boost increase Sparxie’s Elation damage?
No. Ordinary DMG Boost effects do not increase Elation damage, so an ATK% Sphere is the default choice over a Fire DMG Sphere.
Does Sparxie need Speed Boots?
Usually not with Sparkle or another action-advance setup. ATK% Boots and base Speed are standard. Use SPD Boots only when testing shows a real extra action or better Aha timing.
What is Sparxie’s best F2P Light Cone?
Mushy Shroomy’s Adventures S5 is the best guaranteed F2P choice. Each copy costs 200 Lucent Afterglow from the Light Cone Manifest, and its passive grants personal Elation plus enemy Elation vulnerability.
Is Dazzled by a Flowery World worth pulling?
Yes for accounts committed to Sparxie and Elation. It adds 48% CRIT DMG, raises the SP cap based on Elation allies, grants DEF ignore, and supplies a teamwide Elation buff after a four-SP turn. A missing core teammate or sustain can still have higher account value.
Can Sparxie work without Yao Guang?
Yes. Trailblazer · Elation is the most important free replacement, with Hanya, Pela, or Tingyun filling the remaining support slot. The team works, but it loses Yao Guang’s dedicated Elation amplification and extra Aha Instant.
Is Sparxie a main DPS or sub-DPS?
She can fill both roles. A hypercarry team feeds her SP-heavy Enhanced Basics; a Silver Wolf Lv.999 team uses her as a Punchline generator, SP-consuming sub-DPS, and team CRIT DMG buffer.
What is Sparxie’s trace priority?
Level Elation Skill and Talent first. Then level Basic ATK, Skill, and Ultimate at roughly equal priority. Unlock A4 first, A6 second, and A2 third when early materials are limited.
Should I pull Sparxie E1 or her S1 Light Cone?
For most E0 accounts with the core team ready, S1 is the cleaner stopping point because it improves damage, SP capacity, and team utility. E1 is most attractive when you plan to continue to the transformational E2.
📚 Sources
This guide separates fixed game data from build interpretation. Kit wording, Light Cone effects, availability, and Event Warp dates were checked against official HoYoverse notices and current in-game database references. Prydwen, Game8, and Icy Veins were used to cross-check build priorities and expose recommendations that depend on team assumptions. No unannounced banner or damage number is presented as fact.
1 Comment