

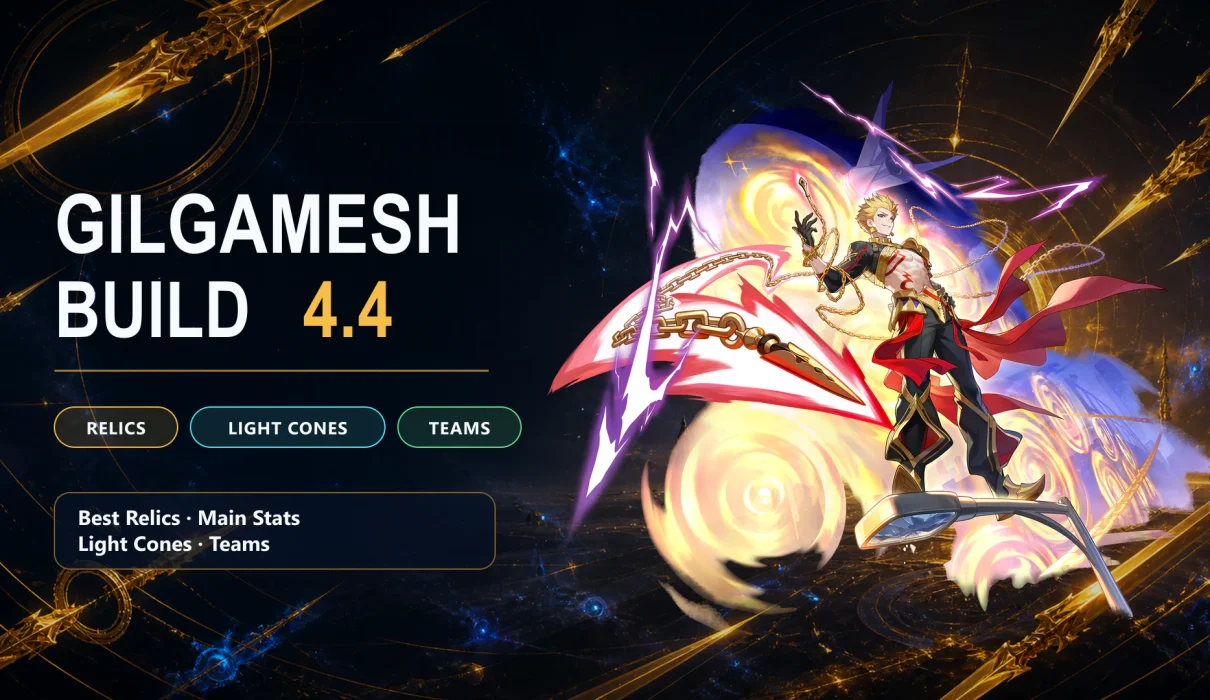
Updated: August 17, 2026 · Version: Honkai: Star Rail 4.4 · Build focus: E0 practical investment, Saber synergy, F2P alternatives, and endgame-ready stat targets
The best Gilgamesh HSR build treats him as a Lightning Destruction damage dealer who also supplies unusually strong teamwide offensive value. At E0, his most natural role is a support DPS beside Saber: he gains Energy when allies spend Energy on Ultimates, builds Interest as teammates act, and unlocks a unique Joint Follow-Up ATK with Saber. He can also function outside that pairing, but the more you separate him from Saber and high-Energy teammates, the more carefully you need to plan his rotations.
For most accounts, the practical build is straightforward: prioritize CRIT Rate until you are close to 100% in combat, then CRIT DMG and ATK%. Use ATK% boots rather than forcing a conventional Speed breakpoint, because Gilgamesh can generate large temporary Speed gains through Interest. His signature Light Cone is best, but On the Fall of an Aeon S5 is a strong free alternative, which makes his E0 build much cheaper than it first appears.
Contents
- 1 ⚡ Quick Answer: Best Gilgamesh HSR Build
- 2 👑 1. Gilgamesh Role and Build Identity
- 3 ⚙️ 2. How Gilgamesh Works
- 4 🧩 3. Best Relics for Gilgamesh
- 5 💡 4. Best Light Cones for Gilgamesh
- 6 📊 5. Best Gilgamesh Stats and Endgame Targets
- 7 📈 6. Gilgamesh Trace Priority
- 8 🤝 7. Best Gilgamesh Teams in HSR 4.4
- 9 🎮 8. Gilgamesh Rotation and Practical Play Tips
- 10 ✨ 9. Gilgamesh Eidolons: Best Stopping Points
- 11 🎟️ 10. Gilgamesh Character and Light Cone Banner History
- 12 💎 11. Should You Pull Gilgamesh or Save in HSR 4.4?
- 13 ⚠️ 12. Common Gilgamesh Build Mistakes
- 13.1 ❌ 12.1 Chasing CRIT DMG Before CRIT Rate
- 13.2 ❌ 12.2 Forcing SPD Boots Because “Every DPS Needs Speed”
- 13.3 ❌ 12.3 Using Ashblazing Grand Duke Without Reliable Joint Follow-Up Uptime
- 13.4 ❌ 12.4 Overcapping DEF Ignore / DEF Reduction
- 13.5 ❌ 12.5 Pulling S1 Before Checking the 4.4 Reward
- 13.6 ❌ 12.6 Treating the Saber Team as Auto-Friendly
- 14 ✅ 13. Final Gilgamesh Build Checklist
- 15 ❓ 14. Gilgamesh HSR Build FAQ
- 15.1 Is Gilgamesh free in Honkai: Star Rail 4.4?
- 15.2 What is the best Relic set for Gilgamesh?
- 15.3 What is the best F2P Light Cone for Gilgamesh?
- 15.4 Does Gilgamesh need Saber?
- 15.5 Does Gilgamesh need Speed boots?
- 15.6 Should I use an Energy Regeneration Rate Rope on Gilgamesh?
- 15.7 Is Gilgamesh E1 or S1 more important?
- 15.8 Is Gilgamesh good in Memory of Chaos, Pure Fiction, and Apocalyptic Shadow?
- 16 📌 15. Sources
⚡ Quick Answer: Best Gilgamesh HSR Build
Quick Answer: The best Gilgamesh build in HSR 4.4 uses a CRIT-focused Destruction setup with CRIT Rate Body, ATK% Boots, Lightning DMG Sphere, and ATK% Rope. His best general Light Cone is I Am As You Behold, while On the Fall of an Aeon S5 is the best practical F2P option. For Relics, Scholar Lost in Erudition is the safest general-purpose set; The Ashblazing Grand Duke becomes attractive specifically when his Joint Follow-Up ATK is enabled with Saber. His strongest team core is Gilgamesh + Saber, usually completed by a teamwide amplifier such as Mortenax Blade and an Energy-friendly sustain such as Huohuo.
| Build Slot | Best Practical Choice |
|---|---|
| Role | Support DPS / dual-DPS enabler; can scale toward main DPS with investment |
| Element / Path | Lightning / Destruction |
| Relic Set | 4pc Scholar Lost in Erudition for general use; 4pc Ashblazing Grand Duke with Saber-specific Joint Follow-Up uptime |
| Planar Ornament | Cosmic Life Sciences Institute |
| Best Light Cone | I Am As You Behold S1 |
| Best F2P Light Cone | On the Fall of an Aeon S5 |
| Main Stats | CRIT Rate Body · ATK% Boots · Lightning DMG Sphere · ATK% Rope |
| Substats | CRIT Rate to in-combat cap → CRIT DMG → ATK% → SPD |
| Trace Priority | Talent → Ultimate → Skill → Basic |
| Best Team Core | Gilgamesh + Saber + Mortenax Blade / team amplifier + Huohuo |
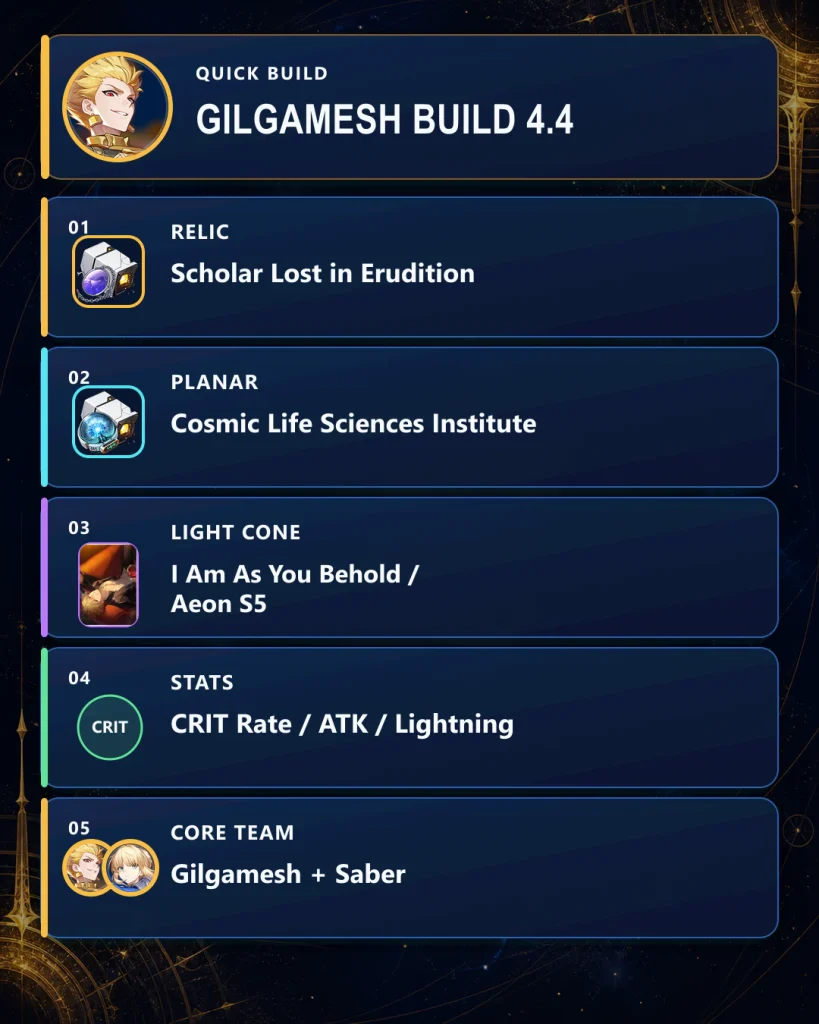
Image: Honkai: Star Rail © HoYoverse
👑 1. Gilgamesh Role and Build Identity
Gilgamesh is a 5-star Lightning Destruction character released through the second wave of the Honkai: Star Rail × Fate/stay night [Unlimited Blade Works] collaboration. His kit is unusual because it combines three jobs that are normally split between different characters: personal AoE/Blast damage, passive teamwide offensive buffs, and a dedicated interaction with Saber.
| Category | Gilgamesh | What It Means for Your Build |
|---|---|---|
| Primary role | Support DPS / dual DPS | Do not judge him only by personal screenshot damage. |
| Damage profile | Skill, high-cost Ultimate, Joint Follow-Up with Saber | Universal DMG/ATK/CRIT stats stay valuable. |
| Energy model | 360 Energy Ultimate plus fixed Energy gained from ally Ultimates | Team composition matters as much as the Rope main stat. |
| Team utility | ATK and CRIT DMG buffs that scale with allies’ Max Energy | High-Energy teammates gain disproportionately more value. |
| Speed model | Interest temporarily increases his SPD | ATK% boots are usually preferred over forcing SPD boots. |
| Signature partner | Saber | Unlocks the Joint Follow-Up ATK and a major Saber Energy/damage loop. |
Best use case: In my experience, Gilgamesh makes the most sense when you build around what his kit does uniquely rather than trying to turn every E0 copy into a conventional hypercarry. If you own Saber, start from the Gilgamesh–Saber duo and optimize the rest of the team around Energy, frequent actions, and teamwide amplification.
If you want to compare his role with other bruiser-style carries, the HSR Destruction character tier list is a useful account-planning reference. Gilgamesh is not simply “another Lightning DPS”; the Saber interaction and high-Energy scaling are the reasons to build him.
⚙️ 2. How Gilgamesh Works
The entire Gilgamesh HSR build becomes easier to understand once you stop thinking of his turn order as fixed. At the start of battle, he initially auto-uses his Basic ATK. Whenever another ally takes action, Gilgamesh gains Interest. Each point of Interest increases his Speed, and once he reaches the required threshold for the first time, he enters Interest Piqued! for the rest of the battle and can use his Skill instead of the forced Basic.
His Skill, Gate of Babylon, deals Lightning Blast damage and grants King’s Acknowledgement, allowing Gilgamesh to ignore part of the target’s DEF when dealing damage. The important practical detail is that his Skill does not turn him into an SP-hungry carry in the usual way, which makes the Gilgamesh–Saber core much easier to fit beside demanding supports.
His Ultimate, Enuma Elish, costs an enormous 360 Energy and combines a full-field hit with additional random-target bounces. That cost looks restrictive until you include his A2 Trace: when another ally uses an Ultimate, Gilgamesh gains Interest and regenerates a fixed amount of Energy equal to a percentage of the Energy that ally consumed. In other words, high-cost ally Ultimates directly accelerate his own Ultimate.
🔄 2.1 Gilgamesh Gameplay Loop
Allies act → Gilgamesh gains Interest → temporary SPD rises → Interest Piqued unlocks Skill → ally Ultimates feed Gilgamesh Energy → Enuma Elish → repeat while tracking Saber Joint ATK count
🤝 2.2 Saber Joint Follow-Up ATK
When Saber is on the team, Gilgamesh’s Talent gains a second layer. Every time Gilgamesh or Saber attacks, an attack tally increases. After the tally reaches eight, the pair launches a Joint Follow-Up ATK that deals Lightning and Wind damage to all enemies. Afterward, Gilgamesh gains Interest, Saber regenerates a fixed 120 Energy, and Saber’s next Ultimate receives a major independent damage increase.
Warning: Saber can be pushed into an unexpected action/Ultimate window by the 120 fixed Energy from the Joint Follow-Up. Do not fire Saber’s Ultimate automatically just because it becomes available. Check whether your amplifier buffs, debuffs, and the Joint ATK damage bonus are aligned first.
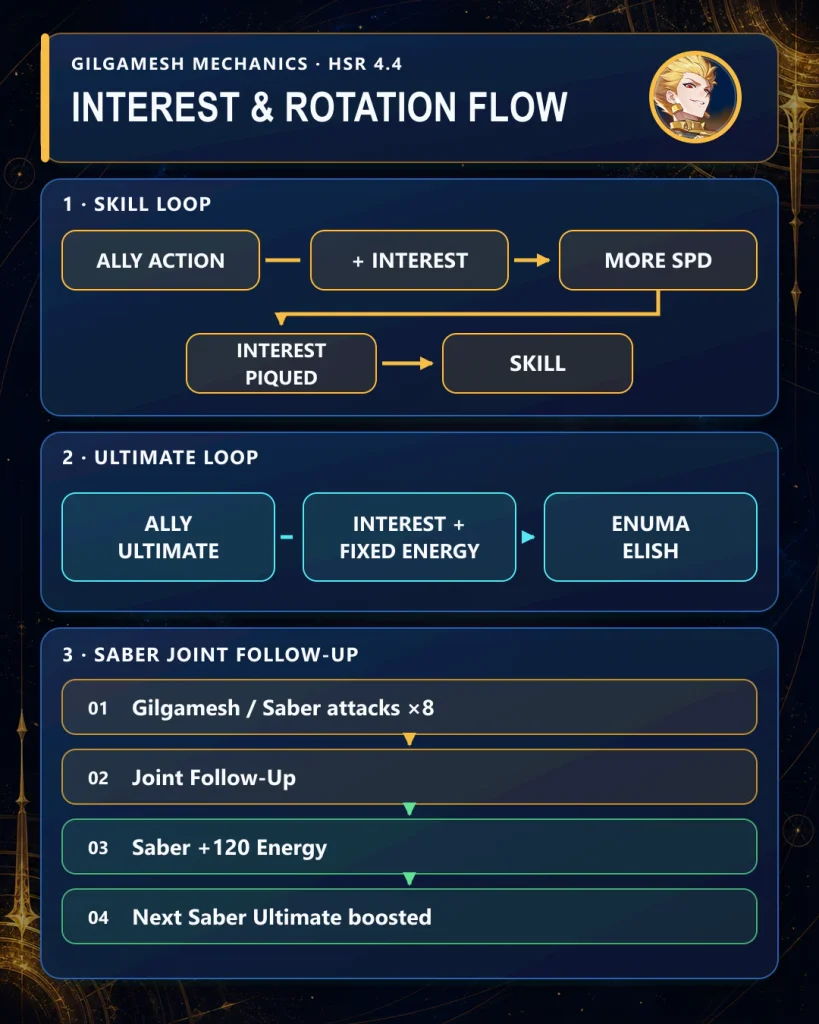
Image: Honkai: Star Rail © HoYoverse
🧩 3. Best Relics for Gilgamesh
Gilgamesh does not have one unconditional 4-piece Relic answer for every team. The correct choice depends on whether you are maximizing his general Skill/Ultimate damage, consistently triggering the Saber Joint Follow-Up, or stacking DEF Ignore against a specific enemy setup.
| Rank | Relic Set | Best Use | Why It Works |
|---|---|---|---|
| 1 | Scholar Lost in Erudition (4pc) | Safest general build | Boosts Skill and Ultimate damage without requiring a specific enemy weakness or Saber-only condition. |
| 2 | The Ashblazing Grand Duke (4pc) | Saber teams / consistent Joint Follow-Up | The multi-hit Joint Follow-Up can activate the set’s ATK stacking efficiently. |
| 3 | Genius of Brilliant Stars (4pc) | Quantum-weak enemies / DEF Ignore stacking | Can become extremely strong when its DEF Ignore is fully active, but the value is matchup-dependent and can overcap with other DEF reduction sources. |
| 4 | 2pc + 2pc mixed sets | Best substat efficiency | Excellent when your four-piece pieces are weak. CRIT, ATK, DMG, or SPD two-piece bonuses can all work. |
| Specialist | Eagle of Twilight Line (4pc) | Niche action-frequency setups | Can be used when extra action manipulation is more valuable than raw set-bonus damage. |
Practical rule: A great 2pc + 2pc combination with strong CRIT rolls is better than forcing a “perfect” 4pc set with mediocre substats. Gilgamesh already receives substantial offensive stats from his own kit and team, so clean CRIT Rate and ATK rolls matter more than chasing a theoretical set bonus at any cost.
🌌 3.1 Best Planar Ornaments
| Planar Set | Recommendation | Best Situation |
|---|---|---|
| Cosmic Life Sciences Institute | Best overall personal-damage option | General Gilgamesh builds across different teams. |
| City of Converging Stars | Excellent Saber-team alternative | Joint Follow-Up can enable the ATK effect, while the team can benefit from its CRIT DMG utility. |
| Izumo Gensei and Takama Divine Realm | Strong CRIT-focused alternative | Useful when its condition is active and you need additional CRIT Rate consistency. |
Before salvaging a piece just because it is not from the first-ranked set, compare the actual substats. The site’s relic stats and optimization guide is especially relevant here because Gilgamesh benefits more from a balanced in-combat CRIT profile than from blindly completing a set.
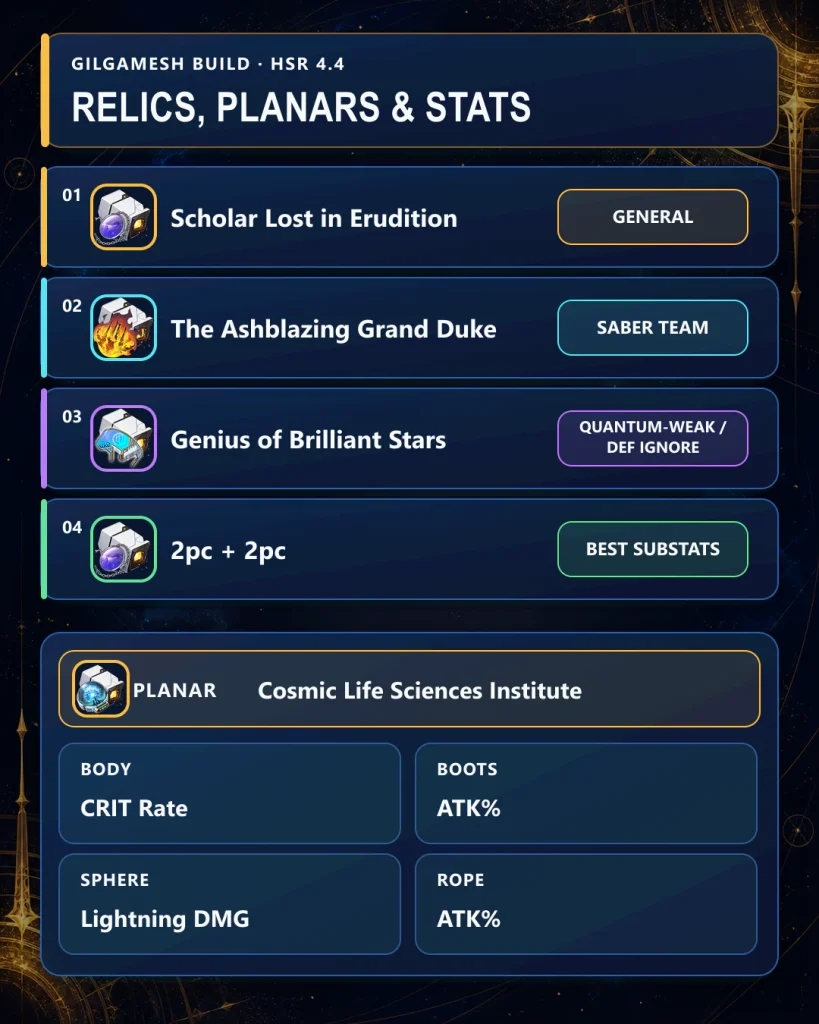
Image: Honkai: Star Rail © HoYoverse
💡 4. Best Light Cones for Gilgamesh
Gilgamesh has good Light Cone flexibility because his damage is still built around conventional ATK/CRIT/DMG scaling. His signature improves both personal output and team value, but the free Herta Store option is competitive enough that F2P players do not need to treat S1 as part of his base kit.
| Rank | Light Cone | Rarity | Use Case | Verdict |
|---|---|---|---|---|
| 1 | I Am As You Behold | 5★ | Signature / team support | Best overall. Adds ATK, Energy Regeneration Rate, Ultimate damage, and team CRIT DMG. |
| 2 | A Thankless Coronation | 5★ | Premium alternative | Very strong due to Energy utility plus large offensive stats. |
| 3 | Thus Burns the Dawn | 5★ | Premium generic Destruction option | Excellent Base ATK and DEF Ignore; watch for DEF Ignore saturation in heavily debuffed teams. |
| 4 | A Trail of Bygone Blood S5 | 4★ | Battle Pass / CRIT support | Strong CRIT Rate option with useful Skill and Ultimate damage bonuses. |
| 5 | On the Fall of an Aeon S5 | 5★ | Best F2P | Reliable ATK ramp plus a Break-triggered damage bonus. The default recommendation for free-to-play accounts. |
| 6 | A Secret Vow S5 | 4★ | Fallback damage option | Generic DMG bonus keeps it usable when better options are occupied. |
F2P tip: If your Herta Store copy of On the Fall of an Aeon is available, build it before spending Stellar Jade only to “complete” Gilgamesh. From a planning perspective, E0 Gilgamesh + Aeon S5 already gives you the important part of the character: his full Saber interaction, high-Energy team buff, and 360-Energy Ultimate engine.
If Aeon is competing with another Destruction carry, check the Herta Store Light Cone buy order before committing your limited Herta Bonds or Superimposers.
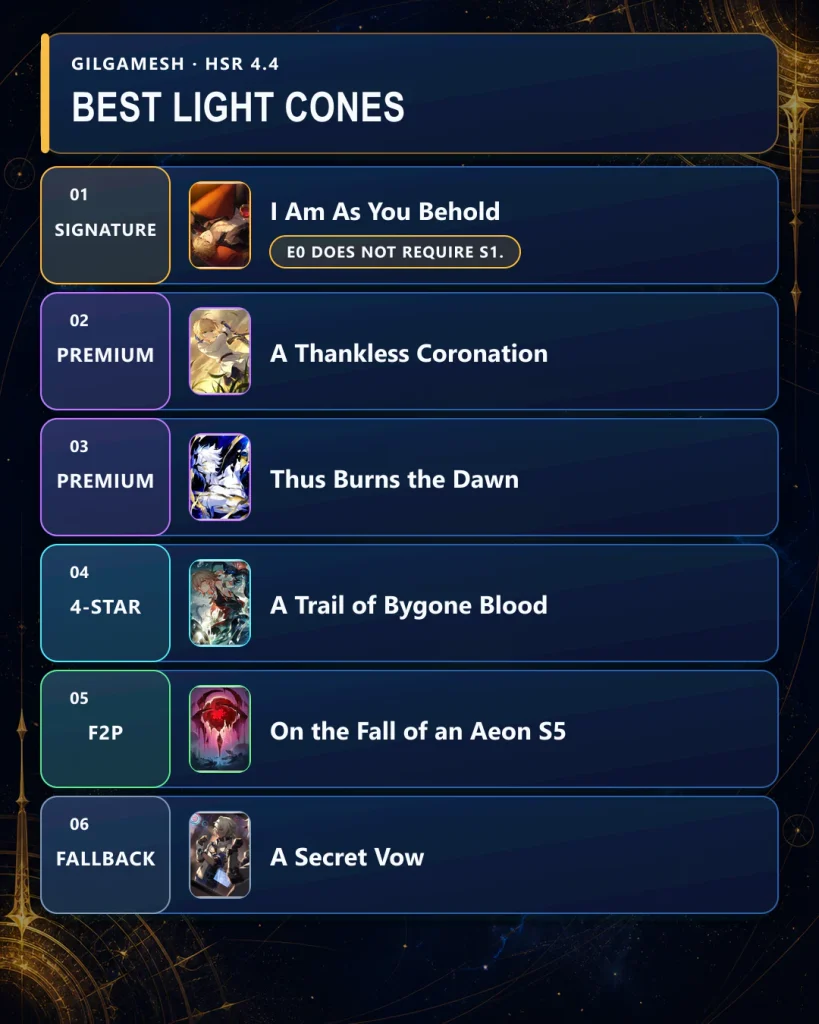
Image: Honkai: Star Rail © HoYoverse
📊 5. Best Gilgamesh Stats and Endgame Targets
Gilgamesh’s A4 Trace can generate a large amount of personal CRIT DMG as he gains Interest, which changes how you should evaluate Relics. In practice, CRIT Rate is the stat you usually need to protect first. A build with beautiful CRIT DMG but inconsistent crits wastes too much of his Skill, Ultimate, and Joint Follow-Up damage.
🎯 5.1 Main Stats
| Slot | Recommended Main Stat | Why |
|---|---|---|
| Body | CRIT Rate | Best default because his own kit supplies considerable CRIT DMG. |
| Feet | ATK% | Interest already provides large temporary SPD gains. |
| Planar Sphere | Lightning DMG | Direct damage scaling across Skill, Ultimate, and Joint Follow-Up. |
| Link Rope | ATK% | Default recommendation; much of his special Energy gain is fixed rather than ordinary ERR-scaled rotation value. |
📌 5.2 Substat Priority
- CRIT Rate until you approach 100% in combat
- CRIT DMG
- ATK%
- SPD
📈 5.3 Recommended Endgame Targets
| Stat | Target | Practical Note |
|---|---|---|
| ATK | 3,000–3,500+ | Use this as a finished-build range, not a hard minimum for starting the character. |
| SPD | Base SPD is acceptable | Interest changes his Speed dynamically, so do not force a static breakpoint without testing the actual team. |
| CRIT Rate | 90–100% in combat | Prioritize consistency before stacking more CRIT DMG. |
| CRIT DMG | ~120%+ before combat | His kit can add more during battle, so pre-combat sheet CRIT DMG does not need to look extreme. |
Speed note: Gilgamesh is a bad character to build by spreadsheet Speed breakpoint alone. His Interest can move him dramatically on the action bar. Test the finished team before replacing strong ATK% boots with weaker SPD boots. For the underlying action-value math, see the HSR Speed breakpoints guide.
📈 6. Gilgamesh Trace Priority
| Priority | Trace | Reason |
|---|---|---|
| 1 | Talent | Core Interest engine, Saber Joint Follow-Up interaction, and the mechanics that define his role. |
| 2 | Ultimate | Enuma Elish is a major share of his personal damage. |
| 3 | Skill | Important repeatable personal damage after Interest Piqued. |
| 4 | Basic ATK | Lowest long-term priority once the Skill loop is active. |
Major Trace priority: Hegemon’s Strife (A6) → Epic’s Opening (A2) → Hero’s Hauteur (A4). A6 is especially important because it is the source of his always-on team ATK and CRIT DMG support, with extra scaling for allies whose Max Energy exceeds 140. A2 then makes the 360-Energy Ultimate practical by converting allies’ Ultimate spending into fixed Energy for Gilgamesh.
- ✅ Unlock all three Major Traces as early as your resources allow.
- ✅ Level Talent and Ultimate before chasing minor-stat completion.
- ✅ Take CRIT Rate minor Traces seriously; they directly reduce Relic pressure.
- ⏳ Basic ATK can wait if credits and trace materials are tight.
If you are planning materials across several characters, use the HSR Ascension and Traces guide to prioritize guaranteed upgrades before spending weeks chasing small Relic gains.
🤝 7. Best Gilgamesh Teams in HSR 4.4
Gilgamesh teams are easiest to build when you ask two questions: Who spends a lot of Energy? and who takes or generates frequent actions? Saber answers both parts while also activating the unique Joint Follow-Up, which is why she remains his most important partner at E0.
👑 7.1 Premium Saber Dual-DPS Team
| Slot | Character | Role |
|---|---|---|
| DPS | Saber | Main burst DPS and Joint Follow-Up partner |
| Support DPS | Gilgamesh | Joint Follow-Up, team buffs, personal Ultimate damage |
| Amplifier / Sub-DPS | Mortenax Blade | Frequent attacks, DEF reduction/amplification, dual-DPS support |
| Sustain | Huohuo | Healing, cleansing, and percentage-based team Energy restoration |
This is the team I would build first if the account already owns Saber. Mortenax Blade’s frequent attacks help generate Interest while his debuffs amplify both damage dealers. Huohuo is unusually valuable because percentage-based Energy restoration scales well with the very large Energy pools of Saber and Gilgamesh.
🧠 7.2 Saber + Remembrance Trailblazer Team
| Slot | Character | Why It Works |
|---|---|---|
| DPS | Saber | Uses Gilgamesh’s dedicated Saber buffs and Joint Follow-Up. |
| Support DPS | Gilgamesh | Core enabler. |
| Support | Remembrance Trailblazer | Gilgamesh’s high Energy pool helps maximize Mem’s True DMG buff, while team Energy flow helps Mem generate Charge and more action advances. |
| Sustain | Huohuo / Gallagher | Huohuo is the premium Energy option; Gallagher is a lower-cost sustain when Huohuo is unavailable. |
⚡ 7.3 Gilgamesh Without Saber
| Slot | Character | Role |
|---|---|---|
| Main DPS | Gilgamesh | Primary damage dealer |
| Amplifier / Sub-DPS | Mortenax Blade | Frequent attacks plus DEF-oriented amplification |
| Amplifier | Tribbie | Teamwide damage support in a dual-source damage shell |
| Sustain | Huohuo | Energy and survivability |
This team is functional, but it loses the mechanic that makes Gilgamesh uniquely valuable: the Saber Joint Follow-Up. I would use it if you like Gilgamesh enough to play him as the central carry or if Saber is committed to another node, not because it is automatically a better use of E0.
🆓 7.4 Budget Starter Shell
| Slot | Character | Budget Logic |
|---|---|---|
| DPS | Gilgamesh | Free selector can provide E0 during the Fate Contract: Renewal window. |
| Support | Remembrance Trailblazer | Free progression unit with strong synergy with Gilgamesh’s Energy pool. |
| Support | Asta | Accessible action-frequency and Speed support while you build a premium roster. |
| Sustain | Gallagher | Accessible 4-star sustain if owned; replace with your best available healer/shielder when needed. |
Budget reality: This is a starter shell, not a claim that four accessible units equal the Saber premium team. For F2P players, the right approach is to get Gilgamesh functional first, then replace the weakest support slot as your account acquires stronger teamwide amplifiers.
Because the Saber pairing literally creates a Follow-Up ATK, the best HSR Follow-Up Attack teams guide is a natural next read if you are deciding whether Mortenax Blade, Tribbie, or another frequent-action unit should take the flex slot.
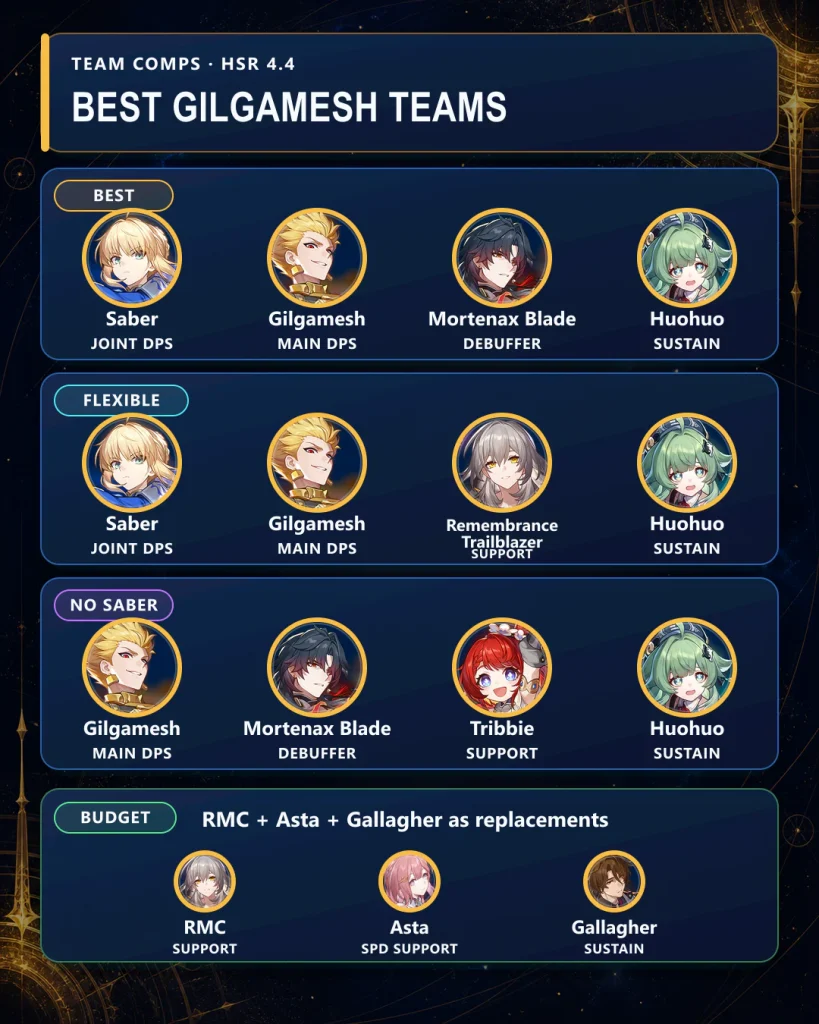
Image: Honkai: Star Rail © HoYoverse
🎮 8. Gilgamesh Rotation and Practical Play Tips
Gilgamesh is easy to build but harder to pilot perfectly. The problem is not remembering one fixed rotation; it is managing three resources that move independently: his Interest, his 360-Energy Ultimate, and Saber’s attack/Energy timing.
- Open with the Technique when practical. It creates a Special Dimension, delays enemy actions inside it, deals opening Lightning damage when combat starts, and gives Gilgamesh starting Interest.
- Let allies act and build Interest. Do not panic if Gilgamesh’s early turn order looks strange; that fluctuation is part of the kit.
- Use ally Ultimates when they create real value. They feed Gilgamesh Energy through A2, but wasting an ally Ultimate only to battery Gilgamesh can still lose more damage than it gains.
- After Interest Piqued, use Gate of Babylon on his turns. Maintain King’s Acknowledgement and convert his high temporary Speed into repeatable damage.
- Track the Gilgamesh/Saber attack count. The eighth counted attack triggers the Joint Follow-Up.
- After the Joint Follow-Up, check Saber’s buffs before using her newly charged Ultimate. The free 120 Energy is powerful, but bad timing can waste the boosted Ultimate window.
- Use Enuma Elish when team buffs/debuffs are aligned. Its huge Energy cost makes each cast important; do not throw it into a nearly dead wave if the next wave matters more.
Auto-battle warning: Gilgamesh + Saber has a much larger gap between “works” and “played optimally” than many standard hypercarry teams. Auto can spend Ultimates or enter Saber windows at awkward times. Manual play matters more when you are chasing low-cycle clears or difficult three-team endgame nodes.

Image: Honkai: Star Rail © HoYoverse
✨ 9. Gilgamesh Eidolons: Best Stopping Points
| Eidolon | Value | What Changes | Recommendation |
|---|---|---|---|
| E0 | Excellent baseline | Complete Interest engine, Saber Joint Follow-Up, team buffs, and full core gameplay. | Best stopping point for most F2P players. |
| E1 — He Who Saw the Deep | Very high | Shares King’s Acknowledgement DEF Ignore with teammates, gives Gilgamesh more ATK, and adds fixed Energy when using Skill. | Best early vertical investment. |
| E2 — Wisdom That Encompassed All | High personal upgrade | Starts combat with more Interest, gains more from Ultimate use, and improves Skill multipliers. | For players pushing Gilgamesh toward a carry role. |
| E4 — King Who Bowed to None | Situational | Adds Energy Regeneration Rate. | Useful, but not a natural stopping point on its own. |
| E6 — Soul That Bore Friendship | Whale-level | Large Ultimate enhancement plus teamwide All-Type RES PEN and additional Ultimate scaling. | Luxury investment only. |
Investment rule: Claim and build E0 before deciding whether you need more. E1 changes team value more clearly than most early Eidolons because the DEF Ignore effect can extend beyond Gilgamesh. His signature Light Cone is strong, but the existence of Aeon S5 means S1 is not required to make the character function.
🎟️ 10. Gilgamesh Character and Light Cone Banner History
Gilgamesh does not use a normal short Phase 1/Phase 2 availability model. He entered the separate Fate[UBW] Collaboration Warp system on July 24, 2026. HoYoverse described the collaboration characters and Light Cones as available long-term after that date, so a standard three-week “rerun clock” should not be assumed.
📅 10.1 Character Banner History
| Version | Start Date | End / Status | Availability | Notes |
|---|---|---|---|---|
| 4.4 — Gilgamesh collaboration release | July 24, 2026 at 12:00 server time | Long-term / no fixed end date announced | Fate[UBW] Collaboration Warp | Gilgamesh also has a separate free selector window through the end of Version 4.6. |
Free E0 event: During Fate Contract: Renewal, eligible players can log in from July 24, 2026 at 12:00 server time until the end of Version 4.6 and choose Gilgamesh or Archer. This is separate from pulling additional Gilgamesh copies on the Collaboration Warp.
💡 10.2 Light Cone Banner History
| Light Cone | Version | Start Date | Banner / Status | Extra Acquisition Note |
|---|---|---|---|---|
| I Am As You Behold | 4.4 — Gilgamesh collaboration release | July 24, 2026 | Age of Gods Golden Gate · long-term Collaboration Warp | Version 4.4 also includes a reward that lets players choose I Am As You Behold or Archer’s The Hell Where Ideals Burn after spending a total of 200 Star Rail Special Passes during Version 4.4. |
Banner update warning: Collaboration availability is not the same as a normal limited rerun schedule. Before publishing an update after Version 4.4, verify the in-game Warp screen and the newest HoYoverse announcement. Do not automatically replace “long-term” with a guessed end date.
For a broader timeline, compare this special collaboration structure with the site’s HSR character and Light Cone banner history.
💎 11. Should You Pull Gilgamesh or Save in HSR 4.4?
The most important pull advice is also the simplest: do not spend Stellar Jade trying to obtain E0 Gilgamesh before checking whether you are eligible to claim him through Fate Contract: Renewal. His 4.4 value proposition is fundamentally different from a normal limited five-star because the base copy can be free.
| Your Account Situation | Pull or Save? | Why |
|---|---|---|
| You own Saber and do not have Gilgamesh | Claim Gilgamesh first | He is Saber’s dedicated Joint Follow-Up partner and one of her most important upgrades. |
| You do not own Saber, but want a free Lightning Destruction unit | Claim is still reasonable | He remains functional without Saber, but loses the unique Joint Follow-Up mechanic. |
| You already have E0 Gilgamesh and are F2P | Usually save | E0 is complete and Aeon S5 is a strong free Light Cone. |
| You use Saber heavily and want vertical investment | E1 is high value | It improves Gilgamesh and extends DEF Ignore to teammates. |
| You want S1 only because it is “signature” | Save unless the opportunity cost is low | His signature is best, but the character does not need it to function. |
| You will already spend 200 Star Rail Special Passes in Version 4.4 | Check the free 5★ Light Cone reward first | You may be able to select I Am As You Behold instead of separately targeting it. |
| You must choose between free Archer and Gilgamesh | Choose by roster | Gilgamesh is the obvious Saber-focused choice; Archer is the more natural choice if your account benefits more from a Quantum Hunt carry and its available synergies. |
My practical recommendation: For F2P players, E0 Gilgamesh + Aeon S5 is the sweet spot. For Saber mains who want to invest further, E1 is the first upgrade I would seriously evaluate. Only chase S1 after checking the 4.4 200-pass reward and making sure the pulls are not stealing a more important character from your account plan.
If you are close to pity or comparing several 4.4 targets, use an HSR pull tracker and pity plan before converting more Stellar Jade into passes.
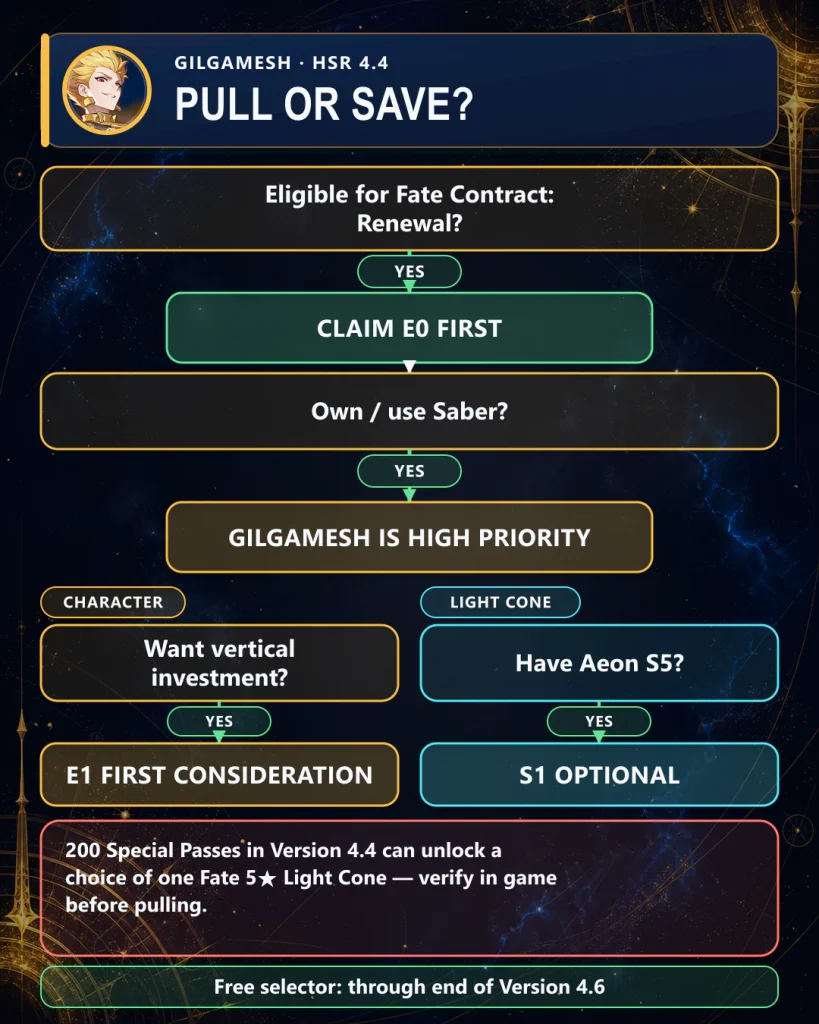
Image: Honkai: Star Rail © HoYoverse
⚠️ 12. Common Gilgamesh Build Mistakes
❌ 12.1 Chasing CRIT DMG Before CRIT Rate
Gilgamesh already receives substantial CRIT DMG from his own kit. If your in-combat CRIT Rate is inconsistent, another 20–30% CRIT DMG on the character sheet is usually less valuable than making his big hits actually crit.
❌ 12.2 Forcing SPD Boots Because “Every DPS Needs Speed”
His Interest mechanic can produce major temporary Speed gains. ATK% boots are the default recommendation. Only swap to SPD boots after testing a specific rotation and confirming the breakpoint creates more useful actions rather than just a prettier stat sheet.
❌ 12.3 Using Ashblazing Grand Duke Without Reliable Joint Follow-Up Uptime
The four-piece set is attractive because the Joint Follow-Up is multi-hit. If your team does not enable that mechanic reliably, Scholar or a strong mixed set is safer.
❌ 12.4 Overcapping DEF Ignore / DEF Reduction
Genius of Brilliant Stars, King’s Acknowledgement, Mortenax Blade, Eidolons, and some Light Cones can all push the same defensive axis. More is not always equally valuable once your team is already saturated. Treat DEF-based options as a full-team calculation, not isolated item rankings.
❌ 12.5 Pulling S1 Before Checking the 4.4 Reward
Version 4.4 includes a 200-Star-Rail-Special-Pass reward that can let you choose one of the two Fate five-star Light Cones. If you are already spending heavily during the patch, verify that reward before using more passes on Age of Gods Golden Gate.
❌ 12.6 Treating the Saber Team as Auto-Friendly
The team can absolutely clear on Auto in easier content, but the highest-value Saber Ultimate window depends on Energy, attack count, action advance, and buff timing. Manual play is much more reliable when the stage is tight.
✅ 13. Final Gilgamesh Build Checklist
- ✅ Character: Gilgamesh — 5★ Lightning / Destruction
- ✅ Role: Support DPS / dual-DPS enabler, especially with Saber
- ✅ Relics: Scholar Lost in Erudition for general use; Ashblazing Grand Duke for reliable Saber Joint Follow-Up setups
- ✅ Planar: Cosmic Life Sciences Institute
- ✅ Light Cone: I Am As You Behold S1
- ✅ F2P Light Cone: On the Fall of an Aeon S5
- ✅ Body: CRIT Rate
- ✅ Boots: ATK%
- ✅ Sphere: Lightning DMG
- ✅ Rope: ATK%
- ✅ Substats: CRIT Rate → CRIT DMG → ATK% → SPD
- ✅ Trace priority: Talent → Ultimate → Skill → Basic
- ✅ Major Traces: A6 → A2 → A4
- ✅ Best team core: Saber + Gilgamesh + teamwide amplifier + Huohuo
- ✅ F2P stopping point: E0 + Aeon S5
- ✅ First vertical target: E1 if you actively use the Saber/high-Energy team
Final verdict: Gilgamesh is one of the easiest 4.4 characters to justify building because the base copy can be free and his best F2P Light Cone is already obtainable without limited-banner pulls. His ceiling is highest beside Saber, but the more important reason to invest is that his kit contributes even when he is not taking the spotlight: fixed Energy interactions, teamwide ATK/CRIT DMG, DEF Ignore, and frequent high-impact attacks. Build the CRIT fundamentals first, then optimize the Saber rotation.
❓ 14. Gilgamesh HSR Build FAQ
Is Gilgamesh free in Honkai: Star Rail 4.4?
Yes. During Fate Contract: Renewal, eligible players can choose one free copy of Gilgamesh or Archer from July 24, 2026 at 12:00 server time until the end of Version 4.6. Additional Gilgamesh copies come from the Fate[UBW] Collaboration Warp.
What is the best Relic set for Gilgamesh?
Scholar Lost in Erudition is the safest general-purpose four-piece set. The Ashblazing Grand Duke is especially good when Gilgamesh is paired with Saber and can trigger his multi-hit Joint Follow-Up consistently. Genius of Brilliant Stars is a more conditional option against Quantum-weak enemies and in DEF Ignore-heavy setups.
What is the best F2P Light Cone for Gilgamesh?
On the Fall of an Aeon S5 is the best practical free-to-play option. It gives strong ATK scaling and can activate an additional damage bonus after Weakness Break, while avoiding the Stellar Jade cost of a limited signature Light Cone.
Does Gilgamesh need Saber?
No, but Saber is his most important partner at E0. Without Saber, Gilgamesh keeps his personal damage, Interest mechanics, Energy interaction, and team buffs; however, he loses the unique Joint Follow-Up that gives Saber 120 fixed Energy and boosts her next Ultimate.
Does Gilgamesh need Speed boots?
Usually no. ATK% boots are the default recommendation because Interest can give Gilgamesh large temporary Speed increases during battle. Use Speed boots only when a tested team rotation proves that the extra base Speed creates a better action pattern.
Should I use an Energy Regeneration Rate Rope on Gilgamesh?
ATK% is the standard Rope choice. Gilgamesh’s 360-Energy Ultimate is expensive, but a meaningful share of his Energy comes from fixed Energy interactions tied to ally Ultimates and, at E1, his Skill. Build the intended high-Energy team before sacrificing ATK for ERR.
Is Gilgamesh E1 or S1 more important?
E1 is the first vertical upgrade I would evaluate for an active Gilgamesh/Saber account because it extends DEF Ignore to teammates and improves Gilgamesh’s own ATK/Energy flow. S1 is his best Light Cone, but Aeon S5 is already strong, and Version 4.4 players who spend 200 Star Rail Special Passes should check the special five-star Light Cone reward before pulling S1 directly.
Is Gilgamesh good in Memory of Chaos, Pure Fiction, and Apocalyptic Shadow?
Yes, especially when the team is built around his strengths. His Ultimate and Joint Follow-Up provide strong multi-target coverage, while his high multipliers, DEF Ignore, and Saber synergy keep him relevant against priority targets. Matchup, enemy weakness, and team quality still matter, so do not treat one tier placement as universal.
📌 15. Sources
This guide was fact-checked for Honkai: Star Rail Version 4.4 on August 16, 2026. Kit mechanics, release status, the Fate Contract: Renewal selector, the 200-pass Version 4.4 Light Cone reward, and collaboration availability were checked against official HoYoverse / HoYoLAB information. Build rankings and practical stat recommendations were cross-referenced against current 4.4 theorycrafting databases.
- HoYoverse — Version 4.4 Update Details
- HoYoverse — Keeping Up With Star Rail: Gilgamesh
- HoYoLAB — Fate[UBW] Collaboration Warp Details
- HoYoLAB — Holy Grail War / Fate Contract: Renewal Notice
- Prydwen — Gilgamesh Build, Kit, Relics, Light Cones and Teams
- Game8 — Gilgamesh Builds and Teams
- Honkai: Star Rail Wiki — Gilgamesh Reference