


Updated October 4, 2026. Calculation examples use standard combat rules and the displayed Toughness scale. Character notes distinguish native kit effects from external Super Break sources.
A character can have excellent Break Effect and still produce disappointing damage. The missing piece is often the attack’s Toughness reduction, an inactive Super Break source, or an enemy modifier that the build screen cannot show.
This HSR Break Effect and Super Break guide explains the formulas, then works through the numbers. You will learn what raising Break Effect actually buys, why Weakness Break Efficiency matters, and how to check whether your next upgrade improves the damage window.
⚡ Quick Answer
Break Effect increases Break-related damage, but it does not make attacks reduce Toughness faster. Ordinary Weakness Break uses character level, an elemental coefficient, and the enemy’s maximum Toughness. Super Break uses character level and the attack’s eligible Toughness reduction instead. Both benefit from Break Effect and relevant DEF, RES, and vulnerability modifiers; neither normally benefits from CRIT or ordinary DMG Bonus.
Super Break shortcut: Level multiplier × (eligible Toughness reduction ÷ 10) × (1 + Break Effect) × source coefficient × applicable damage modifiers. A kit must enable the conversion. Harmony Trailblazer normally requires an already Broken target; The Dahlia provides an explicit pre-Break exception.
Contents
- 1 🔎 1. Break Effect, Weakness Break and Super Break Explained
- 2 💥 2. Ordinary Weakness Break Damage Formula
- 3 ⚙️ 3. Super Break Damage Formula and Trigger Conditions
- 4 🧮 4. Damage Calculation Examples You Can Reproduce
- 5 📊 5. Which Stats Scale Break and Super Break?
- 6 🧩 6. Character Mechanics That Change the Calculation
- 7 🕹️ 7. How to Test Break Damage Without Misreading the Result
- 8 🌱 8. F2P Upgrade Priorities: Guaranteed Gains Before Perfect Relics
- 9 🗓️ 9. Character and Light Cone Banner History for Break Planning
- 10 🎟️ 10. Pull or Save? Decide from the Missing Mechanic
- 11 ❓ 11. HSR Break Effect and Super Break FAQ
- 11.1 💬 11.1. What is the difference between Break Effect and Super Break?
- 11.2 💬 11.2. Does Break Effect make the Toughness bar disappear faster?
- 11.3 💬 11.3. Can Super Break damage CRIT?
- 11.4 💬 11.4. Does ATK increase Super Break damage?
- 11.5 💬 11.5. Does Fire or Physical deal more Super Break because of its element?
- 11.6 💬 11.6. How much Break Effect do I need? Is 360% a cap?
- 11.7 💬 11.7. Can Super Break happen before an enemy is Weakness Broken?
- 11.8 💬 11.8. Whose Break Effect is used: the attacker’s or the support’s?
- 11.9 💬 11.9. Does a larger enemy Toughness bar increase Super Break damage?
- 11.10 💬 11.10. Why is my Super Break lower than a guide’s number?
- 12 ✅ 12. A Practical Break Damage Review
- 13 📚 13. Sources
🔎 1. Break Effect, Weakness Break and Super Break Explained
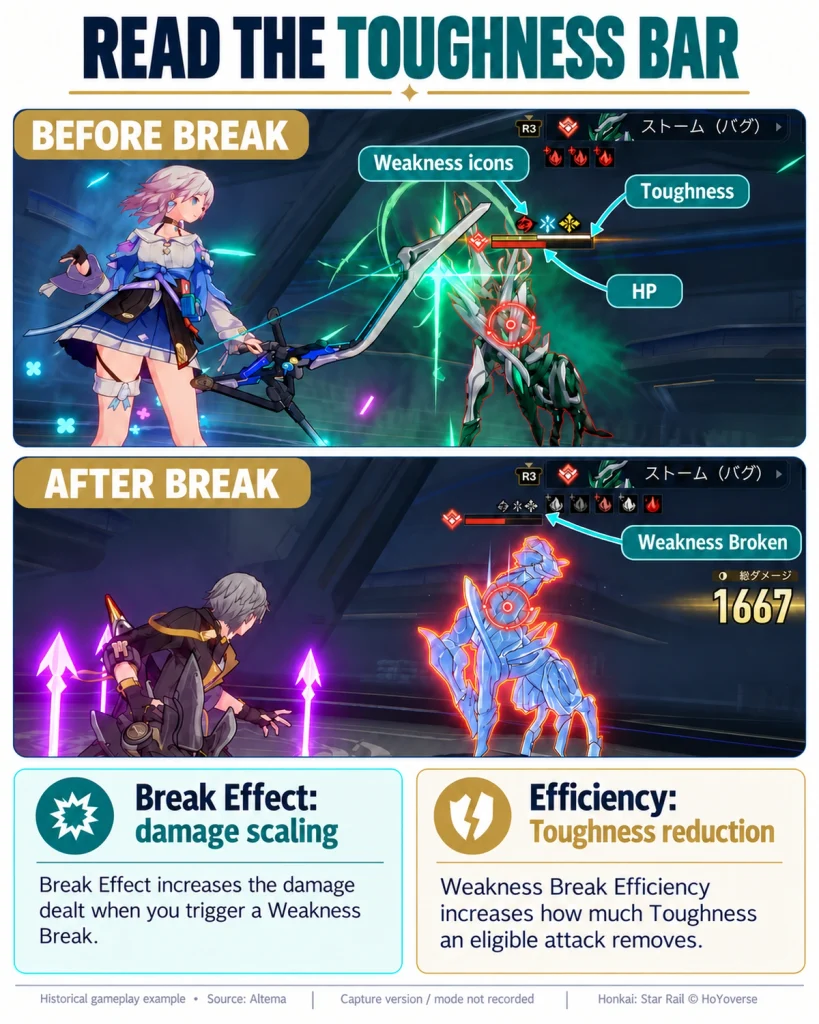
Start by separating the stat from the event. Break Effect is a character attribute. Weakness Break happens when the enemy’s Toughness reaches zero. Super Break is damage generated by an ability that converts eligible Toughness reduction into damage. High Break Effect alone does not grant that ability.
| Term | What it changes | What to check |
|---|---|---|
| Break Effect | The damage or specified effects of a Break-related instance | The attacking or triggering character’s in-combat value |
| Weakness Break | An initial damage event and an element-specific debuff | Who removes the last Toughness and which element they use |
| Weakness Break Efficiency | How much eligible Toughness reduction an attack delivers | Buff uptime, native kit bonuses, and any special restrictions |
| Super Break | Damage conversion supplied by a kit or combat effect | The source, qualifying target state, and conversion coefficient |
| Exo-Toughness | An additional bar that can create another Break event | The effect that supplies it and the target’s remaining bar |
🧩 1.1. Break Effect vs. Weakness Break Efficiency
With an ordinary 20-Toughness attack, raising Break Effect from 100% to 200% leaves that attack’s Toughness reduction at 20. Adding 50% Weakness Break Efficiency makes an eligible 20-Toughness attack reduce 30 Toughness. Once a Super Break source can convert that value, the larger reduction also increases the converted damage.
💡 Practical rule
Use Break Effect to strengthen each qualifying damage instance. Use efficiency and action frequency to create larger or more frequent opportunities to deal it.
If the white bar, elemental weaknesses, and Break debuffs are still unfamiliar, the Paths and Elements overview explains the combat basics before the equations below.
💥 2. Ordinary Weakness Break Damage Formula
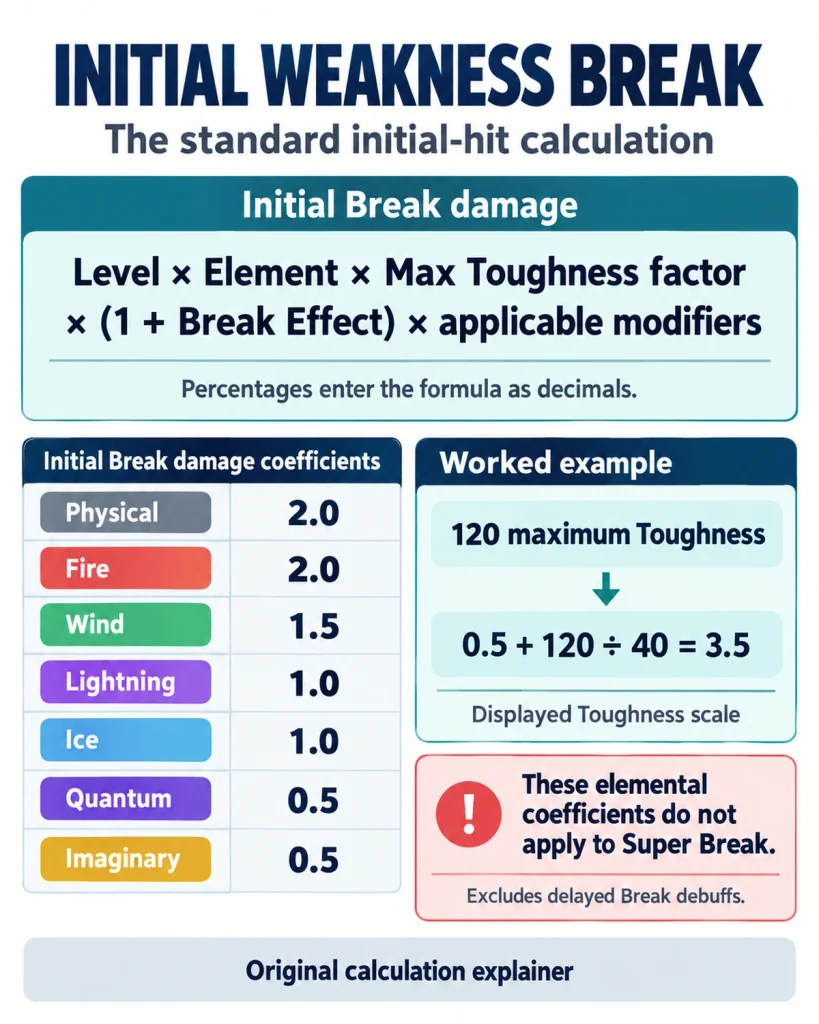
For the initial standard Weakness Break hit, use the following calculation. The percentages in an equation are decimal values: 200% Break Effect becomes 2.00, so its damage factor is 3.00.
🧮 Initial Break formula
Initial Break DMG = L × E × (0.5 + Tmax ÷ 40) × (1 + BE) × Cbreak × Gbreak × D × R × V × M × B
L = level multiplier; E = elemental coefficient; Tmax = enemy maximum Toughness on the displayed scale; BE = the breaker’s Break Effect; Cbreak = any applicable ability coefficient, normally 1 for the standard initial hit; Gbreak = applicable Break DMG increase factor, normally 1; D = DEF factor; R = RES factor; V = relevant vulnerability; M = other damage mitigation; B = the Toughness-state factor.
🌈 2.1. Elemental coefficients apply to the initial Break
| Element | Initial Break coefficient | Associated Break debuff |
|---|---|---|
| Physical | 2.0 | Bleed |
| Fire | 2.0 | Burn |
| Wind | 1.5 | Wind Shear |
| Lightning | 1.0 | Shock |
| Ice | 1.0 | Freeze |
| Quantum | 0.5 | Entanglement |
| Imaginary | 0.5 | Imprisonment |
The coefficient describes the initial Break hit. Follow-up Bleed, Burn, Shock, Wind Shear, Freeze damage, and Entanglement use their own rules. Do not reuse the initial-hit equation as a universal formula for every debuff.
⚠️ Do not carry the element coefficient into Super Break
A Fire character does not receive a built-in 2× Super Break coefficient simply because Fire has a 2.0 initial Break coefficient. Super Break uses eligible Toughness reduction and its source coefficient instead. Element still matters for weakness access and the target’s resistance.
🎯 2.2. Maximum Toughness, Break ownership and the 0.9 factor
The maximum-Toughness term uses the enemy’s maximum bar, not the sliver remaining before the final hit. An enemy with 120 maximum Toughness gives a factor of 0.5 + 120 ÷ 40 = 3.5. The character that empties the bar supplies the ordinary initial Break’s level and Break Effect. Separate additional effects may have their own owners.
The standard Toughness-depletion Break hit uses the unbroken-state factor B = 0.9. Ordinary attacks after the target is Broken use B = 1.0. This timing detail is easy to miss when comparing a Break pop-up with a later Super Break instance. Other mitigation still applies separately.
⚙️ 3. Super Break Damage Formula and Trigger Conditions
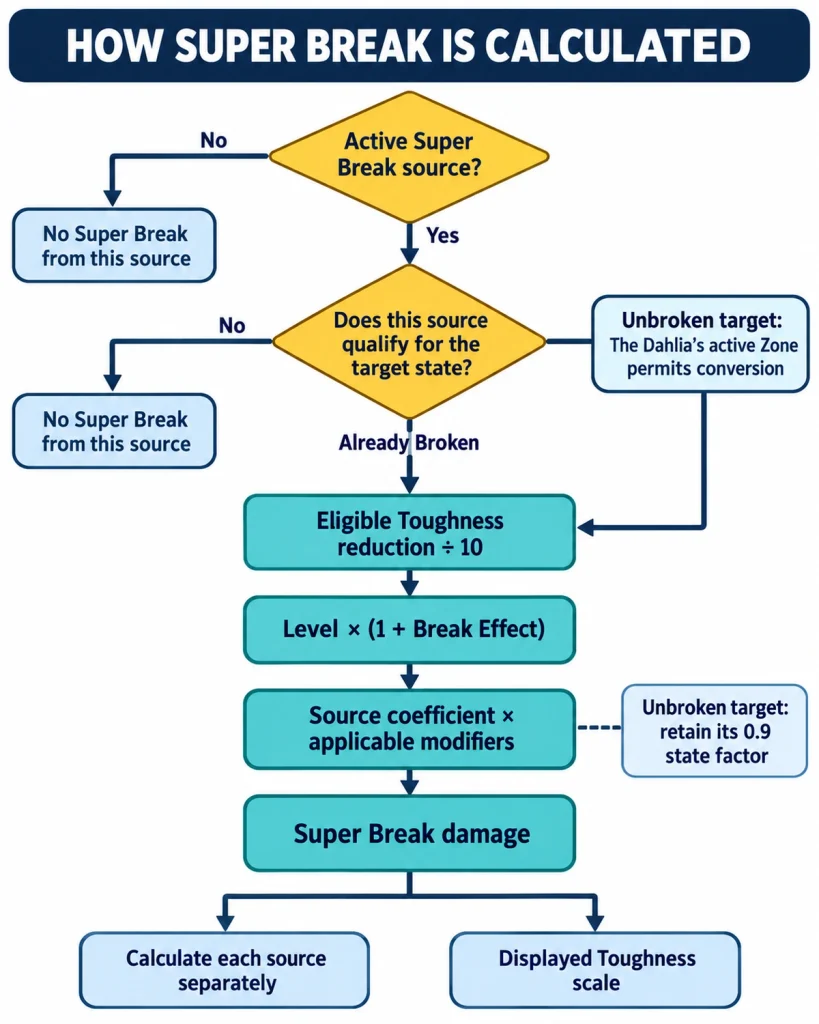
For one qualifying Super Break source against one target, the starting point is the attack’s convertible Toughness reduction. Calculate different sources and targets separately when their rules differ.
🧮 Super Break formula
Super Break DMG = L × (Teligible ÷ 10) × (1 + BE) × CSB × Gbreak × GSB × D × R × V × M × B
Teligible is the Toughness value eligible for that conversion after applicable efficiency and ability modifiers. CSB is the source’s conversion coefficient. Gbreak and GSB are the applicable Break DMG and Super Break DMG increase factors. Set an unused factor to 1. BE and L normally belong to the character whose attack produces the instance, rather than the support that enables it.
📏 3.1. Toughness units: divide by 10 or 30?
This guide uses displayed Toughness values, where a common Basic ATK reduces 10 Toughness. On that scale, divide eligible reduction by 10 for Super Break and maximum Toughness by 40 for the ordinary initial Break term.
Older spreadsheets often use values three times larger: the same Basic ATK is 30, the Super Break divisor is 30, and the maximum-Toughness divisor is 120. Both systems can describe the same damage. Mixing a modern 10-Toughness input with a legacy divisor of 30 makes the result three times too small.
| Quantity | Displayed scale used here | Legacy scale |
|---|---|---|
| Typical Basic ATK reduction | 10 | 30 |
| Super Break normalization | Teligible ÷ 10 | Teligible ÷ 30 |
| Initial Break maximum-Toughness factor | 0.5 + Tmax ÷ 40 | 0.5 + Tmax ÷ 120 |
🔑 3.2. Enablers, source coefficients and target state
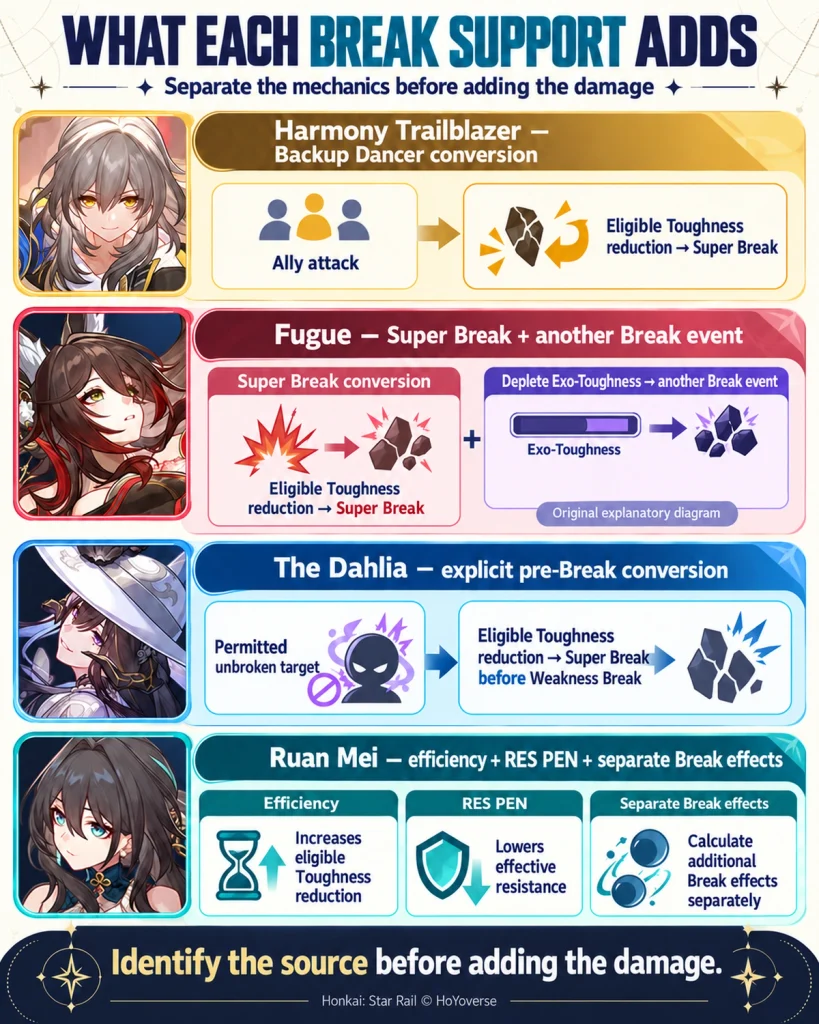
Harmony Trailblazer’s Backup Dancer, Fugue’s Talent, and native character abilities can supply Super Break. With Harmony Trailblazer, the relevant Ultimate effect must be active and the target normally needs to be Broken. With Fugue, the Talent supplies its conversion while she is on the field.
Harmony Trailblazer’s “Dance With the One” Trace strengthens the Backup Dancer source according to enemy count: +60% with one enemy, declining to +20% with five or more. In a calculation, apply that increase to the Backup Dancer contribution. It does not automatically increase every other character’s native Super Break source.
⚠️ The Dahlia is a specific exception
Her active Skill Zone allows would-be Toughness reduction to generate Super Break before an enemy is Broken, including the protected-Toughness interaction documented in current character references. The normal unbroken-state damage reduction remains relevant. Treat the Zone conversion and her post-Break Dance Partner contribution according to their own rules; do not give every source blanket permission to trigger on any target.
➕ 3.3. Multiple sources and attacks that Break midway
When more than one source qualifies, the attack can produce multiple Super Break contributions. If two instances have identical inputs and coefficients of 100% and 60%, their sum equals 160% of that shared baseline. They do not multiply into 1.6 times one another, and a bonus limited to one source stays with that source.
An attack that empties Toughness midway can contain normal damage, an initial Break, and eligible later Super Break damage. Check which hits qualify under the source’s wording. Feeding the full action’s Toughness total into every source without checking the hit timing can overestimate the result.
🧮 4. Damage Calculation Examples You Can Reproduce
📌 Controlled example, not a team damage benchmark
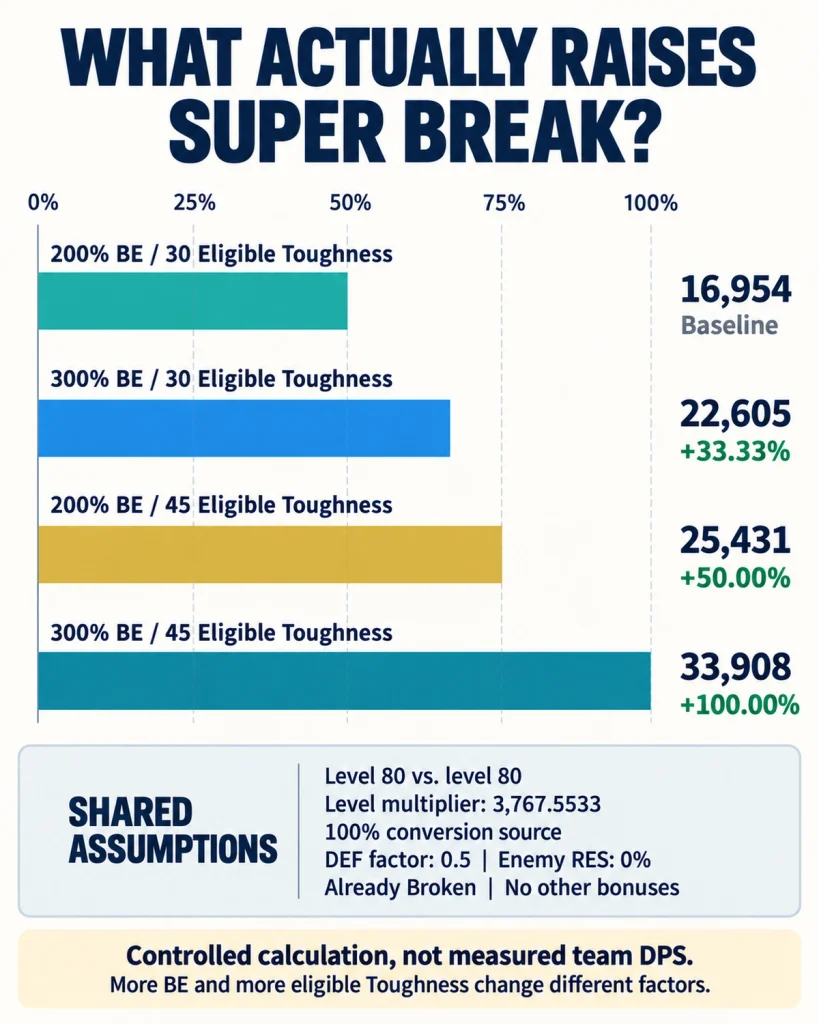
The examples below describe one damage instance. They use a level-80 attacker, a level-80 ordinary enemy, 200% in-combat Break Effect, a 100% conversion source, and no extra Break/Super Break increase, vulnerability, or mitigation. The enemy has 0% resistance to the damage type. The Super Break target is already Broken. Rounding is applied only at the displayed result.
🧾 4.1. Baseline Super Break: 16,954 damage
| Input | Value | How it enters the equation |
|---|---|---|
| Level multiplier L | 3,767.5533 | Attacker level 80 |
| Eligible Toughness reduction | 30 | 30 ÷ 10 = 3 |
| Break Effect | 200% | 1 + 2.00 = 3 |
| Source coefficient | 100% | 1.00 |
| DEF factor | 0.50 | Equal level, no DEF reduction or ignore |
| RES / vulnerability / mitigation / state | 1 / 1 / 1 / 1 | Neutral resistance and an already Broken target |
3,767.5533 × 3 × 3 × 1 × 0.5 = 16,953.98985 ≈ 16,954 Super Break DMG.
This 100% source is a neutral calculation input. If you test it with Harmony Trailblazer’s relevant Trace unlocked, include the enemy-count bonus instead of expecting this baseline to match unchanged.
💥 4.2. Initial Fire Break on a 120-Toughness enemy
Keep the same attacker, Break Effect, and defense assumptions, but calculate the ordinary initial Fire Break against an enemy with 120 maximum Toughness. Fire contributes E = 2, the maximum-Toughness factor is 3.5, and the initial depletion hit keeps B = 0.9.
3,767.5533 × 2 × 3.5 × 3 × 0.5 × 0.9 = 35,603.378685 ≈ 35,603 initial Break DMG.
💡 Why the numbers differ
The initial Break uses the enemy’s maximum Toughness and an elemental coefficient. The Super Break baseline uses the attack’s 30 eligible Toughness reduction. One large initial Break does not prove that every later Super Break hit should be equally large.
📈 4.3. More Break Effect vs. 50% more efficiency
| Change from the Super Break baseline | New result | Increase | Reason |
|---|---|---|---|
| BE 200% → 250% | 19,780 | 16.67% | Break Effect factor 3.0 → 3.5 |
| BE 200% → 300% | 22,605 | 33.33% | Break Effect factor 3.0 → 4.0 |
| Eligible Toughness 30 → 45 | 25,431 | 50.00% | An eligible 50% efficiency bonus increases that value by 1.5× |
| BE 300% and eligible Toughness 45 | 33,908 | 100.00% | 4/3 × 1.5 = 2.0 |
| Same baseline plus 20% relevant vulnerability | 20,345 | 20.00% | No other vulnerability in this example |
“200% to 300% Break Effect” means adding 100 percentage points to the stat. It increases the Break Effect damage factor by 33.33%, not 50% or 100%. The damage remains linear in the stat; the relative benefit of another fixed amount becomes smaller as the starting total grows.
For eligible ordinary attacks with no other Toughness modifiers, use final Toughness reduction = base reduction × (1 + Weakness Break Efficiency). A native efficiency bonus already present changes the relative value of adding another one, and special fixed Toughness effects can follow different rules.
🛡️ 4.4. DEF reduction, RES and vulnerability
For an ordinary enemy, no DEF bonus, and attacker level A versus enemy level N, the useful DEF expression is D = (A + 20) ÷ [(A + 20) + (N + 20) × max(0, 1 − DEF reduction − DEF ignore)]. Apply only the reduction and ignore that qualify for the damage instance.
| Combined applicable DEF reduction + ignore | DEF factor, level 80 vs. 80 | Super Break result | Gain vs. no reduction |
|---|---|---|---|
| 0% | 0.5000 | 16,954 | — |
| 20% | 0.5556 | 18,838 | 11.11% |
| 40% | 0.6250 | 21,192 | 25.00% |
| 60% | 0.7143 | 24,220 | 42.86% |
| 80% | 0.8333 | 28,257 | 66.67% |
| 100% | 1.0000 | 33,908 | 100.00% |
DEF reduction is therefore not a one-for-one damage percentage. In this equal-level example, the first 20% raises damage by 11.11%. The value of the next reduction depends on the modifiers already active. Enemy level and special DEF bonuses change the result.
The usual resistance factor is R = 1 − (enemy RES − applicable RES PEN), within the game’s supported bounds. At 20% RES, the baseline becomes about 13,563. Bringing that resistance to 0% restores 16,954, a 25% relative increase. A weakness implant does not automatically erase the enemy’s existing resistance.
Relevant vulnerability is another factor. With no other vulnerability, +20% Break DMG taken multiplies eligible Break and Super Break by 1.20. If the target already has +20% applicable vulnerability, adding another 20 percentage points changes 1.20 to 1.40, which is a 16.67% increase over the previous result.
📊 Calculation summary
Separate the factors before comparing upgrades: Break Effect, eligible Toughness, conversion coefficient, Break/Super Break increases, DEF, RES, vulnerability, and target state. Bonuses inside the same additive category usually offer a smaller relative gain when that category is already large.
📊 5. Which Stats Scale Break and Super Break?
| Stat or effect | Initial Break | Super Break | Practical consequence |
|---|---|---|---|
| Attacker level | Direct level multiplier and DEF interaction | Direct level multiplier and DEF interaction | Level damage contributors before chasing small substat gains |
| Break Effect | Yes | Yes | Use in-combat values, including active buffs |
| Eligible Toughness reduction / efficiency | Efficiency does not directly multiply the initial standard hit | Yes | A larger valid Toughness value gives more converted damage |
| Enemy maximum Toughness | Yes | Not a generic direct term | Specific character mechanics can introduce their own dependence |
| CRIT Rate / CRIT DMG | No, under the standard rules | No, under the standard rules | The separate normal attack component may still CRIT |
| ATK, HP or DEF scaling attribute | Not a direct input | Not a direct input | A character’s conversion or threshold can make a stat useful indirectly |
| Ordinary DMG Bonus / elemental DMG Bonus | Does not normally apply | Does not normally apply | Read whether an effect explicitly increases Break-related damage |
| Applicable Break DMG increase | Yes | Yes | Distinct from ordinary DMG Bonus |
| Super Break-specific increase | No | Yes, to qualifying sources | Respect the source or target restrictions |
| DEF / RES debuffs and applicable vulnerability | Yes | Yes | A debuff can help without adding Break Effect |
| SPD and action advance | More chances to Break | More damage opportunities | Action count and buff uptime affect total fight output |
⬆️ 5.1. Why level 80 matters
| Attacker level | Break level multiplier | Super Break in the same level-80-enemy example |
|---|---|---|
| 70 | 2,659.6406 | 11,338 |
| 75 | 3,239.9758 | 14,206 |
| 80 | 3,767.5533 | 16,954 |
The underlying level multiplier rises by about 41.66% from 70 to 80. Against the same ordinary level-80 enemy, the DEF interaction makes this controlled Super Break example rise by about 49.53%. That is why a level-70 support contributing serious Super Break can be a bigger upgrade opportunity than one missing Break Effect roll.
For F2P players, the character leveling and material guide is useful when planning that guaranteed upgrade before another week of relic farming.
🎚️ 5.2. Thresholds are specific to kits and equipment
| Effect | Relevant threshold or condition | What the threshold means |
|---|---|---|
| Firefly’s enhanced Module β, after Version 4.2 Novaflare | 150% / 300% in-combat BE during Complete Combustion | 100% / 150% native Super Break conversion against eligible Broken targets |
| Fugue’s Phecda Primordia Trace | 220% BE | Improves the Break Effect buff produced by that Trace |
| Ruan Mei’s Candle Lights on Still Waters | 180% in-combat BE completes its stated scaling | Caps that Trace’s ordinary DMG Bonus contribution, not universal Break scaling |
| Iron Cavalry Against the Scourge, 4-piece | 150% / 250% BE | Activates 10% Break DEF ignore, then an additional 15% DEF ignore for Super Break |
| Gallagher’s healing conversion Trace | 150% BE reaches its stated healing-conversion cap | A healing threshold; his Break damage can still benefit from additional BE |
⚠️ There is no universal 360% Break Effect cap
A cap on a skill coefficient, healing conversion, or equipment activation threshold does not cap the underlying Break Effect factor. Firefly’s enhanced skill coefficient and her Super Break conversion are separate calculations. Check the actual kit version before copying a stat target from an older build.
🧩 6. Character Mechanics That Change the Calculation
| Character | Mechanic to identify | How to model it |
|---|---|---|
| Harmony Trailblazer | Backup Dancer and its enemy-count Trace | Calculate the attack owner’s conversion and apply the Trace to that source |
| Fugue | Teamwide Super Break and Cloudflame Luster / Exo-Toughness | Separate the extra Break event from the Super Break instance |
| The Dahlia | Pre-Break Zone conversion and Dance Partner effects | Check source eligibility and retain the target’s current state modifier |
| Ruan Mei | Efficiency, RES PEN, and separate Break-related damage | Apply eligible buffs to the ally’s instance; calculate her additional effects separately |
| Firefly | Native Super Break and ATK-to-Break conversion | Use in-combat BE after her conversion; ATK is not a direct Super Break term |
| Boothill | Native Break retriggering | Use the Talent’s Break rules and its stated Toughness limit; do not label every retrigger as Super Break |
| Rappa | Break-triggered Charge and native Super Break | Separate Charge-based Break damage from her qualifying Super Break contribution |
| Gallagher / Lingsha | Healing, Toughness reduction, and Break vulnerability | Track their own attacks and the debuff affecting each damage instance |
🔥 6.1. Why Fugue adds more than another multiplier
Fugue’s Exo-Toughness can create another Break event after the original bar is depleted. That can matter to characters that gain resources or deal additional damage when a Break happens. It is a separate benefit from enabling Super Break on attacks against a Broken enemy. Her DEF debuff adds another distinct calculation layer.
Use the Fugue build guide for her own gear and rotation details once you have identified which part of her kit your carry needs.
🧠 6.2. Hybrid damage and indirect scaling
Xueyi is a useful reminder that a character’s total damage can include a conventional component and a Break component. A Break-oriented team does not automatically make every CRIT or ATK roll useless. Conversely, Firefly benefiting from ATK through a kit conversion does not mean that the Super Break formula itself has an ATK term.
💡 Best use case
Use this guide to explain why a teammate changes your damage. For complete four-character lineups, replacements, and mode-specific recommendations, follow the separate team composition guide rather than turning one formula example into a universal best-team claim.
🕹️ 7. How to Test Break Damage Without Misreading the Result
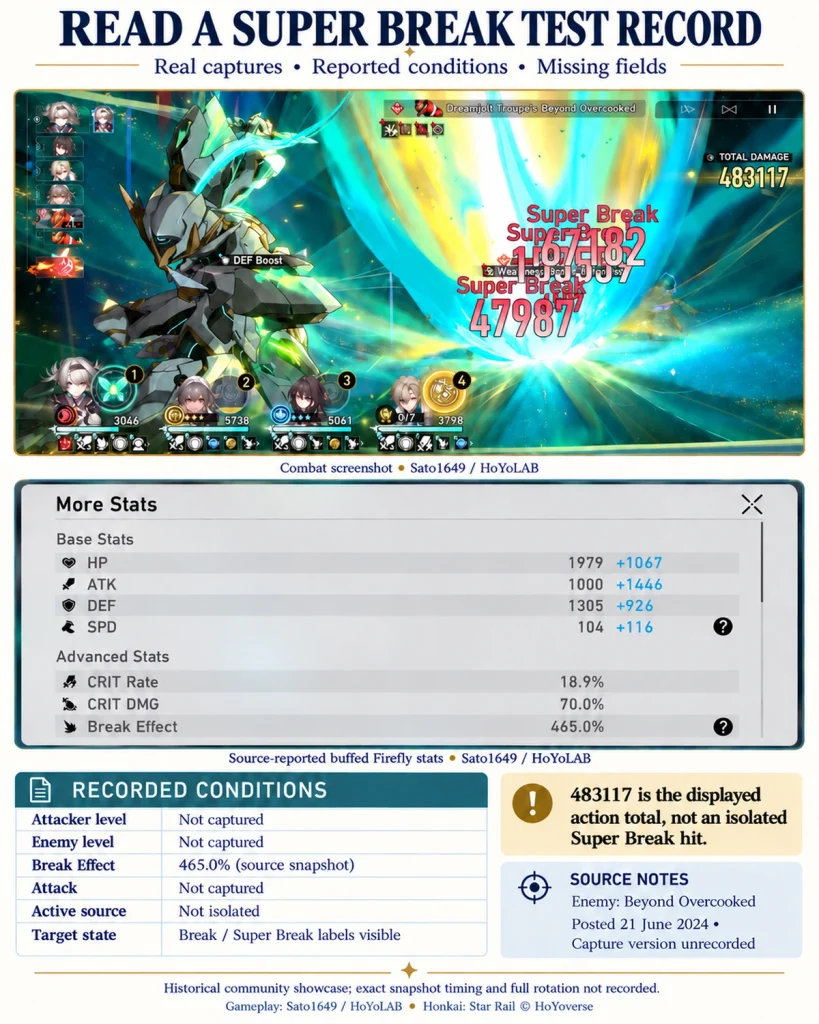
A useful comparison changes one input at a time. A Calyx wave, an endgame boss, and a Simulated Universe run can have very different levels, resistances, and combat modifiers, so their pop-up numbers are not automatically comparable.
🔬 7.1. Record the conditions, not just the damage pop-up
- Choose the same enemy, difficulty, wave, and phase. Record the enemy level.
- Use the same attacker level, attack, targets hit, and active Super Break source.
- Check in-combat Break Effect immediately before the attack, including temporary buffs.
- Record efficiency, DEF reduction/ignore, RES PEN, relevant vulnerability, and special stage effects.
- Confirm whether the enemy was already Broken, was Broken during the attack, or qualified through a specific exception.
- Separate ordinary attack damage, initial Break, native Break retriggers, and different Super Break sources where the game’s presentation allows.
- Repeat with one controlled change. Treat multi-target totals and multi-hit pop-ups carefully.
⏱️ 7.2. One stronger hit can still mean a slower clear
Suppose a lower-BE setup deals 16,954 per qualifying action and takes three such actions in the window: about 50,862 total. A higher-BE setup deals 22,605 but only acts twice: about 45,211. These simplified totals ignore normal damage and other teammates, but they show why action count can outweigh a bigger screenshot.
Use the Speed breakpoint guide to check actual turns, buffs, and action advances before trading a needed SPD roll for more Break Effect.
✅ 7.3. Low damage troubleshooting checklist
- ☐ A native or external Super Break source is actually active.
- ☐ The target meets that source’s conditions.
- ☐ The attack has a non-zero eligible Toughness value.
- ☐ The damage contributor is leveled appropriately.
- ☐ The BE shown in the calculation is the attacker’s in-combat BE.
- ☐ Toughness inputs and divisors use the same unit convention.
- ☐ Buffs and debuffs last through the important action.
- ☐ Enemy resistance, mitigation, and stage rules are included.
- ☐ Enough Skill Points remain to take the high-value actions.
- ☐ The comparison uses the same source and separates different damage components.
🌱 8. F2P Upgrade Priorities: Guaranteed Gains Before Perfect Relics
For F2P players, begin with upgrades whose benefit you can identify before spending resources. A functioning source, a leveled attacker, and a repeatable action sequence usually deserve attention before a tiny increase in a single relic’s score.
| Priority | Upgrade | Why it can help | Stop and check |
|---|---|---|---|
| 1 | Unlock the required source and major Traces | Creates or strengthens the conversion you are trying to calculate | Does the team actually have that source active? |
| 2 | Level major Break damage contributors | Raises their level factor and improves the DEF interaction | Which teammates contribute meaningful Break damage? |
| 3 | Reach the relevant kit or equipment threshold | Activates a defined benefit | Use the current kit and in-combat conditions |
| 4 | Fix SPD, Energy, and Skill Point flow | Keeps the source active and preserves attack count | Does the carry act before setup or run out of SP? |
| 5 | Equip useful main stats and refine BE substats | Improves the build once the rotation functions | Does the upgrade cost a necessary turn or survival? |
| 6 | Consider premium characters, cones, or Eidolons | Adds new mechanics or stronger eligible modifiers | Compare the whole team improvement and resource cost |
🧱 8.1. Relic main stats are character-specific
SPD Boots and a Break Effect Rope are common starting points for damage-oriented Break builds, but supports may need an Energy Regeneration Rope, Effect Hit Rate, healing, or defensive stats. Firefly’s ATK conversion and Xueyi’s hybrid profile also change the tradeoff. A low-damage calculation alone is not a reason to give every teammate the same four main stats.
Judge a relic by the effect it has on the finished build: a threshold reached, a turn preserved, a source maintained, or a useful damage factor increased. A conventional CRIT-weighted score cannot answer all of those questions.
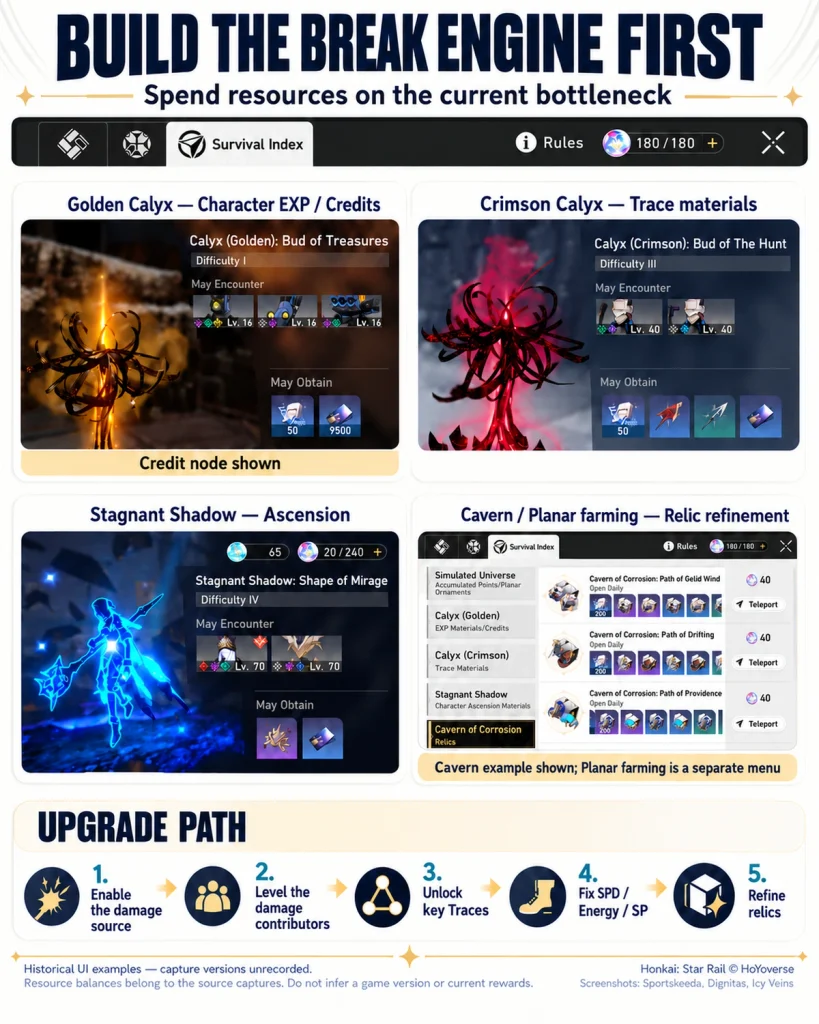
⚡ 8.2. Spend Trailblaze Power on the current bottleneck
Use Golden Calyx farming when character EXP or Credits block levels, Crimson Calyx farming when an important Trace is missing, and Stagnant Shadow when Ascension is the restriction. Move to Caverns and Planar farming when the guaranteed upgrades and rotation requirements are in place. Do not spend a week chasing BE while the actual problem is an unbuilt enabler.
The Trailblaze Power spending guide helps turn that bottleneck into a practical farming plan without spreading resources across several unfinished teams.
💡 Budget sustain note
A healer that survives and funds the rotation can be more useful than a damage-oriented sustain build that collapses. Gallagher is a 4-star Warp character, so “budget-friendly” does not mean every account owns him. Use a reliable available sustain while the rest of the engine develops.
🗓️ 9. Character and Light Cone Banner History for Break Planning
These compact tables record the original release banners of the characters and signature Light Cones discussed here. They are release-history references, not a current banner schedule or a complete rerun list. Dates use the Asia/EU release calendar; maintenance launches can appear on the previous date in the Americas. The full banner history is the better place for a broader chronological view.
👤 9.1. Character Banner History table
| Character | First featured banner | Asia/EU debut date | Relevance to the calculation |
|---|---|---|---|
| Ruan Mei | Version 1.6, Phase I | December 27, 2023 | Efficiency, RES PEN, and separate Break effects |
| Gallagher | Version 2.1, Phase I — 4-star rate-up | March 27, 2024 | Sustain, own Toughness contribution, Break vulnerability |
| Boothill | Version 2.2, Phase II | May 29, 2024 | Native Break retriggering |
| Firefly | Version 2.3, Phase I | June 19, 2024 | Native Super Break and ATK conversion; later kit enhancement |
| Lingsha | Version 2.5, Phase II | October 2, 2024 | Sustain, own Toughness contribution, Break vulnerability |
| Rappa | Version 2.6, Phase I | October 23, 2024 | Charge-based Break damage and native Super Break |
| Fugue | Version 2.7, Phase II | December 25, 2024 | Teamwide conversion and Exo-Toughness |
| The Dahlia | Version 3.8, Phase I | December 17, 2025 | Pre-Break conversion and Dance Partner effects |
Harmony Trailblazer: released as a free protagonist Path in Version 2.2, not as a limited character banner. Gallagher’s row is a 4-star rate-up debut, which also should not be described as a limited 5-star rerun.
🔦 9.2. Light Cone Banner History table
| Signature Light Cone | Associated character / Path | First featured banner | Asia/EU debut date |
|---|---|---|---|
| Past Self in Mirror | Ruan Mei / Harmony | Version 1.6, Phase I | December 27, 2023 |
| Sailing Towards a Second Life | Boothill / The Hunt | Version 2.2, Phase II | May 29, 2024 |
| Whereabouts Should Dreams Rest | Firefly / Destruction | Version 2.3, Phase I | June 19, 2024 |
| Scent Alone Stays True | Lingsha / Abundance | Version 2.5, Phase II | October 2, 2024 |
| Ninjutsu Inscription: Dazzling Evilbreaker | Rappa / Erudition | Version 2.6, Phase I | October 23, 2024 |
| Long Road Leads Home | Fugue / Nihility | Version 2.7, Phase II | December 25, 2024 |
| Never Forget Her Flame | The Dahlia / Nihility | Version 3.8, Phase I | December 17, 2025 |
⚠️ Current-banner update rule
A historical release date does not establish present availability or predict the next rerun. Update any current or upcoming banner claim only after the latest official HoYoverse Warp announcement, including the exact banner type, server dates, and featured item. This guide does not label a historical banner as live.
🎟️ 10. Pull or Save? Decide from the Missing Mechanic
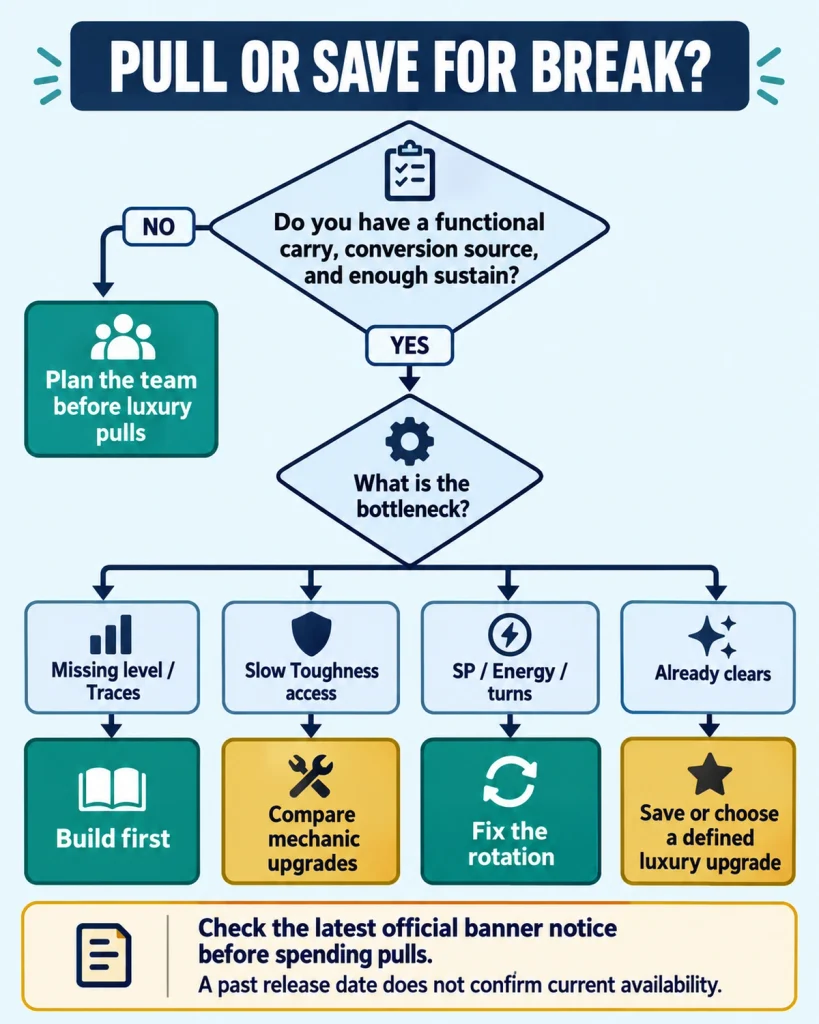
From a planning perspective, identify the missing mechanic first. More Break Effect cannot compensate for an absent source, and a signature cone cannot make a rotation work if there are no Skill Points left for the carry. Track the budget and guarantee with the pull planning guide before comparing upgrades.
| Your situation | Pull or save? | Priority | Reason |
|---|---|---|---|
| No coherent Break team and no carry you want | Save while planning | A preferred carry and compatible available supports | Specialized upgrades have limited value without a team to use them |
| A built carry spends too long waiting for Break | Consider a mechanic upgrade | Compare efficiency, weakness access, and The Dahlia’s pre-Break conversion | Different upgrades solve different causes of downtime |
| Your carry benefits strongly from additional Break events | Consider Fugue when officially available | Exo-Toughness and supporting utility | Another Break event can improve kit resources as well as damage |
| You have a free Super Break source but missing core Traces or levels | Save pulls and build first | Guaranteed progression upgrades | Fix the source and level inputs before buying a larger multiplier |
| The team already clears and survives comfortably | Usually save | Only a clearly useful upgrade | A larger damage screenshot may not solve a real clear problem |
| You are missing multiple functional team slots | Usually save on signature cones | Complete the character engine | A new teammate can add an entire mechanic or reliable sustain |
| The team is complete and you want more investment | Compare carefully | A suitable cone or Eidolon versus a future character | Calculate changes to qualifying factors and actual action count |
| A rerun is rumored, with no official notice | Save and wait | Official confirmation | A past date or rumor is not a current banner |
🪙 F2P planning rule
Build the damage source and rotation first, improve guaranteed character inputs next, and spend premium pulls when an upgrade addresses a specific limitation. Compare alternatives for your roster rather than following one universal pull order.
❓ 11. HSR Break Effect and Super Break FAQ
💬 11.1. What is the difference between Break Effect and Super Break?
Break Effect is a stat that strengthens Break-related damage and certain specified effects. Super Break is a damage conversion enabled by an ability. Increasing the stat improves a qualifying conversion, but it does not grant the conversion by itself.
💬 11.2. Does Break Effect make the Toughness bar disappear faster?
No. Ordinary Toughness reduction depends on the attack and eligible efficiency or ability modifiers. Break Effect strengthens the resulting damage. Some characters connect the stat to other kit effects, so read the specific ability rather than assuming a universal rule.
💬 11.3. Can Super Break damage CRIT?
Under the standard rules, no. The ordinary damage portion of the same attack may CRIT, which can make the combined display misleading. CRIT can still matter to a hybrid character’s total damage even though it does not multiply the Super Break instance.
💬 11.4. Does ATK increase Super Break damage?
ATK is not a direct term in the Super Break equation. It can help indirectly when a character converts ATK into Break Effect or has an ATK-based condition that changes a relevant effect. Firefly’s kit conversion is a clear example of that distinction.
💬 11.5. Does Fire or Physical deal more Super Break because of its element?
There is no universal Fire or Physical 2× Super Break coefficient. Those coefficients belong to the ordinary initial Break hit. Element still affects weakness matching and resistance, and individual kits can make one character’s attacks more effective than another’s.
💬 11.6. How much Break Effect do I need? Is 360% a cap?
There is no universal 360% cap on Break Effect damage scaling. Meet relevant current kit and equipment thresholds, then compare additional BE with SPD, Energy, survival, and attack count. A threshold that caps one Trace or coefficient does not cap every damage instance.
💬 11.7. Can Super Break happen before an enemy is Weakness Broken?
The common Harmony Trailblazer route needs a Broken enemy. The Dahlia’s active Zone supplies an explicit pre-Break conversion exception. The permission belongs to that mechanic, so check the source’s conditions and the target-state factor in the calculation.
💬 11.8. Whose Break Effect is used: the attacker’s or the support’s?
For the usual attack-triggered Super Break instance, use the attacking character’s level and in-combat Break Effect. The support supplies the enabling effect and may add buffs. A separately triggered damage effect can have its own owner and must be calculated by its own rules.
💬 11.9. Does a larger enemy Toughness bar increase Super Break damage?
Not through the generic Super Break equation: it uses eligible Toughness reduction of the attack. Enemy maximum Toughness does increase the standard initial Break term. A particular character’s ability may separately reference maximum Toughness, so keep that ability-specific damage distinct.
💬 11.10. Why is my Super Break lower than a guide’s number?
Check attacker and enemy levels, in-combat BE, eligible Toughness, the source coefficient, active debuffs, resistance, and target state. Also confirm that the guide uses the same Toughness unit scale. A multi-source or multi-target total is not comparable to one isolated instance.
✅ 12. A Practical Break Damage Review
🎯 Before you change the build
Identify the damage type and its owner. Check the active conversion source and qualifying target state. Use the correct Toughness scale, then include the relevant damage factors. Finally, confirm that the upgrade preserves enough actions, Energy, Skill Points, and survival to use those factors in combat.
For roster-specific next steps, the Break team composition guide covers complete teams and replacements. Keep the calculation here focused on why those choices work.
📚 13. Sources
Review date: October 4, 2026. The equations use displayed Toughness units. Worked examples are transparent calculations with stated assumptions, not measured team DPS, account screenshots, or claimed personal playtesting. The banner tables intentionally cover debut records rather than current availability.
🏛️ 13.1. Official HoYoverse references
- HoYoLAB: Firefly Novaflare announcement — official enhancement reference for checking the Version 4.2 kit.
- HoYoverse: Version 3.8 update notice — The Dahlia release context.
- HoYoverse: Version 2.7 update notice — Fugue release context.
- HoYoverse: Version 2.6 update notice — Rappa release context.
- HoYoverse: Version 2.5 update notice — Lingsha release context.
- HoYoverse: Version 2.3 update notice — Firefly release and Harmony Trailblazer acquisition context.
- HoYoverse: Version 2.2 update notice — Boothill and Harmony Trailblazer release context.
- HoYoverse: Version 1.6 update notice — Ruan Mei release context.
- Official Honkai: Star Rail site — current notices and official promotional material. Official character art and genuine game captures are the visual asset sources for this guide.
🔍 13.2. Formula, kit and historical-data cross-checks
- Honkai: Star Rail Wiki — Toughness and Break Effect — the calculation structure, Toughness conventions, element coefficients, and Break-related stat definitions.
- Prydwen — Damage Formula — DEF, RES, vulnerability, and mitigation cross-checks.
- Prydwen — Harmony Trailblazer — Backup Dancer and its enemy-count Trace; Fugue — Super Break, Exo-Toughness, and the 220% Trace condition.
- Prydwen — Firefly — enhanced native conversion and indirect ATK scaling; The Dahlia — pre-Break and protected-Toughness conversion interactions.
- Prydwen — Boothill, Rappa, and Ruan Mei — separate native Break mechanics and ability-specific scaling.
- KQM — Gallagher Quick Guide and Lingsha Quick Guide — sustain contributions and the difference between healing thresholds and damage scaling.
- Game8 — Iron Cavalry Against the Scourge — relic activation conditions.
- Game8 — Version 1.6, Version 2.2, Version 2.6, Version 2.7, and Version 3.8 — historical character and matching Light Cone release records, including regional date differences.
- Game8 — Version 2.1 — Gallagher’s first 4-star rate-up; character release archive — additional debut cross-checks, with the listed server calendar taken into account.
- HSR Wiki — Whereabouts Should Dreams Rest and Scent Alone Stays True — availability records for the Firefly and Lingsha signature Light Cones.