

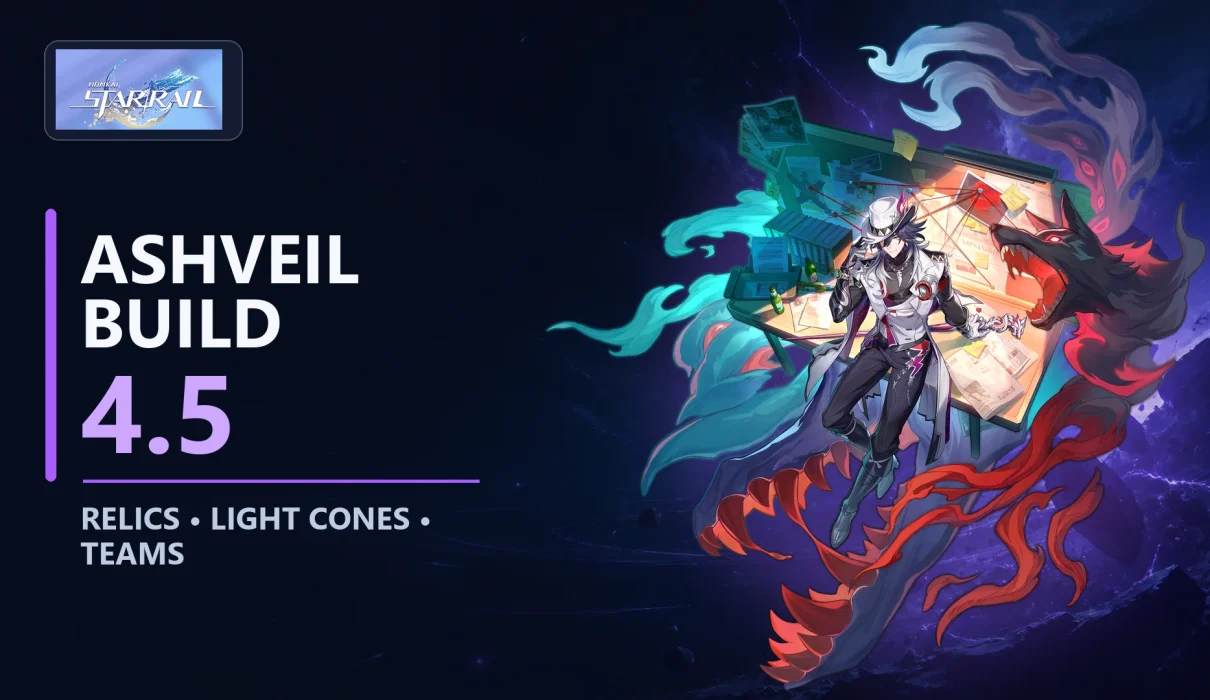
The best Ashveil build in HSR uses 4-piece The Ashblazing Grand Duke, a CRIT Rate body, ATK boots, a Lightning DMG sphere, and an ATK rope. His signature, The Finale of a Lie, is the strongest all-round Light Cone, while Cruising in the Stellar Sea S5 is the practical free-to-play choice. Build toward 90–100% in-combat CRIT Rate, at least 3,000 ATK, and enough CRIT DMG to make his repeated follow-up attacks count.
Ashveil is a 5-star Lightning character on the Path of The Hunt, but he does more than fill a traditional single-target carry slot. He marks one enemy as Bait, lets allies trigger his follow-up attacks, restores fixed Energy through those triggers, and exposes the marked target through a powerful DEF reduction. That gives him two real identities: a main damage dealer built around fast allies, or a hybrid sub-DPS and amplifier beside another follow-up carry.
This guide is written for the live Version 4.5 environment on August 26, 2026. I separate confirmed kit behavior from early-patch team judgment, because a useful build guide should help you spend resources now without pretending that every new composition has already been solved.
Contents
- 1 ⚡ Quick Answer
- 2 1. ⚡ Ashveil Quick Build
- 3 2. 🎯 How Ashveil Works
- 4 3. 🧥 Best Relics for Ashveil
- 5 4. 📊 Best Ashveil Stats and Speed Targets
- 6 5. 💡 Best Light Cones for Ashveil
- 7 6. 🌳 Trace Priority and Major Traces
- 8 7. 🤝 Best Ashveil Teams in HSR 4.5
- 9 8. 🗡️ Mortenax Blade Synergy: Why the Pair Works
- 10 9. 🔄 Best Ashveil Rotation and Combat Rules
- 11 10. 🆓 Ashveil F2P Build and Low-Cost Team
- 12 11. ✨ Ashveil Eidolons and Signature Priority
- 13 12. 🎟️ Should You Pull Ashveil or Save?
- 14 13. 📅 Ashveil Character and Light Cone Banner History
- 15 14. ⚠️ Common Ashveil Build Mistakes
- 16 15. ❓ Ashveil Build FAQ
- 16.1 ❓ What is the best Relic set for Ashveil?
- 16.2 ❓ What main stats should Ashveil use?
- 16.3 ❓ Does Ashveil need SPD boots?
- 16.4 ❓ What is Ashveil’s best F2P Light Cone?
- 16.5 ❓ Is The Finale of a Lie worth pulling?
- 16.6 ❓ Is Ashveil good at E0S0?
- 16.7 ❓ Does Ashveil need Mortenax Blade?
- 16.8 ❓ What is Ashveil’s best team in Version 4.5?
- 16.9 ❓ Is Ashveil good in Pure Fiction?
- 16.10 ❓ How does Ashveil’s Bait work?
- 16.11 ❓ Does Energy Regeneration Rate increase Ashveil’s 8 Energy trigger?
- 16.12 ❓ Is Duran or City of Converging Stars better?
- 16.13 ❓ When is Ashveil’s next banner?
- 17 16. ✅ Final Ashveil Build Summary
- 18 17. 📝 Sources & Update Notes
⚡ Quick Answer
Ashveil’s best HSR build uses 4-piece The Ashblazing Grand Duke, Duran, a CRIT Rate body, ATK boots, a Lightning DMG sphere, and an ATK rope. Equip The Finale of a Lie or Cruising in the Stellar Sea S5. Pair him with frequent attackers such as Mortenax Blade, then spend Charges before using Ultimate at 8–12 Gluttony.
1. ⚡ Ashveil Quick Build
If you only need the setup before entering a Cavern of Corrosion, use the configuration below. It is the safest general build for E0 Ashveil and does not depend on a perfect premium team.
| Build Slot | Best General Choice | Practical Alternative |
|---|---|---|
| Relic Set | 4-pc The Ashblazing Grand Duke | 4-pc Pioneer Diver of Dead Waters |
| Planar Set | Duran, Dynasty of Running Wolves | City of Converging Stars / Inert Salsotto |
| Light Cone | The Finale of a Lie S1 | Cruising in the Stellar Sea S5 |
| Body | CRIT Rate | CRIT DMG only if CRIT Rate is already secure |
| Feet | ATK% | SPD for a tuned rotation or dual-DPS setup |
| Planar Sphere | Lightning DMG Boost | ATK% with clearly better substats |
| Link Rope | ATK% | Energy Regeneration Rate only for a tested niche rotation |
| Substats | CRIT Rate = CRIT DMG > ATK% > SPD | Do not chase SPD at the cost of strong CRIT rolls |
| Trace Priority | Skill ≥ Talent = Ultimate >>> Basic ATK | Unlock all three major traces |
Practical rule: A finished set with correct main stats and strong CRIT rolls beats a “best-in-slot” four-piece set made from weak pieces. In my experience, Ashveil feels much better when you finish his CRIT Rate first and optimize the last set bonus second.
✅ Build-Ready Checklist
- ☐ CRIT Rate reaches roughly 90–100% after all reliable battle buffs.
- ☐ ATK reaches approximately 3,000 or more at level 80 with a leveled Light Cone.
- ☐ Ashveil is not accidentally over 100% effective CRIT Rate.
- ☐ The team includes at least one ally who attacks frequently.
- ☐ A real sustain is included for normal progression and endgame clears.
- ☐ Skill, Talent, Ultimate, and all major traces are upgraded.
- ☐ Bait is manually placed on the enemy the team will actually attack.
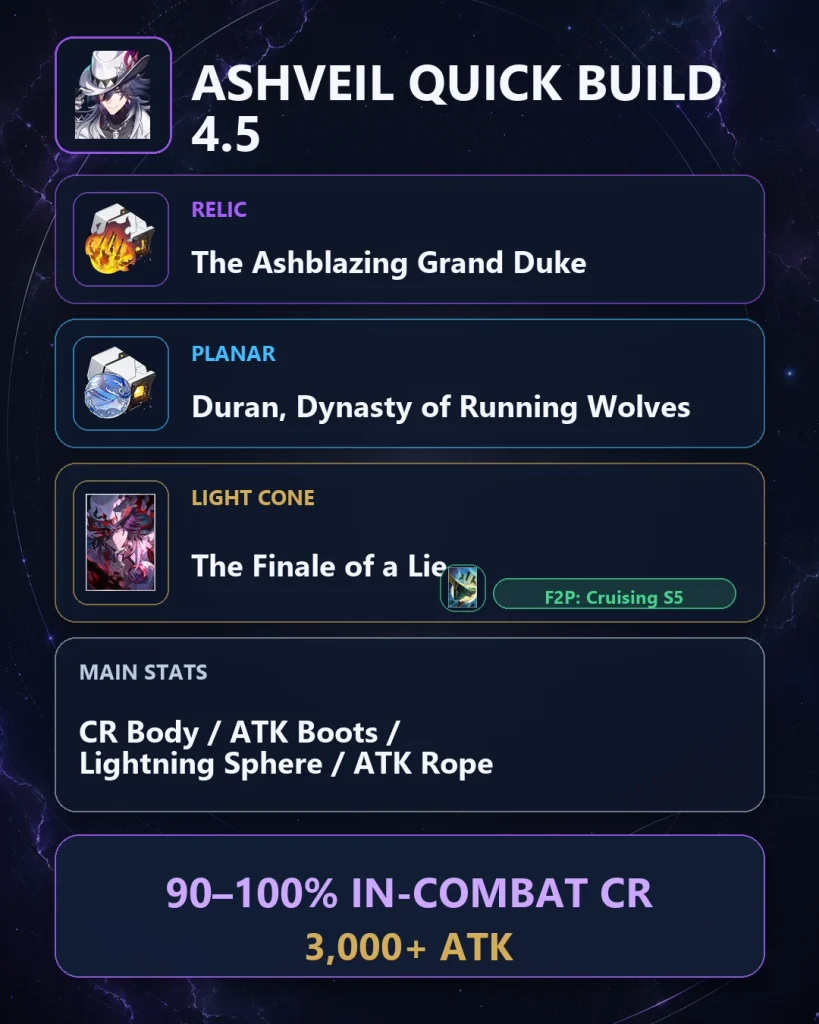
Image: Honkai: Star Rail © HoYoverse
2. 🎯 How Ashveil Works
Ashveil’s damage is not primarily about taking more turns himself. His engine starts when other allies attack the marked enemy. Each qualifying ally attack can consume one Charge, restore a fixed amount of Energy to Ashveil, and launch his Talent follow-up attack. That is why his best partners are active attackers, not supports who only advance turns or cast non-damaging buffs.
| Kit Part | Live Behavior at Trace Level 10 | Build Meaning |
|---|---|---|
| Basic ATK | Deals 100% of Ashveil’s ATK as Lightning DMG to one enemy. | Low upgrade priority; use when conserving Skill Points. |
| Skill | Deals 200% ATK, marks the target as Bait, and deals an additional 100% ATK if the target was already Bait. Casting on current Bait refunds 1 Skill Point. | Repeated casts on the same target are effectively net-zero SP, but Ashveil still needs 1 SP available to cast. |
| Bait effect | Only one Bait can exist. While it exists, all enemies have DEF reduced by 40%. | Ashveil contributes team damage even when he is not the largest damage dealer. |
| Talent | Starts with 2 Charge, holds up to 3. When another ally attacks Bait, Ashveil gains 8 fixed Energy, consumes 1 Charge, launches a 200% ATK follow-up attack, and gains 2 Gluttony. | Frequent attacking allies improve Energy, damage, and Ultimate scaling at the same time. |
| Ultimate | Costs 150 Energy, deals 400% ATK, moves Bait, restores 3 Charge, and launches an enhanced follow-up attack without consuming Charge. Every 4 Gluttony adds another 200% ATK instance, up to 12 Gluttony at E0. | Ultimate timing matters; use it after building Gluttony when the extra instances will land on a valuable target. |
| Technique | Dazes enemies before battle. Entering combat against a dazed target deals 100% ATK as AoE Lightning DMG and grants 1 Charge. | Use it before difficult encounters to begin with a fuller follow-up cycle. |
2.1 🪤 Bait, Charge, and Gluttony Explained
- Place Bait: Use Skill on the priority enemy. If Bait is absent, the game can assign it automatically to the lowest-HP enemy, but manual placement is more reliable.
- Trigger follow-ups: When a different ally attacks Bait, one Charge is consumed and Ashveil launches his Talent follow-up.
- Gain fixed Energy: Each trigger restores 8 Energy. Energy Regeneration Rate does not multiply this fixed restoration, which lowers the value of an ERR rope.
- Build Gluttony: Talent follow-ups normally add 2 Gluttony. His major trace also adds Gluttony through Skill, Ultimate, and qualifying follow-up kills.
- Cash out with Ultimate: The Ultimate restores all 3 Charges and adds extra damage instances for every 4 Gluttony, up to three extra instances at E0.
Important trigger rule: One ally attack action can trigger Ashveil only once, even if that attack has multiple hits. Count attacking actions—not animation hits—when judging a teammate’s synergy.
2.2 🧭 Main DPS or Sub-DPS?
| Role | How to Build | Best When |
|---|---|---|
| Main DPS | ATK boots, Duran, premium amplifier, high-frequency attacking support, sustain. | You want Ashveil to receive the largest share of buffs and deal most of the team’s damage. |
| Hybrid sub-DPS | SPD boots may help; City of Converging Stars becomes more attractive; preserve high CRIT Rate. | Mortenax Blade or Feixiao is also taking frequent offensive actions. |
| Team amplifier | E0S0 is enough; prioritize reliable Bait uptime and survival over luxury personal upgrades. | The team values his 40% DEF reduction and frequent additional attacks as much as his own damage. |
From a planning perspective, this flexibility is Ashveil’s biggest strength. It is also why a single damage spreadsheet cannot settle every build question: a Light Cone that wins personal damage can lose team value, and a slower ATK-boot build can outperform a faster build when action advance already supplies his turns.
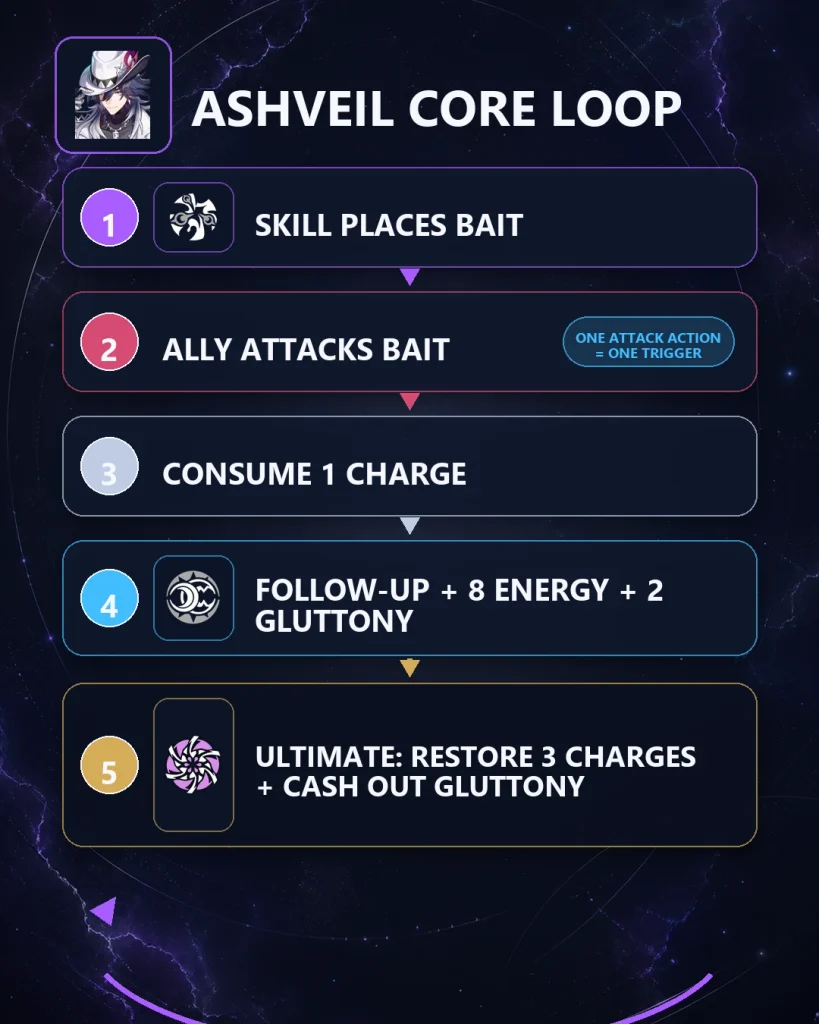
Image: Honkai: Star Rail © HoYoverse
3. 🧥 Best Relics for Ashveil
The Ashblazing Grand Duke is Ashveil’s best general Relic set because follow-up attacks are a large, repeatable share of his damage and the set rewards that exact pattern. It works in both main-DPS and dual-DPS teams, so it is the most efficient target if you want one build that survives future team changes.
| Rank | Relic Set | Why It Works | When to Use It |
|---|---|---|---|
| 1 | 4-pc The Ashblazing Grand Duke | Directly improves follow-up damage and converts follow-up hits into a strong ATK increase. | Best default for nearly every Ashveil role. |
| 2 | 4-pc Pioneer Diver of Dead Waters | Ashveil’s DEF reduction helps activate Pioneer, but the team must maintain enough total debuffs to unlock the set’s highest CRIT bonus. | Excellent when your full team maintains enough debuffs and the pieces have better substats. |
| 3 | 2-pc follow-up + 2-pc Lightning/ATK | Gives unconditional damage while you assemble a strong four-piece set. | Best transition build and often better than forcing weak four-piece pieces. |
| 4 | 4-pc Band of Sizzling Thunder | Provides Lightning DMG and an ATK bonus after Skill. | Usable if already farmed; not worth entering an old Cavern specifically for Ashveil. |
Best farming rule: Keep a high-quality 2+2 setup until your Grand Duke four-piece is genuinely stronger. If you want to compare close pieces rather than guess from total CRIT Value, run them through the HSR Relic Optimizer guide and test the full battle state.
3.1 🌌 Best Planar Ornaments
| Planar Set | Best Use Case | Tradeoff |
|---|---|---|
| Duran, Dynasty of Running Wolves | Best personal-damage default in a follow-up team. Ally follow-up attacks build Merit, increasing Ashveil’s follow-up damage and eventually CRIT DMG. | Needs the team to generate follow-up attacks consistently. |
| City of Converging Stars | Strong hybrid or dual-DPS option. Ashveil gains 24% ATK after a follow-up attack, while defeating an enemy can add a 12% teamwide CRIT DMG benefit for the battle. | The team benefit is weaker in a pure single-boss encounter with nothing to defeat. |
| Inert Salsotto | Reliable fallback with CRIT Rate plus Ultimate and follow-up damage. | Lower ceiling than modern specialized sets, but easy to use. |
| Izumo Gensei and Takama Divine Realm | Conditional option when another Hunt character, such as Feixiao, is in the team. | Loses value when Ashveil is the only Hunt unit. |
| Wondrous BananAmusement Park | Niche CRIT DMG option if Dan Heng • Permansor Terrae makes Ashveil the Bondmate. | Not a general recommendation; the Bondmate assignment must match the planned rotation. |
3.2 🧩 Transitional Relics and Efficient Farming
- Use correct main stats first: A CRIT Rate body and ATK rope are more important than completing the final set on day one.
- Lock double-CRIT pieces: Ashveil’s major trace supplies substantial CRIT DMG, so CRIT Rate substats are especially valuable.
- Keep both ATK and SPD boots: Team speed tuning can change as you move between hypercarry and dual-DPS lineups.
- Compare Lightning and ATK spheres: Lightning DMG is the default, but an ATK sphere with several extra CRIT rolls can win in heavily DMG-buffed teams.
- Do not salvage the transition set too early: It can be reassigned to another follow-up unit after Ashveil’s final build is complete.
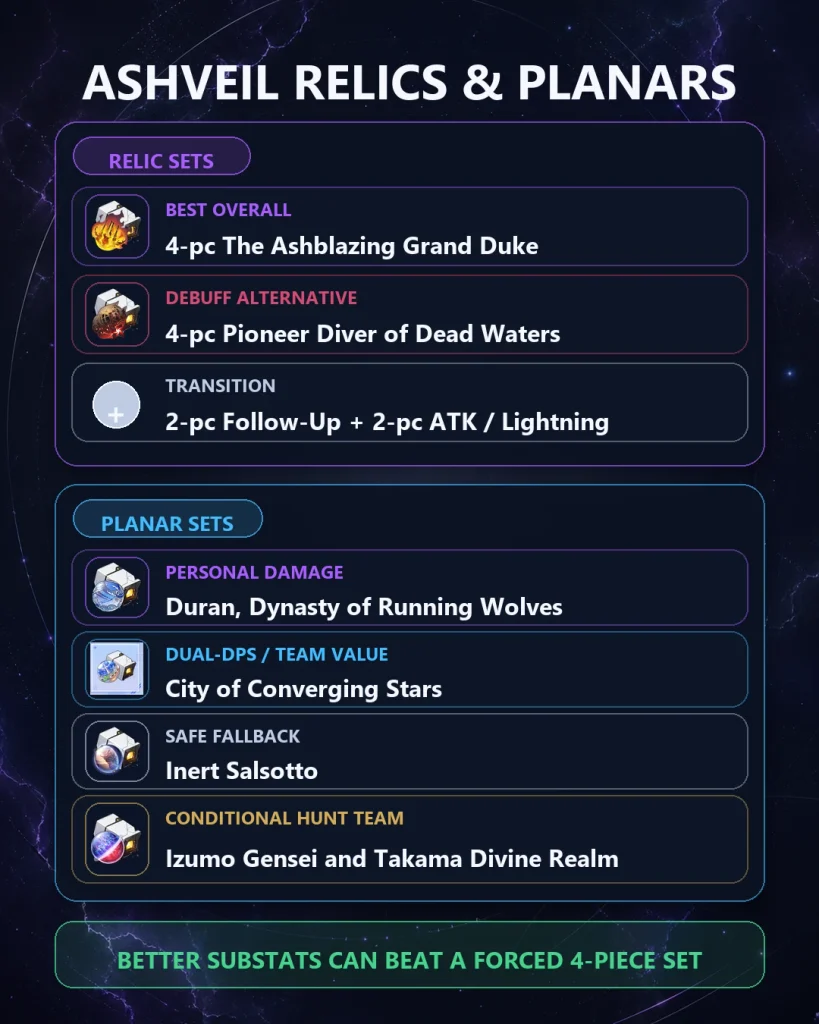
Image: Honkai: Star Rail © HoYoverse
4. 📊 Best Ashveil Stats and Speed Targets
Ashveil receives large follow-up CRIT DMG bonuses from his major traces, including a teamwide CRIT DMG buff and additional CRIT DMG for his own follow-ups. This makes CRIT Rate the usual bottleneck. A flashy 250% CRIT DMG screenshot is not a good build if half of his enhanced Ultimate instances fail to crit.
| Relic Slot | Recommended Main Stat | Decision Rule |
|---|---|---|
| Body | CRIT Rate | Use CRIT DMG only if reliable buffs and substats already bring effective CRIT Rate close to 100%. |
| Feet | ATK% by default | Use SPD for a tuned 135/134 setup, a dual-DPS team, or when Ashveil must act before supports. |
| Planar Sphere | Lightning DMG Boost | An ATK sphere can compete with much stronger substats or unusually heavy external DMG buffs. |
| Link Rope | ATK% | ERR is niche because it does not increase the fixed 8 Energy restored by Talent triggers. |
🎯 Recommended Endgame Stat Goals
| Stat | Comfortable Target | What to Watch |
|---|---|---|
| ATK | 3,000+ | Compare in the same team state; Light Cone base ATK and buffs change the displayed result. |
| CRIT Rate | 90–100% in combat | Include reliable Light Cone, Relic, and teammate buffs. Never build beyond 100% effective rate. |
| CRIT DMG | 100–150%+ on the character screen | His traces add a great deal in combat, so do not sacrifice CRIT Rate just to inflate sheet CRIT DMG. |
| SPD | Base SPD or approximately 135 | The correct target depends on action advance and turn order, not a universal “more is better” rule. |
| Energy Regeneration Rate | Base | Test any ERR rope against ATK over a full rotation before committing. |
👢 ATK Boots vs. SPD Boots
| Setup | Ashveil Speed | Recommended Boots | Reason |
|---|---|---|---|
| Hyperspeed Sunday/Bronya-style advance | Base or low SPD | ATK% | The support supplies turns, letting Ashveil keep the higher-damage boots. |
| Standard independent cycle | Displayed 134+ | SPD if needed | The familiar breakpoint is about 133.4; the game display commonly shows 134. |
| −1 action-advance tuning | Ashveil 135 / support 134 | SPD | Ashveil acts, then the support advances him for a second action. |
| Dual-DPS follow-up team | About 134–135 | SPD or best-substat pair | More regular turns can help Bait management without relying on one hypercarry buffer. |
For a deeper explanation of why 134 is a shorthand rather than a magical universal number, see the HSR speed breakpoints guide. The important part is matching your intended cycle count and support order—not forcing Ashveil to 160 SPD and losing the ATK and CRIT rolls his follow-ups need.
Do not copy a profile card blindly: A build showing 70% CRIT Rate may be correct with 30% reliable in-combat CRIT Rate—or badly inconsistent without it. Add every guaranteed buff, remove conditional buffs that are not active on the important turn, and then judge the final number.
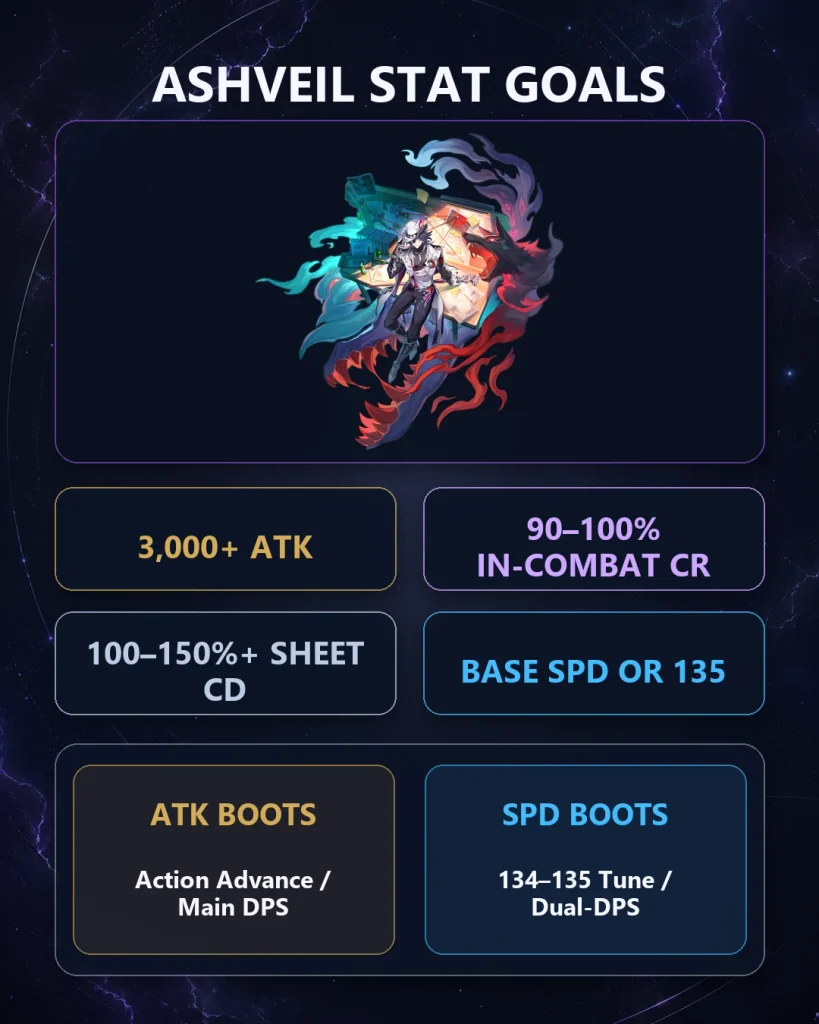
Image: Honkai: Star Rail © HoYoverse
5. 💡 Best Light Cones for Ashveil
The Finale of a Lie is Ashveil’s best all-round Light Cone, but he is not locked behind it. He can use several Hunt cones because his kit values CRIT, ATK, follow-up damage, and teamwide vulnerability. For F2P players, Cruising in the Stellar Sea S5 is good enough to make E0S0 a complete, endgame-ready stopping point.
| Rank | Light Cone | Why It Fits | Availability / Caveat |
|---|---|---|---|
| S | The Finale of a Lie S1 | 18% CRIT Rate plus its Umbra Devourer effect, which can provide 40% ATK and make all enemies take 20% more DMG. It improves both Ashveil and the team. | Limited signature; strongest general option, not required. |
| S− | Baptism of Pure Thought S1 | Excellent personal-damage stat package with strong synergy for CRIT and follow-up damage in debuff teams. | Limited; best when already owned. |
| A+ | Worrisome, Blissful S1 | CRIT and follow-up bonuses plus team-oriented value against its marked target. | Limited; especially attractive in dual-DPS follow-up teams. |
| A | Cruising in the Stellar Sea S5 | Reliable CRIT Rate, more CRIT Rate against low-HP targets, and ATK after a kill. | Best general F2P choice from Herta’s Store; contested by other Hunt characters. |
| A / conditional | Hell Where Ideals Burn | Can deliver strong personal damage when the team has an increased Skill Point cap. | Specialist choice; generally needs a 6+ SP cap such as a Sparkle setup. |
| B+ | See You at the End S5 | Useful CRIT and follow-up-oriented damage for a non-limited option. | Battle Pass cone; not a free-to-play recommendation. |
| B | Only Silence Remains S5 | ATK plus conditional CRIT Rate in encounters with one or two enemies. | Loses consistency in multi-wave or multi-target content. |
❓ Which Light Cone Should You Actually Use?
- You own his signature: Use The Finale of a Lie unless a specific speed or challenge setup demands something unusual.
- You own Baptism or Worrisome: Keep your Stellar Jade unless you want Ashveil’s teamwide signature value or are committed to vertical investment.
- You are F2P: Buy and superimpose Cruising in the Stellar Sea through Herta’s Store. The Herta Store Light Cone buy-order guide can help if several characters are competing for bonds.
- Cruising is occupied: Use the best available Only Silence Remains or another leveled Hunt stat stick while planning a permanent solution.
- You use Sparkle: Check whether Hell Where Ideals Burn is activated by the team’s increased SP cap before ranking it.
How to read rankings: Light Cone order can change with superimposition, enemy count, kill timing, debuff count, and teammate buffs. Treat simulation percentages as one modeled encounter—not a promise that the same gap appears in every Memory of Chaos or Apocalyptic Shadow fight.
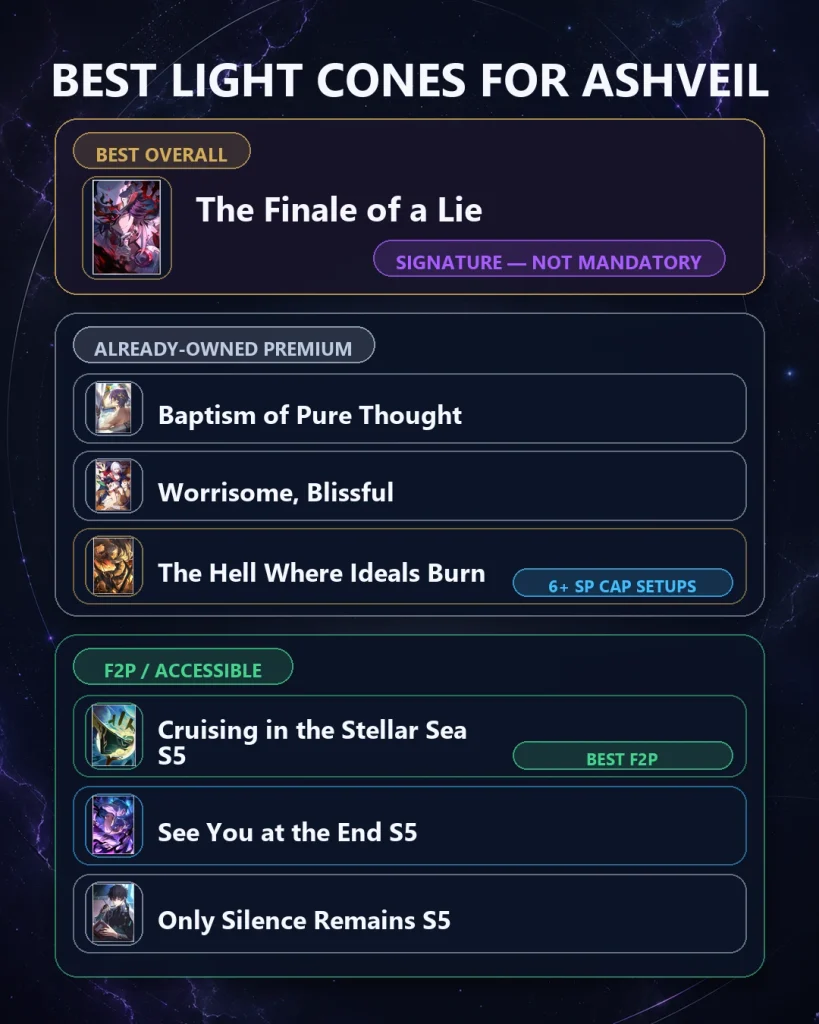
Image: Honkai: Star Rail © HoYoverse
6. 🌳 Trace Priority and Major Traces
Upgrade Skill ≥ Talent = Ultimate >>> Basic ATK. The exact first max depends on your role: main-carry Ashveil values Skill levels immediately, while a hybrid team wants Talent and Ultimate caught up quickly. Do not leave the major traces locked; they change his resource engine and CRIT profile more than a small substat upgrade does.
| Major Trace | Effect | Priority |
|---|---|---|
| Damnation Trail | Skill grants 1 Gluttony, Ultimate grants 2, and a Talent follow-up kill grants 1 additional Gluttony. | Unlock first; it accelerates every Ultimate cycle. |
| Phantom Limb | Follow-up attacks gain 80% CRIT DMG, plus another 10% for each current Gluttony. | Essential for main-carry damage. |
| First Fang | All allies gain 40% CRIT DMG, while Ashveil’s own follow-up attacks gain another 80% CRIT DMG. | Essential for both personal and dual-DPS value. |
Low-resource order: Unlock Damnation Trail, then take Skill, Talent, and Ultimate to a functional shared level before pushing one node to maximum. Finish Phantom Limb and First Fang as soon as their ascension gates open. Basic ATK can wait.
7. 🤝 Best Ashveil Teams in HSR 4.5
Ashveil wants three things from a team: frequent attacking actions to hit Bait, buffs that benefit more than one damage dealer when used as a hybrid, and enough sustain to protect his naturally fragile stat line. The first two requirements explain why Mortenax Blade and attacking supports are so valuable; the third is why showcase-only sustainless teams should not be presented as the default.
If you are comparing his place across the broader archetype, the best HSR follow-up attack teams guide covers additional carries and account-level options. The teams below stay focused on Ashveil’s own build decisions.
| Team Type | Lineup | Why It Works | Investment Note |
|---|---|---|---|
| Early 4.5 high-synergy | Ashveil + Mortenax Blade + Robin • Summeretto + Hyacine | Two active damage dealers feed a dense follow-up engine while Summeretto amplifies the offense and Hyacine stabilizes the team. | Premium and still being optimized in the opening days of Version 4.5. |
| Stable premium dual-DPS | Ashveil + Mortenax Blade + Tribbie + Hyacine | Reliable attacking frequency, broad amplification, and enough sustain for endgame progression. | Expensive, but its roles are clear and consistent. |
| Ashveil hypercarry | Ashveil + Sunday + Remembrance Trailblazer + Dan Heng • Permansor Terrae | Sunday concentrates turns and buffs on Ashveil, while an attacking secondary support helps trigger Bait and DHPT supplies protection. | Speed tuning matters; choose ATK or SPD boots around Sunday’s actual speed. |
| Classic follow-up dual carry | Feixiao + Ashveil + Robin + Aventurine (Preservation) | Feixiao attacks frequently, Ashveil supplies Bait and DEF reduction, and the original Preservation Aventurine adds sustain plus follow-ups. | Still effective, although no longer the only premium ceiling option. |
| Flexible carry shell | Ashveil + Tribbie/Sunday + Remembrance Trailblazer + Hyacine/DHPT | Combines one main amplifier, one support that takes offensive actions, and one sustain. | Use the best-owned units; avoid stacking two supports that rarely attack. |
🧩 Team Slot Rules
| Slot | Priority | Good Examples | Avoid |
|---|---|---|---|
| Ashveil | Place and maintain Bait; deal follow-up damage. | Main DPS or hybrid sub-DPS. | Building so much SPD that CRIT and ATK collapse. |
| Second attacker / enabler | Attack Bait often. | Mortenax Blade, Feixiao, Remembrance Trailblazer, Moze, Hunt March 7th. | Counting multi-hit animations as multiple Talent triggers. |
| Amplifier | Buff both carries or strongly advance Ashveil. | Robin • Summeretto, Tribbie, Sunday, Robin. | Two passive buffers with no attacking actions in a team already short on triggers. |
| Sustain | Keep a low-HP Hunt unit alive while contributing actions or utility. | Hyacine, Dan Heng • Permansor Terrae, Preservation Aventurine, Gallagher. | Sustainless play outside reset-heavy showcases or highly invested speed clears. |
Version 4.5 caution: Robin • Summeretto entered the live environment with Version 4.5, so her exact ranking across every Ashveil encounter is early-patch judgment, not permanent fact. Aventurine • Waveflair is an officially announced Phase 2 option, but his exact place in Ashveil’s best team should be re-evaluated after live testing. Waveflair is an offensive Quantum Elation character—not the original Preservation sustain—so a team using him may still need protection.
🧭 Best Team by Account Situation
- You own Mortenax and Hyacine: Start with Mortenax/Ashveil/Tribbie/Hyacine, then compare Summeretto in your actual encounter.
- You own Sunday but no Mortenax: Run Ashveil as the main carry and tune Sunday to the selected ATK-boot or −1 SPD rotation.
- You own Feixiao and Robin: The classic Feixiao/Ashveil core remains a natural way to share follow-up investment.
- You have no premium sustain: Gallagher or Lynx is safer than forcing a fourth offensive slot.
- You want a sustainless showcase: Ashveil/Mortenax/Tribbie/Summeretto can produce high burst, but expect resets and do not use it as the baseline recommendation.
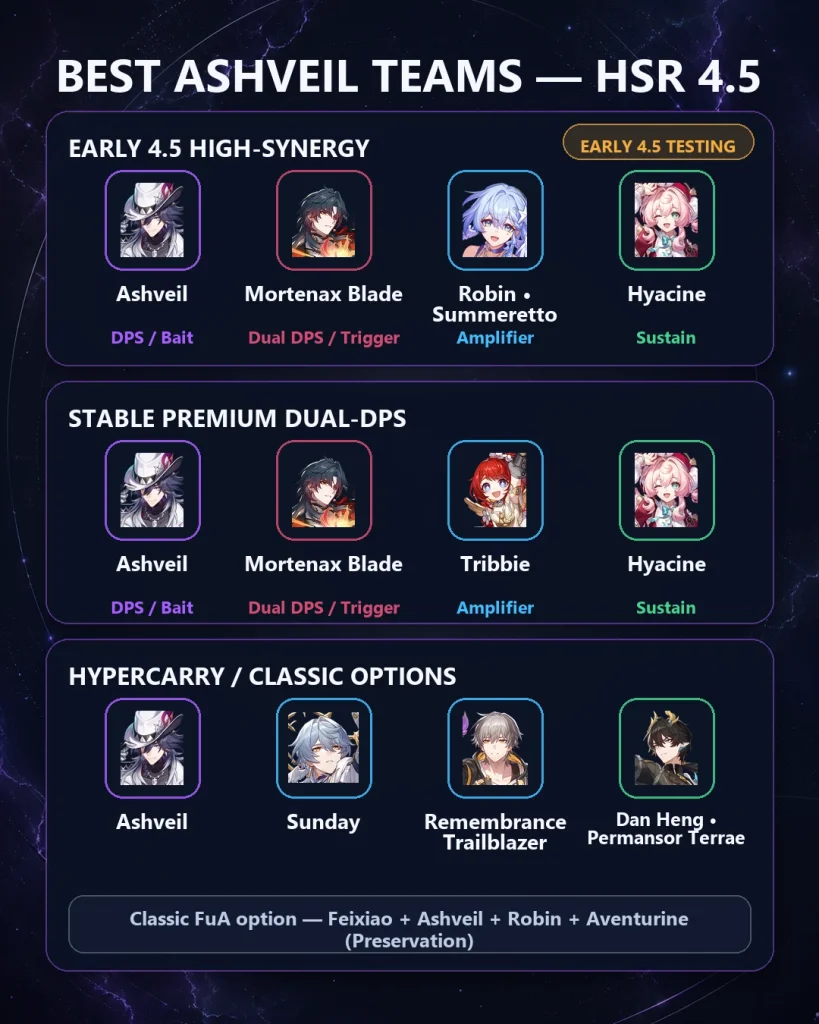
Image: Honkai: Star Rail © HoYoverse
8. 🗡️ Mortenax Blade Synergy: Why the Pair Works
Mortenax Blade is Ashveil’s most natural dual-DPS partner because the pair creates the kind of active, repeated offense Ashveil’s Talent wants. Mortenax contributes meaningful damage instead of occupying a purely supportive slot, while Ashveil’s Bait keeps the chosen target under a 40% DEF reduction and turns Mortenax’s attacking actions into follow-up triggers.
The pairing also makes teamwide amplification more valuable than narrow single-carry buffs. If you are building both halves, the full Mortenax Blade build covers his own Relics, speed, and upgrade decisions without duplicating them here.
| Decision | Recommended Approach | Why |
|---|---|---|
| Who is the main carry? | Let encounter weakness, Eidolons, and Light Cones decide. | Ashveil’s DEF reduction remains valuable even when Mortenax deals the larger share. |
| Ashveil boots | Compare ATK and 134–135 SPD. | Dual-DPS teams usually have less direct action advance than a Sunday hypercarry team. |
| Planar set | Duran for Ashveil personal damage; City for more hybrid/team value. | The second carry changes the value of teamwide buffs. |
| Support | Prefer broad amplification such as Tribbie or Summeretto. | Both damage dealers benefit instead of forcing all resources onto one unit. |
| Sustain | Hyacine or another reliable sustain. | Two offensive Hunt-style units do not make a sustainless team safe. |
Targeting rule: Place Bait on the enemy Mortenax is about to attack, not automatically on the highest-HP enemy. Losing one trigger because the team splits targets is often worse than a small theoretical stat difference.
9. 🔄 Best Ashveil Rotation and Combat Rules
Ashveil has a priority system rather than one rigid rotation. Enemy waves, Bait movement, ally action order, and Gluttony all change the correct button. The following sequence is the reliable starting point.
- Use Technique before a difficult battle. Enter against a dazed enemy to deal opening AoE damage and begin with an extra Charge.
- Cast Skill on the priority target. This places Bait and activates the 40% DEF reduction across the enemy side.
- Apply team buffs and debuffs. Plan the order so attacking supports strike the marked target whenever possible.
- Let allies attack Bait. Each qualifying action consumes one Charge, restores 8 fixed Energy, launches Ashveil’s follow-up, and builds Gluttony.
- Recast Skill on the same Bait target when appropriate. The enhanced hit refunds 1 Skill Point, making the cast net-zero, although 1 SP must be available first.
- Spend the current Charges before Ultimate when practical. Ultimate refills all 3, so using it at full Charge can waste part of the reset.
- Use Ultimate around 8–12 Gluttony at E0. Higher Gluttony creates more extra 200%-ATK damage instances, but do not overhold into Energy cap or the end of a wave.
- Aim Ultimate at a healthy priority enemy. Its extra instances can retarget after a kill, but starting on a nearly defeated target may waste the most valuable initial hit.
- Repeat the three-Charge cycle. Reposition Bait when the team changes focus or a marked enemy dies.
⏱️ Ultimate Timing Checklist
- ☐ Is Ashveil at 0–1 Charge, so the refill will not be wasted?
- ☐ Is Gluttony at 8 or 12, or will waiting lose a cycle?
- ☐ Are the main buffs and debuffs currently active?
- ☐ Is the selected target valuable and healthy enough to receive the opening hit?
- ☐ Will holding Ultimate cause Energy overcap, missed damage, or an unfinished wave?
In my experience: The most common live-combat error is saving Ultimate for a perfect 12-Gluttony moment while Ashveil sits at zero Charge. Restoring three triggers now is often worth more than one extra enhanced instance later.
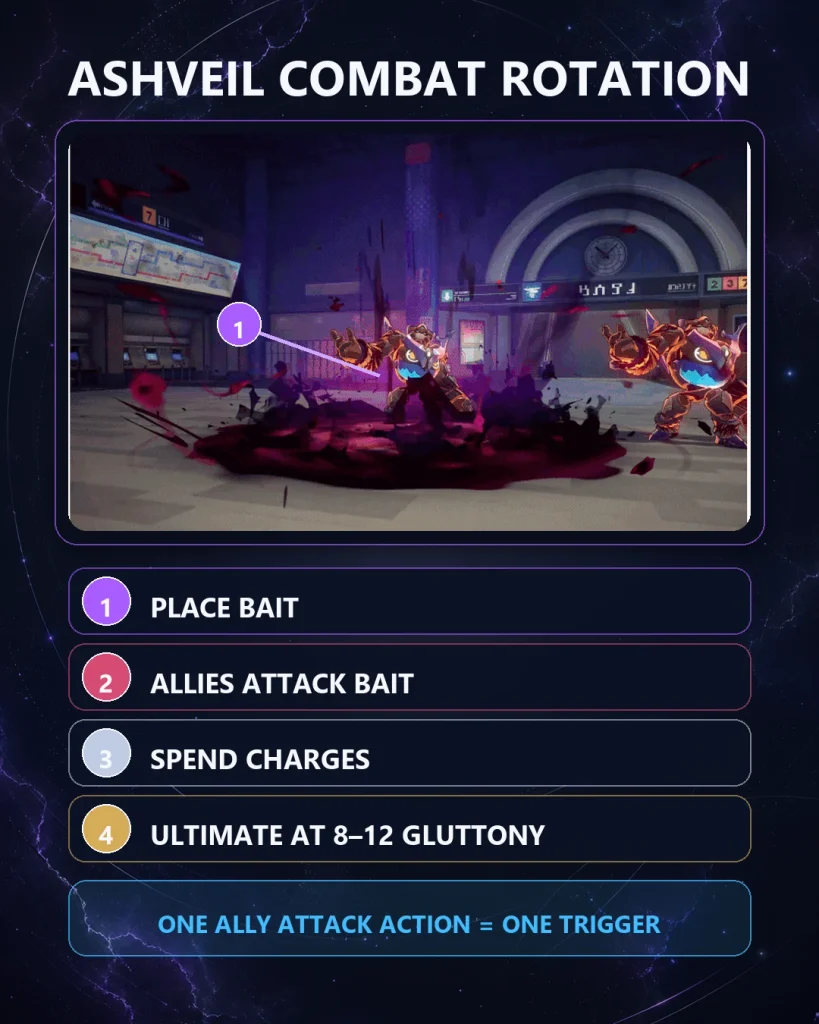
Image: Honkai: Star Rail © HoYoverse
10. 🆓 Ashveil F2P Build and Low-Cost Team
For F2P players, the efficient stopping point is E0S0 Ashveil with Cruising in the Stellar Sea S5. His core mechanics—including Bait, DEF reduction, fixed Energy, Charge, and Gluttony—are all present at E0. Spend Stellar Jade on a functional team before chasing luxury vertical upgrades.
| Slot | F2P / Low-Cost Choice | Role | Replacement Path |
|---|---|---|---|
| Carry | Ashveil E0 | Bait, DEF reduction, follow-up DPS. | Keep; the build is complete at E0. |
| Trigger / sub-DPS | Hunt March 7th or Moze | Provides attacking actions and secondary damage. | Mortenax Blade or Feixiao. |
| Support | Remembrance Trailblazer | Useful account-accessible support who contributes active offense. | Tribbie, Sunday, or a suitable premium amplifier. |
| Sustain | Gallagher or Lynx | Keeps the team alive without requiring another limited unit. | Hyacine, DHPT, or Preservation Aventurine. |
| Light Cone | Cruising in the Stellar Sea S5 | CRIT and conditional ATK from Herta’s Store. | The Finale of a Lie only after team needs are covered. |
If one recommended unit is missing, use the same role logic instead of treating the lineup as all-or-nothing. The best F2P teams in Honkai: Star Rail guide offers additional low-investment shells for accounts with different free characters.
F2P upgrade order: Level Ashveil and Cruising to 80 → unlock all major traces → level Skill/Talent/Ultimate together → secure correct main stats → reach reliable CRIT Rate → optimize four-piece and Planar substats. Do not spend weeks chasing a perfect sphere while core traces remain underleveled.
11. ✨ Ashveil Eidolons and Signature Priority
Ashveil is complete at E0. Eidolons increase team vulnerability, Gluttony efficiency, and late-investment damage; they do not repair a missing base-kit function. That makes account upgrades and teammates the better first destination for most players.
| Investment | What It Adds | Value |
|---|---|---|
| E0 | Full Bait, 40% DEF reduction, Charge, fixed Energy, follow-up, and Gluttony engine. | Best stopping point for most accounts. |
| E1 | All enemies take 24% more DMG; the vulnerability increases to 36% when a target is below 50% HP. | Excellent teamwide vertical upgrade, especially with a second DPS. |
| E2 | Raises the Gluttony cap to 18 and refunds 35% of the Gluttony consumed each time Ashveil launches his enhanced Talent follow-up attack. | Strong rotation and enhanced-follow-up upgrade for committed owners. |
| E3 | Raises relevant Skill and Basic ATK levels. | Incremental damage, not a target by itself. |
| E4 | After Ultimate, Ashveil gains 40% ATK for 3 turns. | Large personal damage increase with good uptime. |
| E5 | Raises relevant Ultimate and Talent levels. | Incremental scaling on core damage. |
| E6 | Reduces all enemies’ All-Type RES by 20% and lets Ashveil ramp up to 120% additional personal damage after gaining enough Gluttony. | Whale-level team amplification and personal ceiling. |
❓ S1 or E1 First?
| Your Account | Better First Luxury | Reason |
|---|---|---|
| No premium Hunt cone for Ashveil | S1 The Finale of a Lie | Fixes CRIT more easily and adds both personal ATK and teamwide damage-taken amplification. |
| Already owns Baptism or Worrisome | E1 or save | The Light Cone gap narrows, so E1’s broad vulnerability becomes more attractive. |
| Dual-DPS Mortenax account | Compare E1 and S1 | Both add team value; E1 is more cone-independent, while S1 also improves Ashveil’s stat build. |
| F2P with incomplete roster | Neither yet | E0S0 plus a complete four-unit team normally creates more value. |
Recommended investment path: E0 Ashveil → complete sustain and amplifier slots → S1 if he lacks a premium cone → E1 → E2. Stop at any stage that meets your clear goals; none of these upgrades replaces correct Bait targeting or a balanced team.
12. 🎟️ Should You Pull Ashveil or Save?
Ashveil is a good pull when you want a Lightning follow-up carry who can also support another attacker. He is a weaker account decision when your sustain and universal support slots are unfinished, or when you expect one new character to make an outdated team competitive without any matching enablers.
| Account Situation | Decision | Why |
|---|---|---|
| You own Mortenax Blade plus Tribbie, Summeretto, or Hyacine. | Pull | You already have pieces that exploit Ashveil’s Bait triggers and dual-DPS amplification. |
| You need a Lightning single-target/follow-up damage option. | Pull | Ashveil covers that weakness while remaining useful as a hybrid later. |
| You value flexible main-DPS and sub-DPS roles. | Pull | His 40% DEF reduction gives him utility beyond personal damage. |
| You are F2P and can give him Cruising S5. | Pull E0, then stop | His base kit is complete and the free cone is functional. |
| You lack a dependable sustain or broad amplifier. | Save first | A four-unit foundation usually improves more teams than another damage dealer. |
| Your available supports rarely attack enemies. | Save or rebuild the team | Ashveil will receive fewer Talent triggers, less fixed Energy, and less Gluttony. |
| You already own several invested Lightning or single-target carries. | Usually save | Role overlap lowers his account value unless you specifically want his playstyle. |
| You only want Ashveil for Aventurine • Waveflair synergy. | Wait for Phase 2 testing | Waveflair’s final place in Ashveil teams should be judged in the live combat environment. |
| You expect him alone to revive every old follow-up roster. | Save | He still needs frequent attacking actions, current amplification, and survival. |
Before committing Stellar Jade, map your guaranteed pity, 50/50 status, cone competition, and the next support you may need. The HSR pull tracker and pity guide is useful for turning “I probably have enough” into an actual budget.
Pulling advice is account-specific: “Best team” ownership is not the same as “must pull.” If Ashveil would leave you without a sustain, delay an important universal support, or force you to split Cruising from an existing carry, saving is a rational choice.
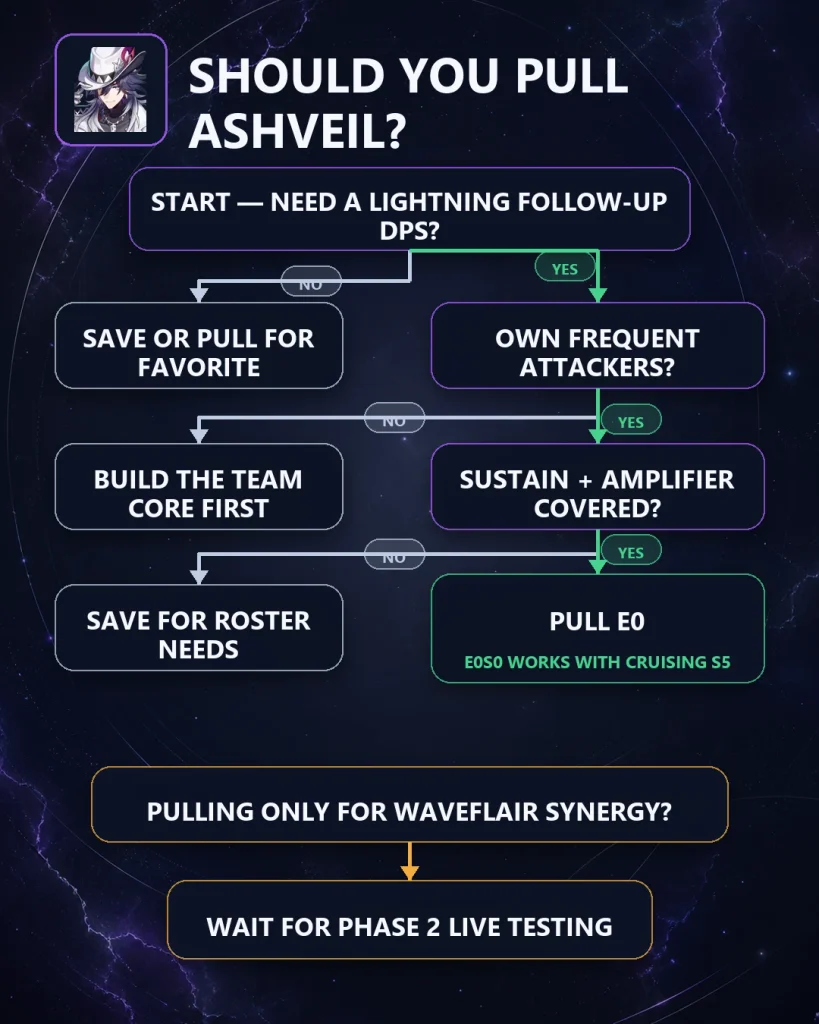
Image: Honkai: Star Rail © HoYoverse
13. 📅 Ashveil Character and Light Cone Banner History
Ashveil debuted in Version 4.1 and is officially scheduled for his first rerun in Version 4.5 Phase 2. Because this article was updated on the first day of Version 4.5, the official Phase 2 Event Warp notice should still be checked for the exact regional end time and final accompanying 4-star lineup.
For broader rerun context, compare these entries with the full HSR banner history. The tables below intentionally distinguish a confirmed announcement from details that remain pending.
🎟️ Character Banner History
| Version / Phase | Event Warp | Dates | Featured 4-Stars | Status |
|---|---|---|---|---|
| Version 4.1 Full version | A Hunt Through Night Ashveil debut | March 25, 2026 after maintenance – April 21, 2026 at 15:00 server time | Asta, Moze, Misha | Completed; official debut run. |
| Version 4.5 Phase 2 | A Hunt Through Night First rerun | Starts September 12, 2026 at 12:00 server time; exact end time to confirm in the Phase 2 notice | Verify against the official Phase 2 Event Warp notice before publication/update | Officially announced; upcoming as of August 26, 2026. |
💡 Light Cone Banner History
| Version / Phase | Featured 5-Star Light Cone | Dates | Featured 4-Star Light Cones | Status |
|---|---|---|---|---|
| Version 4.1 Full version | The Finale of a Lie Signature debut | March 25, 2026 after maintenance – April 21, 2026 at 15:00 server time | Make the World Clamor; Shadowed by Night; Dream’s Montage | Completed; official debut run. |
| Version 4.5 Phase 2 | The Finale of a Lie First rerun | Starts September 12, 2026 at 12:00 server time; exact end time to confirm in the Phase 2 notice | Verify against the official Phase 2 Brilliant Fixation notice before publication/update | Officially announced; upcoming as of August 26, 2026. |
Editorial update trigger: When the Version 4.5 Phase 2 Event Warp notices go live, update both tables with exact end times and featured 4-stars, then refresh the “Last updated” date. Do not infer regional times from an unofficial countdown.
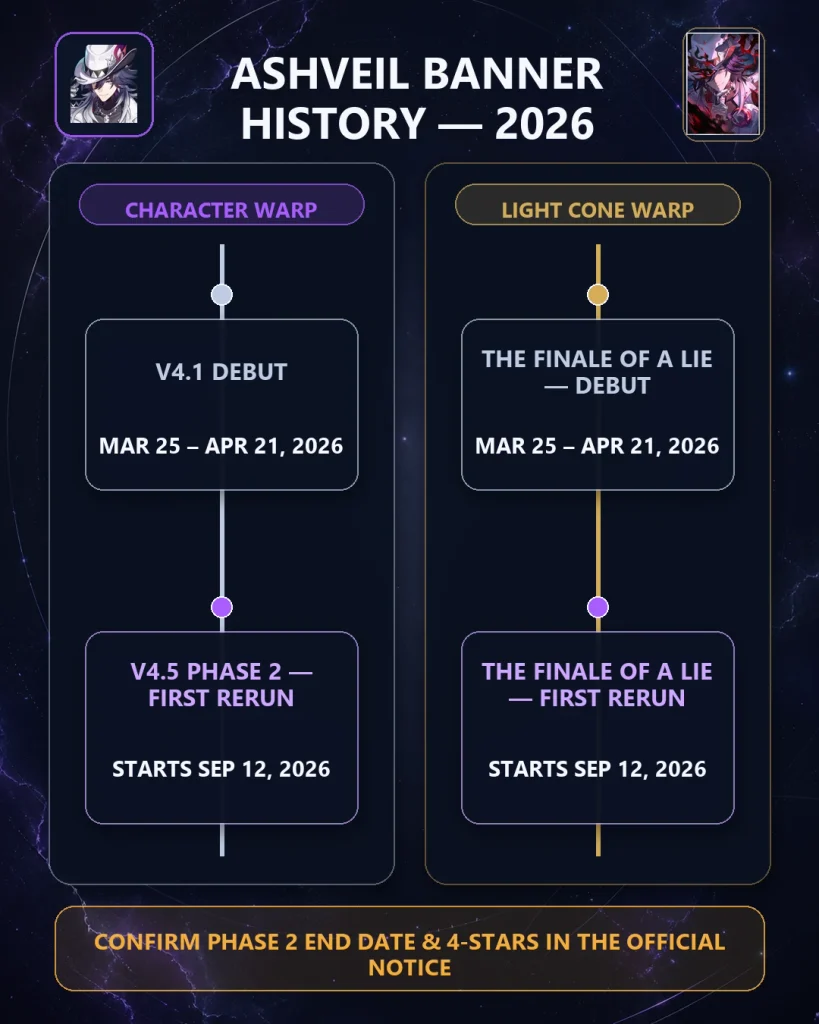
Image: Honkai: Star Rail © HoYoverse
14. ⚠️ Common Ashveil Build Mistakes
| Mistake | Why It Hurts | Fix |
|---|---|---|
| Building sheet CRIT DMG before reliable CRIT Rate | His major traces already add large in-combat follow-up CRIT DMG. | Target 90–100% effective CRIT Rate first. |
| Forcing 160 SPD | It sacrifices ATK and CRIT without guaranteeing more useful Talent triggers. | Use base speed with advance or a tested 134–135 setup. |
| Using an ERR rope by default | ERR does not multiply the Talent’s fixed 8-Energy restoration. | Use ATK rope unless a full-rotation test proves ERR wins. |
| Assuming Skill is always SP positive | Skill must be cast with 1 SP available; hitting current Bait only refunds that point afterward. | Plan it as net-zero on the same target, not usable at zero SP. |
| Letting allies attack different targets | Only attacks on Bait trigger the Talent follow-up. | Move Bait or focus team attacks before the next ally acts. |
| Counting every hit of a multi-hit move | One attack action triggers Ashveil once, not once per animation hit. | Evaluate action frequency rather than hit count. |
| Using Ultimate at full Charge | The three-Charge refill is partly wasted. | Spend Charges first unless delaying would lose a cycle or kill. |
| Holding Ultimate forever for 12 Gluttony | Ashveil can remain at zero Charge or cap Energy. | Use 8 Gluttony when the refill and current damage window matter more. |
| Running two passive supports | Buffs rise, but Bait receives too few attacking actions. | Include at least one active attacker or attacking support. |
| Copying a sustainless showcase | Ashveil is fragile and reset-heavy clips hide failed runs. | Use a real sustain for routine endgame play. |
| Forcing Grand Duke with weak substats | A set bonus cannot always recover lost CRIT and ATK. | Keep a strong 2+2 set until the four-piece is truly better. |
| Calling Waveflair a sustain | Aventurine • Waveflair is an offensive Quantum Elation unit, distinct from Preservation Aventurine. | Evaluate the Phase 2 lineup with a separate protection plan. |
One final sanity check: Before blaming the build, record one full battle cycle. Confirm that Bait stays on the focus target, allies actually attack it, Charges are not overcapped by Ultimate, and conditional Light Cone effects activate. Rotation losses often look like stat losses on the result screen.
15. ❓ Ashveil Build FAQ
❓ What is the best Relic set for Ashveil?
Four-piece The Ashblazing Grand Duke is the best general set because follow-up attacks make up a large and repeatable portion of Ashveil’s damage. Four-piece Pioneer Diver of Dead Waters is the best alternative when the full team maintains enough debuffs and its pieces have stronger substats.
❓ What main stats should Ashveil use?
Use a CRIT Rate body, ATK boots, Lightning DMG sphere, and ATK rope as the default. CRIT DMG body, SPD boots, or ATK sphere are conditional swaps based on reliable buffs, speed tuning, and substat quality.
❓ Does Ashveil need SPD boots?
No. ATK boots are usually stronger with a fast action-advance support, while SPD boots are useful around 134–135 SPD or in a −1 speed setup. Choose the rotation first, then the boots.
❓ What is Ashveil’s best F2P Light Cone?
Cruising in the Stellar Sea S5 is his best broadly available F2P option. It gives useful CRIT Rate and can add ATK after a kill, though another Hunt carry may compete for the same Herta Store cone.
❓ Is The Finale of a Lie worth pulling?
It is Ashveil’s best all-round Light Cone and adds both personal stats and teamwide damage value. It is worth considering after your core team is complete, but players who already own Baptism of Pure Thought or Worrisome, Blissful can reasonably save.
❓ Is Ashveil good at E0S0?
Yes. E0 includes his complete Bait, DEF reduction, Charge, Energy, and Gluttony mechanics, and Cruising S5 supplies a functional free Light Cone. Team construction and reliable CRIT Rate matter more than forcing E1 or S1.
❓ Does Ashveil need Mortenax Blade?
No, but Mortenax is one of his best partners because he supplies frequent attacking actions and benefits from Bait’s DEF reduction. Feixiao, active supports, and accessible options such as Hunt March 7th or Moze can fill the trigger role.
❓ What is Ashveil’s best team in Version 4.5?
A strong early-4.5 premium team is Ashveil, Mortenax Blade, Robin • Summeretto, and Hyacine. Ashveil/Mortenax/Tribbie/Hyacine remains a stable premium baseline; Summeretto’s exact ranking should continue to be tested across live encounters.
❓ Is Ashveil good in Pure Fiction?
He can work when repeated kills let his enhanced attacks retarget, especially with a favorable seasonal buff. However, he remains a Hunt character with a priority-target game plan, so he is not automatically better than dedicated AoE carries in every Pure Fiction cycle.
❓ How does Ashveil’s Bait work?
Only one enemy can be Bait. While Bait exists, all enemies lose 40% DEF; when a different ally attacks the marked enemy, Ashveil can consume a Charge to launch a follow-up, gain 8 fixed Energy, and build Gluttony. Skill or Ultimate can move the mark.
❓ Does Energy Regeneration Rate increase Ashveil’s 8 Energy trigger?
No. The Talent restoration is fixed at 8 Energy and is not multiplied by ERR. That is why an ATK rope is the default, while an ERR rope should only be used after testing a specific rotation.
❓ Is Duran or City of Converging Stars better?
Duran is the default for Ashveil’s personal follow-up damage. City of Converging Stars becomes more appealing in a dual-DPS team or content with enemies to defeat, where its ATK and team CRIT DMG utility can matter more.
His first rerun is officially scheduled for Version 4.5 Phase 2, starting September 12, 2026 at 12:00 server time. Check the official Phase 2 Event Warp notice for the exact end time and accompanying 4-stars before spending.
16. ✅ Final Ashveil Build Summary
Best Ashveil build: Equip 4-piece The Ashblazing Grand Duke and Duran, Dynasty of Running Wolves with CRIT Rate / ATK% / Lightning DMG / ATK% main stats. Use The Finale of a Lie S1 or Cruising in the Stellar Sea S5. Aim for 90–100% in-combat CRIT Rate, 3,000+ ATK, and 100–150%+ sheet CRIT DMG. Pair him with a frequent attacker such as Mortenax Blade, one broad amplifier, and a dependable sustain. Place Bait on the focus target, spend Charges through ally attacks, and use Ultimate after building Gluttony without wasting the three-Charge refill.
- Best Relic: 4-pc The Ashblazing Grand Duke
- Best Planar: Duran, Dynasty of Running Wolves
- Best Signature: The Finale of a Lie S1
- Best F2P Cone: Cruising in the Stellar Sea S5
- Best main stats: CRIT Rate / ATK% / Lightning DMG / ATK%
- Best substats: CRIT Rate = CRIT DMG > ATK% > required SPD
- Trace priority: Skill ≥ Talent = Ultimate >>> Basic ATK
- Recommended stopping point: E0S0 for most players; complete the team before vertical investment
Ashveil rewards good targeting and team sequencing more than brute-force speed. Build enough CRIT Rate to make every enhanced follow-up dependable, give him allies who actually attack Bait, and treat the Ultimate as both a damage button and a Charge reset. Do those three things and his E0 build already delivers the flexible follow-up role that makes him worth considering in 2026.
17. 📝 Sources & Update Notes
Last updated: August 26, 2026. Ashveil is a released 5-star Lightning Hunt character. His first rerun and The Finale of a Lie rerun are officially scheduled for Version 4.5 Phase 2. Exact regional ending times, final featured 4-star lineups, and post-release Aventurine • Waveflair team performance should be rechecked when the official Phase 2 Event Warp notices are published.
Method: Kit percentages in this guide use live trace-level-10 values unless a section says otherwise. Official HoYoverse and HoYoLAB pages establish release and banner status; live databases and established guide sites are used only to cross-check mechanics, equipment, and team interpretation. In-game text and new official notices take priority if a later patch changes a value.
🏛️ Official Sources
- HoYoverse — Version 4.1 “Unraveled for Daybreak” Update Details
- HoYoverse — Keeping Up With Star Rail: Ashveil
- HoYoverse — Ashveil Character Trailer
- HoYoWiki — Ashveil Character Entry
- HoYoWiki — The Finale of a Lie Entry
- HoYoLAB — Version 4.1 Event Warp Details
- HoYoverse — Version 4.5 “No Aha at Full Moon” Update Details
- HoYoLAB — Version 4.5 Special Program Summary
🔎 Cross-Reference Sources
Publication note: This is an independent game guide and is not affiliated with or endorsed by HoYoverse. Honkai: Star Rail, character names, game UI, logos, and official artwork belong to their respective owners. Use official assets in accordance with the publisher’s current fan-content and media rules.