

Last reviewed: September 27, 2026. This guide separates verified rules from practical drafting recommendations. Team examples are adaptable Currency Wars boards, not a claim that one lineup is the strongest in every patch.
Contents
- 1 ⚡ Quick Answer
- 2 1. 🧭 What Is Currency Wars and How Do You Unlock It?
- 3 2. 🧩 Best Currency Wars Teams: Choose a Working Engine
- 4 3. 💰 Gold Economy: Save, Level or Reroll?
- 5 4. 🛠️ Upgrades, Equipment and Permanent Progression
- 6 5. 📊 Investment Environments, Strategies and Bonds
- 7 6. 🗺️ A Step-by-Step Plan for More Consistent Clears
- 8 7. 🎁 Rewards, Weekly Reset and Efficient Farming
- 9 8. 🎟️ Pull or Save? F2P Account Decisions
- 10 9. 🗓️ Character and Light Cone Banner History
- 11 10. 🚫 Common Mistakes That Lose Runs
- 12 11. ❓ Currency Wars FAQ
- 12.1 ❓ 11.1 Is Currency Wars permanent?
- 12.2 ❓ 11.2 What is the best Currency Wars team?
- 12.3 ❓ 11.3 Do I need to own the characters?
- 12.4 ❓ 11.4 Should I always save 50 Gold?
- 12.5 ❓ 11.5 Do relics, Light Cones and Eidolons matter?
- 12.6 ❓ 11.6 When do Currency Wars rewards reset?
- 12.7 ❓ 11.7 Do Fuel Vouchers replace Trailblaze Power?
- 12.8 ❓ 11.8 Why does a listed character never appear in my shop?
- 13 12. 📚 Sources
⚡ Quick Answer
The fastest way to improve your runs
To clear Currency Wars consistently, build around one carry, activate useful Bonds and match equipment to on-field or off-field roles. In Standard Gambit, work toward 50 Gold for normal maximum interest, then spend to stabilize. Overclock has no interest. Aglaea Energy, Break and Phainon are useful team templates; draft according to the available pool.
This HSR Currency Wars guide explains which upgrades actually improve your board, when to stop saving, and how to collect rewards without confusing run currency with Stellar Jade. A sensible purchase now can be worth more than a perfect team that never comes together.
2026 reward correction
Since Version 4.2, Currency Wars and Simulated Universe contribute to a shared weekly points track, resetting Monday at 04:00 server time. Older guides describing a separate two-week Currency Wars track are outdated. Ascension and collection rewards follow their own rules; they do not all refresh with weekly points. See Sources & Update Notes [1].
1. 🧭 What Is Currency Wars and How Do You Unlock It?
Currency Wars: Zero-Sum Game is a permanent mode introduced in Version 3.7. You recruit characters during a run, combine copies, equip them and build Bonds while working through combat stages. The auto-chess influence is in drafting and economy; on-field combat can still be controlled manually.
- Entry requirement: Trailblaze Level 21. Check the Travel Log and Finality’s Vision if your story progression is behind the normal entry route.
- First visit: follow the Currency Wars introductory Adventure Mission and tutorial. The mode can subsequently be accessed through the Interastral Peace Guide; its Penacony location is Dewlight Pavilion.
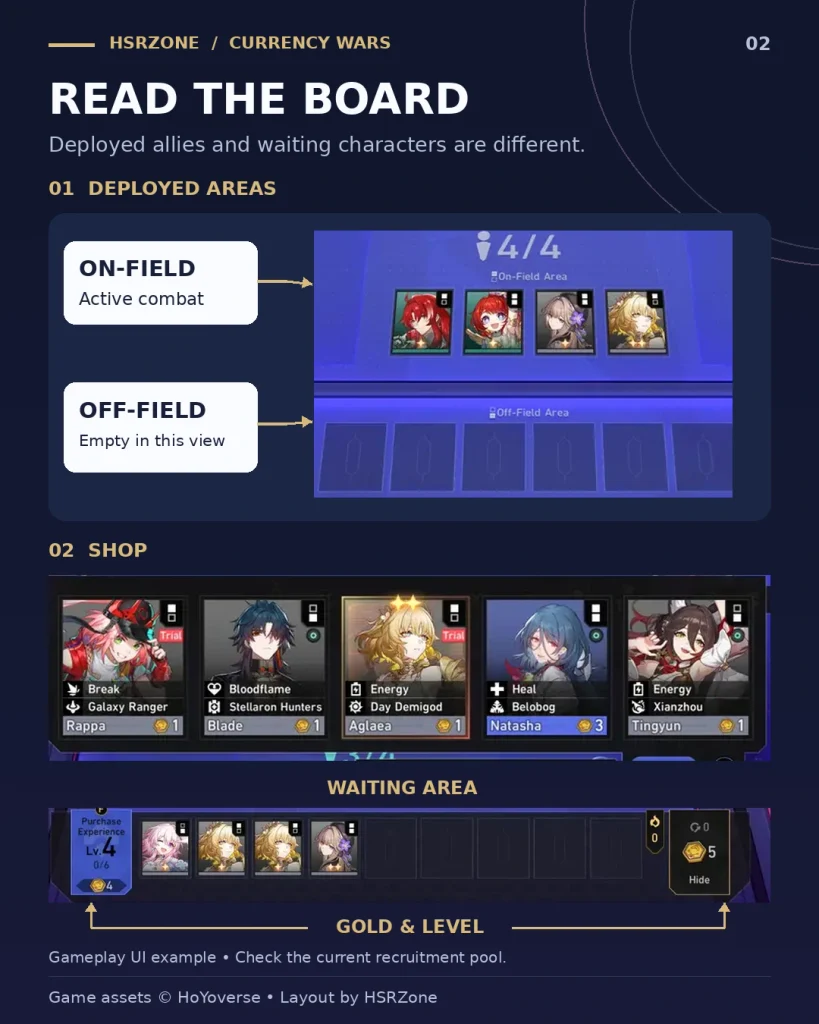
- Board structure: the normal setup allows up to four on-field and six off-field characters, subject to your current deployment capacity. You do not start with ten usable slots.
Two health systems: individual characters fight inside each battle, while squad HP tracks the run. Failing a stage within its action-value limit costs squad HP; the run ends if squad HP reaches zero. Protecting the board early preserves room to recover later.
Players familiar with Divergent Universe should learn this mode’s recruitment and economy separately. Sharing a rewards track does not mean the two modes share their team-building rules.
1.1 🎮 Standard vs Overclock
| Choice | Use it for | Economic difference |
|---|---|---|
| Standard Gambit | Learning full runs and advancing rank at an eligible difficulty | Normal interest rewards a healthy Gold reserve. |
| Overclock Gambit | Shorter sessions and points farming after it becomes available | More automatic Gold and EXP per node; no interest. It does not advance rank. |
Rank progression: clear Standard at your current highest eligible difficulty to advance. Lower-difficulty farming and Overclock do not advance your rank.
Best use case
Choose Standard when your goal is progression or learning how a board develops. Choose Overclock when your immediate goal is a shorter rewards session. In either mode, use a difficulty you can clear reliably before chasing showcase-level runs.
1.2 🪙 Three Different Resource Systems
| Resource | Where it belongs | What to remember |
|---|---|---|
| Gold Coins, shop copies and squad levels | Your current run | They build the current board; they do not purchase permanent characters. |
| Equivalent Banknotes and Advantage Layout | Mode progression | Use them on the relevant progression nodes; distinguish Permanent and Seasonal Advantage. |
| Stellar Jade, passes and Trailblaze Power | Your normal account | Warp spending and normal farming are separate from shop recruitment. |
2. 🧩 Best Currency Wars Teams: Choose a Working Engine
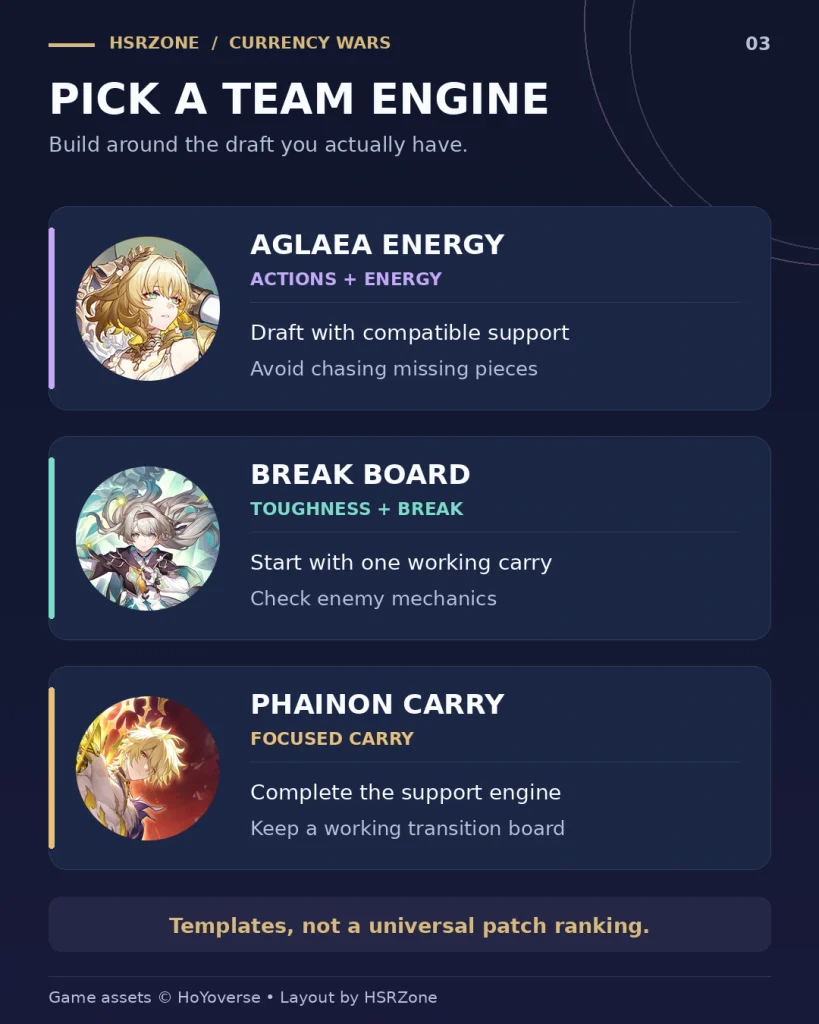
The best Currency Wars team for a run is the one whose carry, support engine, available copies and equipment arrive together. My recommendation is to learn two different routes: one centered on a single carry and one that can use several damage dealers. That makes an awkward shop much easier to rescue.
Read this before copying a lineup
The boards below are published team templates, not a verified September 2026 tier ranking. They illustrate a developed board, not your opening deployment. Before committing, check current character eligibility, cost, position icons and Bond text. A locked Expert Advisor must be unlocked for the run before you can recruit it normally.
2.1 📋 On-Field and Off-Field Team Templates
| Route | On-field example | Off-field example |
|---|---|---|
| Aglaea Energy | Aglaea · Sunday · Cyrene · Hyacine | Fu Xuan · Tingyun* · Huohuo · Tribbie · Anaxa · Saber |
| Break | Boothill · Firefly · Rappa · Lingsha | Himeko* · Ruan Mei · Gallagher* · Robin · Fugue · The Dahlia |
| Phainon | Phainon · Sunday · Cyrene · Remembrance Trailblazer | Tingyun* · Sparkle · Gallagher* · Robin · Cerydra · Dan Heng • Permansor Terrae |
2.2 ⚡ Aglaea Energy
Engine: Aglaea converts action frequency into damage, with Energy support and Day Demigod synergy. Anti-Grav Boots and Day: Light Speed Propeller are established equipment directions when available.
- Draft toward it when: you have a useful Aglaea start, compatible action support and gear that rewards the same carry.
- Do not force it when: repeated purchases leave the board waiting for several missing support pieces. A recognizable character name is not enough.
- Stabilization priority: get the carry doing reliable work before buying every optional backline unit. Keep a functioning support until its replacement actually improves the engine.
2.3 🔥 Break Board
Engine: Break damage supported by Break Bonds and Toughness pressure. Wormhole Drill is a documented equipment option. Boothill and Rappa also offer a Galaxy Ranger pairing.
- Draft toward it when: your early pieces already point toward Break and your equipment supports that direction.
- Build progressively: use one effective Break carry first; the three-DPS end-board is a destination, not an opening requirement.
- Before the boss: inspect whether your board can create the needed Break windows. A damage upgrade cannot solve every Toughness or enemy-mechanic problem.
2.4 🌟 Phainon Carry
Engine: focus the board on Phainon, using compatible support, transformation uptime and off-field protection. The Deliverer route concentrates a large share of the run’s power in one carry.
- Draft toward it when: you can afford both the carry and the support needed to make that carry function.
- Budget risk: do not pay for an entire premium end-board while your current squad is losing badly.
- Pivot rule: keep a temporary upgraded damage dealer equipped until the Phainon package is ready to replace it.
2.5 🔄 Substitutions, Advisors and New Bonds
Replace a missing character by function: the required Bond member, a battery, an amplifier or protection. Then recheck the active Bond counter. A substitute that fills a familiar normal-game role may still remove an important Currency Wars threshold.
The 2026 expansion added Elation options, including an Elation school Bond. Energy, Break and Phainon therefore are not the only viable directions. Use the in-game Strategy Compendium to inspect a recent strategy that matches your available characters, rather than forcing an older screenshot. The official companion strategy tool also supports searching by characters and Bonds.
The role-balancing principles in our team-building guide remain useful, but normal four-character compositions are not complete Currency Wars boards.
3. 💰 Gold Economy: Save, Level or Reroll?
Good economy is not the highest Gold total on the defeat screen. It is enough future income to keep improving without letting the current board collapse. Decide what a purchase accomplishes before pressing refresh.
3.1 🏦 Standard Gambit Interest Table
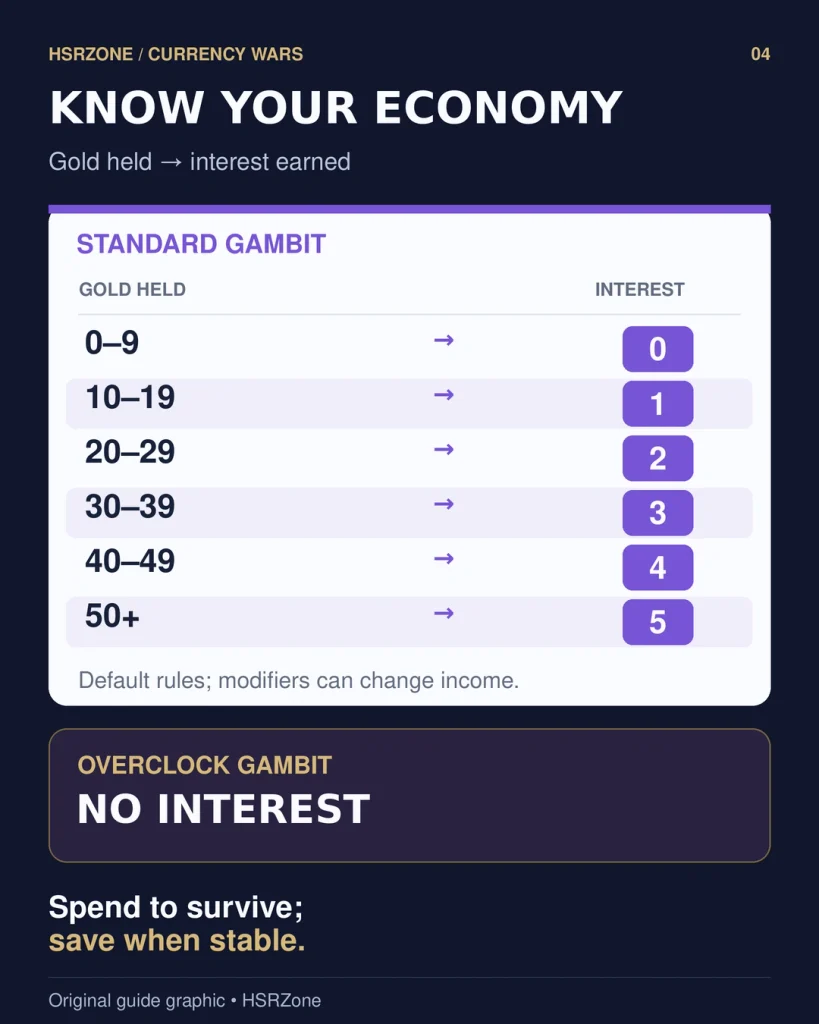
Under the normal Standard rules, each complete 10 Gold earns 1 Gold of interest, capped at 5. This excludes base income, winning-streak income and special modifiers.
| Gold held for the interest calculation | Normal interest |
|---|---|
| 0–9 | 0 |
| 10–19 | 1 |
| 20–29 | 2 |
| 30–39 | 3 |
| 40–49 | 4 |
| 50+ | 5 — normal cap |
Practical rule
Protect 50 only while the board is safe. If you have 54 Gold, a 4-Gold purchase leaves the normal maximum-interest reserve intact. An 8-Gold package leaves 46 and drops the baseline interest bracket by one. If that package completes a crucial upgrade and prevents another loss, the trade can be worthwhile. This is a planning example, not a guaranteed return calculation.
Overclock uses a different rule
Overclock has no interest. Keep Gold only for a concrete purchase, a useful shop search or a level-up plan. Hoarding exactly 50 has no interest benefit there. Investment effects can also change normal Standard incentives, so read their descriptions before applying a reserve rule.
3.2 🎯 Leveling and Shop Odds
Leveling increases deployment capacity and changes the shop’s cost distribution. More levels are not always better when you still need cheap duplicates. Conversely, repeatedly refreshing at a poor level can make an expensive carry much harder to find.
| Target | Documented baseline example | How to use it |
|---|---|---|
| A 2-cost carry | Level 6: 40% of shop slots are 2-cost | A reasonable point to search for that cost tier if the board can stay there safely. |
| A 4-cost carry | Level 8: 22% of shop slots are 4-cost | Improves access to this tier compared with earlier levels; check the current shop tooltip before committing. |
| One specific character | Cost-tier probability is not individual-character probability | A 40% tier rate does not mean a 40% chance of your chosen unit. Pool availability still matters. |
3.3 🛒 A Practical Spending Decision Table
| Your board state | Recommended action | Stop condition |
|---|---|---|
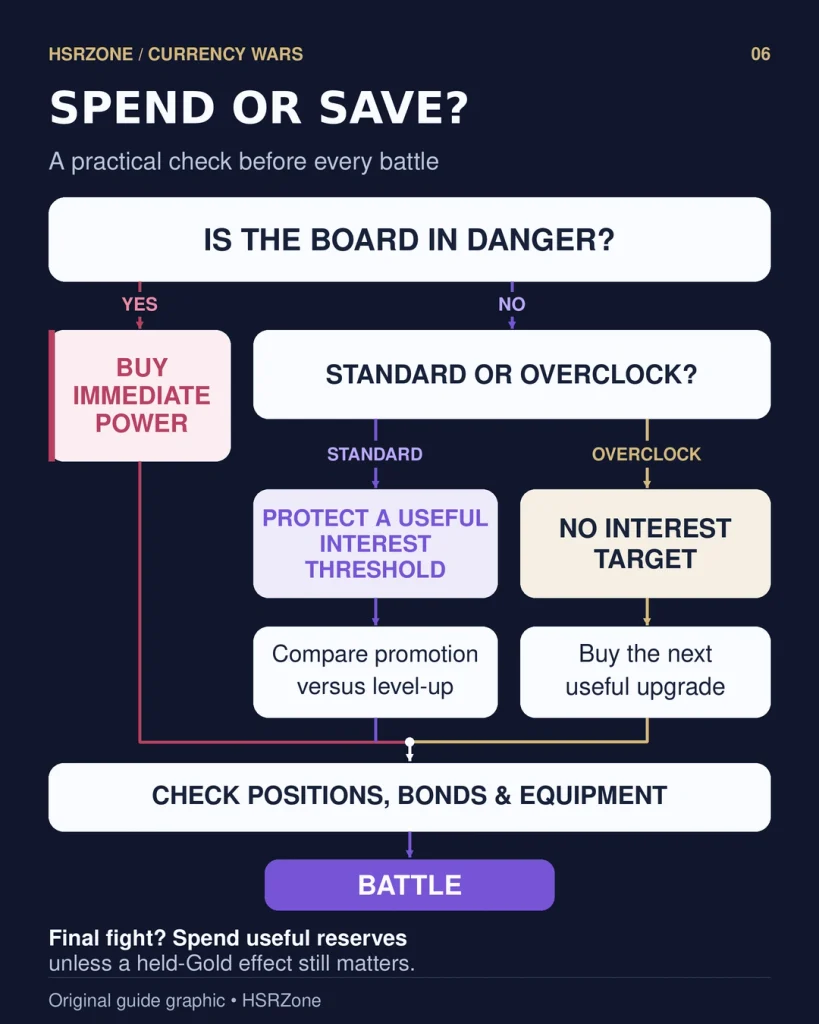
| Winning comfortably in Standard | Buy useful natural shops and rebuild interest | Stop optional spending before the next useful reserve threshold. |
| One copy away from an important promotion | Search within a defined budget at suitable odds | Stop at the promotion or your budget limit; do not invent a new target mid-spend. |
| A new slot completes a useful Bond | Compare the total level-up plus unit cost | Level only when you can also field the piece that makes it worthwhile. |
| Losing heavily or close to elimination | Spend for immediate upgrades and protection | Stop when the board is stable; survival takes priority over interest. |
| Final decisive fight is next | Convert useful remaining Gold into power | Keep only resources tied to an effect that still benefits from holding them. |
| Overclock run | Spend around immediate board improvements | No 50-Gold interest reserve is required. |
The default paid shop refresh costs 2 Gold; five paid refreshes cost 10 before buying anything. Use the automatic node refresh and lock a genuinely valuable shop when appropriate. Bench space and spare pairs are part of the budget too: sell abandoned pieces before they prevent useful recruitment.
4. 🛠️ Upgrades, Equipment and Permanent Progression
4.1 ⭐ Character Star Upgrades
| Promotion | Normal copy requirement | Budget implication |
|---|---|---|
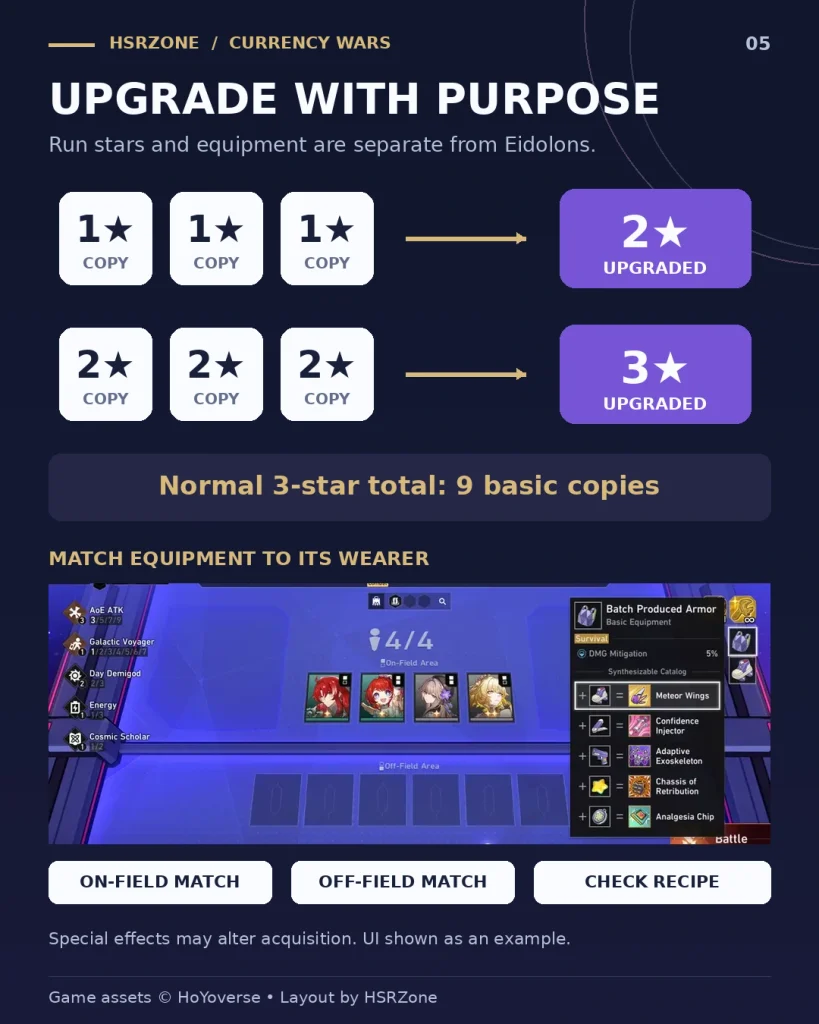
| 1-star → 2-star | Three identical 1-star copies | Often a practical stabilization target. |
| 2-star → 3-star | Three identical 2-star copies | Nine underlying 1-star copies in total, unless a special effect changes acquisition. |
| Every support → 3-star | Usually unnecessary for a basic clear | Spend where the actual empowerment gain helps; do not promote the whole board indiscriminately. |
A shop cost, a Currency Wars star level and an account Eidolon are different things. Read the next Character Empowerment before paying for a promotion. A small support upgrade that fixes your engine can be more valuable than chasing the final copies of a secondary damage dealer.
4.2 ⚙️ Equipment Priority
Run equipment is separate from account Light Cones and relics. A character normally carries up to three pieces. Use the displayed synthesis recipes and available removal tools to move from temporary holders to your final board.
| Problem | What to prioritize | What to check |
|---|---|---|
| Your main carry is underperforming | Equipment matching the carry’s actual damage engine | Does it benefit on-field or off-field output, and does that match the wearer? |
| Your support loop stalls | The resource or action effect the loop lacks | Do its activation conditions occur in this mode and position? |
| Characters repeatedly take lethal damage | Useful defensive equipment or a better protection package | Is the loss caused by fragility, or by a mechanic the board fails to answer? |
| You just changed carry | Reassign compatible equipment before combat | Do not leave the strongest items on the outgoing temporary unit. |
Upgrade order for an unstable board
Correct positioning → useful active Bonds → meaningful promotions → well-matched equipment → extra slots with a purpose. This is a diagnostic order, not a command to skip a strong item or guaranteed upgrade offered earlier.
4.3 📈 Advantage Layout and Account Builds
Open Advantage Layout between runs and spend available Equivalent Banknotes on useful unlocked nodes. The system distinguishes Permanent Advantage from Seasonal Advantage. Review the season notice before assuming that every upgrade survives a reset.
For an early progression route, prioritize a benefit you will actually use repeatedly: a more reliable opening, additional flexibility or protection from a mistake. A specialized damage node is less attractive if you are still changing archetypes every run.
Owned characters can inherit account investment, while available unowned characters use trials and underbuilt characters receive mapping assistance. This does not make every build identical. Off-field effects may also differ from normal combat; check the mode description before valuing a signature. Our Light Cone guide covers normal account choices, which should be considered separately from run equipment.
5. 📊 Investment Environments, Strategies and Bonds
An attractive economy effect can be a poor choice when you will lose before it pays out. Evaluate every Investment Environment and Strategy against your current board, the remaining nodes and the purchase it enables.
| Effect category | Usually attractive when | Common trap |
|---|---|---|
| Gold or interest | You have time to benefit and a board that survives | Taking delayed income immediately before a difficult fight. |
| EXP or additional capacity | Your next slot completes a useful package | Leveling without enough resources to field the new slot. |
| Refreshes or recruitment | You know which eligible cost tier or copy you need | Spending refreshes on a character that is not unlocked. |
| Equipment or combat amplification | The bonus directly improves your working engine | Choosing a rare effect that benefits the wrong damage type or position. |
| Bond emblem or advisor access | It completes an important threshold or unlocks your plan | Treating every emblem or unlocked character as automatically worth deploying. |
For example, the documented Interest Rate Increase strategy raises the interest cap, while Buy-Out removes interest and grants a different growth benefit. The usual 50-Gold plan cannot be copied unchanged into both situations. Read the selected effect, not just its rarity color.
Bond checklist
- ☐ The listed members are deployed, not sitting in the waiting area.
- ☐ The next addition reaches a real threshold shown in the Bond panel.
- ☐ The bonus helps your carry or fixes a current weakness.
- ☐ Moving a character preserves the position required for its empowerment.
- ☐ A substitute does not silently break another important threshold.
From a planning perspective, the strongest choice is often the one that reduces the number of things you still need to find. A finished engine with modest bonuses is easier to play than three impressive effects waiting for three different teams.
6. 🗺️ A Step-by-Step Plan for More Consistent Clears
| Stage | Main decision | Practical action |
|---|---|---|
| Before the run | Choose the objective | Pick rank progression, short points farming or a collection task; do not expect every run to maximize all three. |
| Opening | Field something functional | Use available upgrades, correct positions and one clear damage plan. Avoid expensive speculative shopping. |
| Early development | Identify your real direction | Let copies, equipment and useful Bonds narrow your options before selling a working board. |
| Middle of the run | Stabilize or grow | Compare immediate promotions with the next level and its deployable unit. Review the next boss before committing. |
| Late development | Finish the engine | Prioritize the missing piece that changes the outcome, not cosmetic completeness. |
| Final preparation | Spend and inspect | Allocate equipment, activate Bonds, remove idle inventory and check your protection plan. |
6.1 🔎 Diagnose a Failed Fight Before Buying More Damage
- Carry barely acts: inspect the action and resource engine before buying another damage dealer.
- Team spends too long setting up: reduce dependence on missing support pieces or inspect manual targeting.
- Repeated lethal hits: repair protection. In this mode, lethal damage can cost combat time even when the character recovers.
- Boss barely loses HP: review its mechanic, your damage type and whether the intended Bond or empowerment is actually active.
- Everything works except the last fight: consider whether you saved too long or spent too much on optional copies.
Before pressing Battle
Check the carry’s star level, all active equipment, current Bonds, position icons and the next opponent. If something important is still in the waiting area or inventory, fix it now. This short review is usually more useful than one unfocused refresh.
7. 🎁 Rewards, Weekly Reset and Efficient Farming
7.1 📅 Which Rewards Reset?
| Reward layer | Timing | How to plan |
|---|---|---|
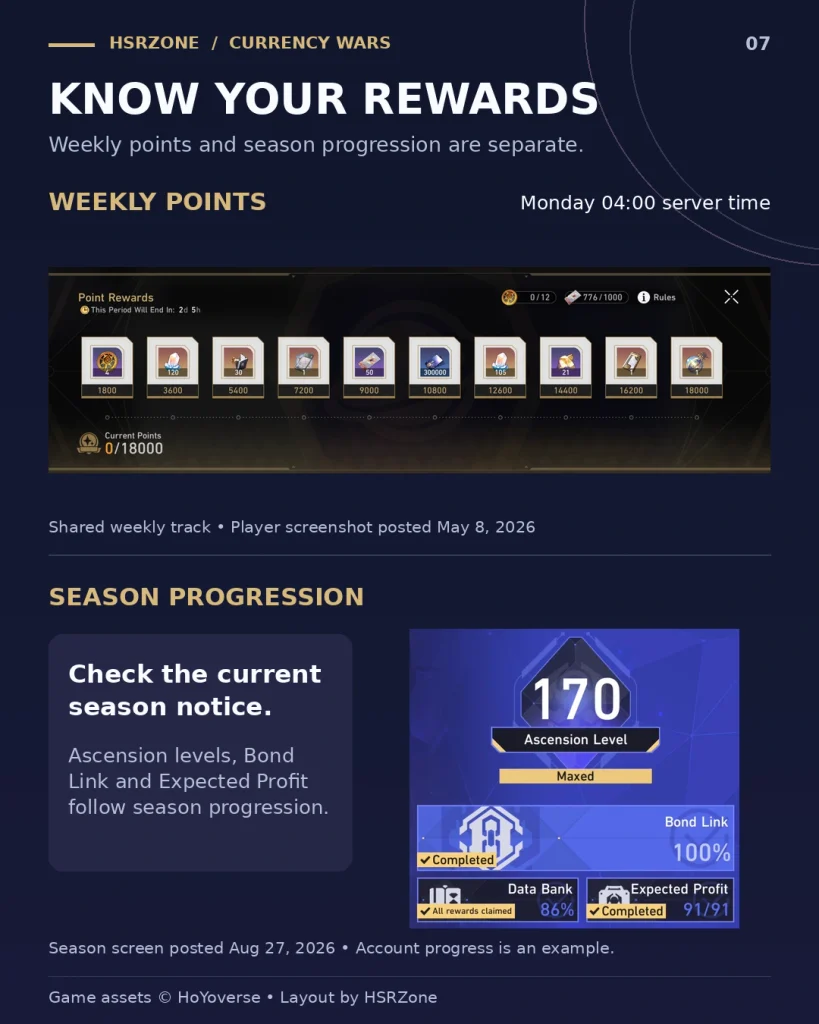
| Shared Currency Wars / Simulated Universe points | Weekly, Monday 04:00 server time under the post-4.2 system | Check the shared bar before starting another run; progress from the other eligible modes may already count. |
| Ascension and season collections | According to the active season and official update notice | Inspect the Ascension, Bond Link, Data Bank and Expected Profit panels for unclaimed objectives and deadlines. |
| Introductory, rank or first-completion claims | As specified on each reward panel | Claim eligible milestones; do not add them to repeatable weekly income. |
| Future expansion rewards | Only after the applicable update is live | Recheck the announcement and in-game panel instead of recycling a launch total. |
The merged points track includes Stellar Jade, Star Rail Passes, Tracks of Destiny, Herta Bonds, Credits, Fuel Vouchers and Deep Immersifiers. Read your displayed reward tier for the applicable quantities rather than assuming that a screenshot from another account matches yours.
How many Stellar Jades can you earn? Separate the visible weekly entitlement from your remaining season and one-time claims. There is no single universal “Jades left” total for every account. Old launch totals should not be presented as a current weekly payout.
- ☐ Check the shared points bar and the current reward tier first.
- ☐ Complete the remaining points with a mode and difficulty you can clear consistently.
- ☐ Claim rewards explicitly; finishing a run and claiming every panel are different steps.
- ☐ Review season objectives before an announced reset.
- ☐ Record only newly claimable rewards in your pull budget.
Add those claims to your wider Stellar Jade farming plan while keeping recurring income and one-time milestones separate.
7.2 ⛽ Fuel Vouchers and Farming Materials
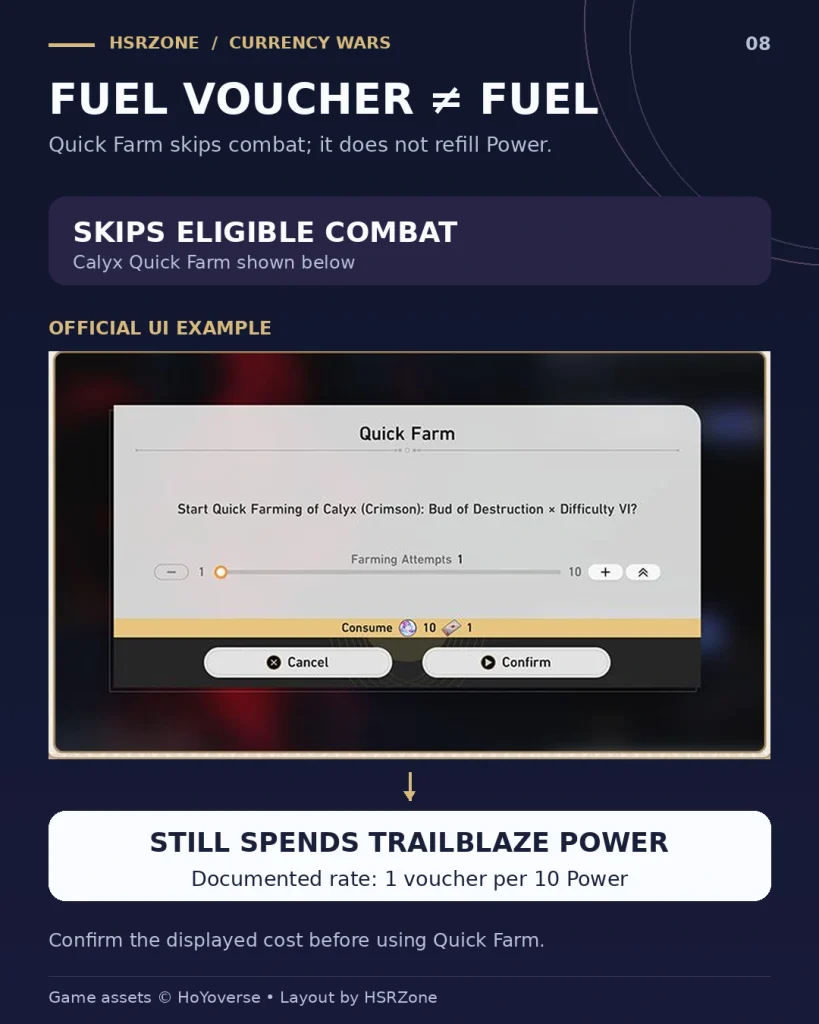
Fuel Vouchers save farming time; they do not refill Trailblaze Power. Eligible Quick Farm actions for Calyx and Stagnant Shadow consume the required Power alongside vouchers. The documented conversion is one voucher per 10 Power. Confirm the cost in the current confirmation window before spending.
For F2P players, use the materials where they complete an actual account upgrade. A voucher is convenient, but it does not make unnecessary farming efficient. Do not mistake it for Fuel or assume that every farming activity uses the same quick-farm item.
8. 🎟️ Pull or Save? F2P Account Decisions
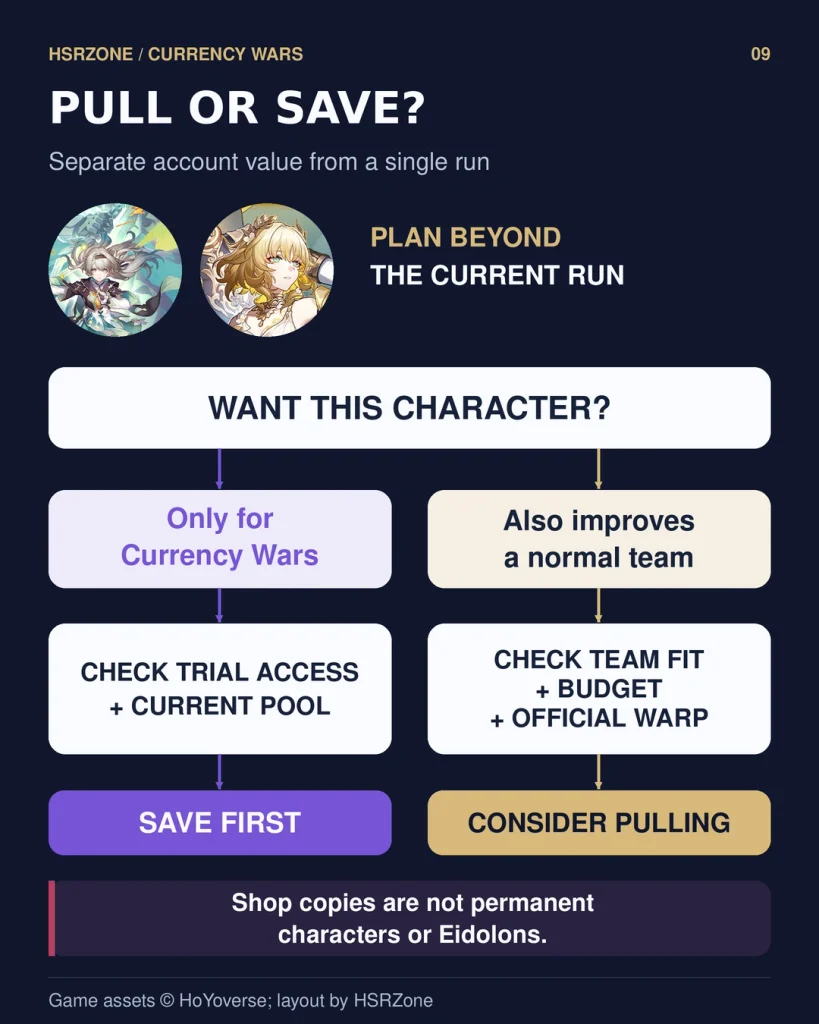
Do not pull a limited character just to make it appear in Currency Wars. Eligible unowned characters can be used through the mode’s trial system. Shop recruitment does not consume Star Rail Special Passes and does not permanently add the character to your account.
| Your situation | Pull or save? | Reason |
|---|---|---|
| You want a character only for a Currency Wars template | Save first | Check trial access and current pool eligibility before spending account currency. |
| The board fails because Bonds, positions or equipment are wrong | Fix the run | A Warp purchase does not repair these decisions. |
| You also want the character for a normal endgame team | Consider pulling | Evaluate that account team, its supports and your budget independently. |
| You want a signature Light Cone only for an off-field unit here | Usually save | Confirm its actual mode behavior before paying for an assumed interaction. |
| You already collect your target rewards | Save or pull for preference | There is no progression requirement to keep spending. |
| You have high pity on a banner you do not want | Save | Pity is not a reason to accept an unwanted five-star. Do not build pity for its own sake. |
If you also need stronger teams outside Currency Wars, review low-investment team options before committing your next guarantee.
Account-spending checklist
- ☐ I want the character beyond one Currency Wars run.
- ☐ I know which existing team the character improves.
- ☐ I have checked the live official Warp notice and availability.
- ☐ My budget still covers a higher-priority target.
- ☐ I am not confusing a shop promotion with an Eidolon.
9. 🗓️ Character and Light Cone Banner History
These selected first-release Warp records cover characters relevant to the examples above. They are historical account-planning context, not the current banner schedule or the Currency Wars recruitment pool. Later reruns are intentionally outside the scope of these tables.
9.1 👤 Character Banner History
| Character | Debut Character Event Warp | First release | Version |
|---|---|---|---|
| Firefly | Firefull Flyshine | June 19, 2024 | 2.3 |
| Sunday | Eyes to the Stars | December 4, 2024 | 2.7 |
| Fugue | The Long Voyage Home | December 25, 2024 | 2.7 |
| Aglaea | Tailored Fate | February 5, 2025 | 3.0 |
9.2 💡 Light Cone Banner History
| Light Cone | Associated character | First Brilliant Fixation release | Version |
|---|---|---|---|
| Whereabouts Should Dreams Rest | Firefly | June 19, 2024 | 2.3 |
| A Grounded Ascent | Sunday | December 4, 2024 | 2.7 |
| Long Road Leads Home | Fugue | December 25, 2024 | 2.7 |
| Time Woven Into Gold | Aglaea | February 5, 2025 | 3.0 |
Our character and Light Cone banner history provides additional historical context. Use official notices and the live Warp screen for present availability; a previous release date does not predict the next rerun.
Before any banner update
If this guide is expanded to discuss an active or upcoming Warp, replace that information using the applicable official announcement. Never label a historical debut or an unconfirmed rerun as a current banner.
10. 🚫 Common Mistakes That Lose Runs
| Mistake | Why it hurts | Fix |
|---|---|---|
| Copying a normal four-character team | Ignores extra deployment, Bonds and mode-specific roles | Build the complete engine and useful off-field support. |
| Treating the waiting area as an active backline | The character is not contributing as a deployed ally | Check the actual deployment zones. |
| Saving 50 Gold in Overclock for interest | That mode does not pay interest | Spend toward a concrete upgrade plan. |
| Refreshing without checking eligibility | A locked Advisor cannot be found through ordinary persistence | Read the current index and unlock conditions. |
| Chasing every unit to three stars | Consumes budget without necessarily fixing the fight | Promote the carry or support whose gain matters most. |
| Ignoring repeated lethal damage | Recovery can cost precious combat time | Repair protection and inspect the enemy mechanic. |
| Budgeting old launch rewards as weekly income | Mixes different reward systems and dates | Read the current weekly and season panels separately. |
| Claiming one template always wins | Shop offers, gear, bosses and patches vary | Keep a second route and a clear pivot condition. |
Your next-run target
Choose one improvement you can observe: fewer wasted refreshes, a correctly activated Bond, a useful promotion before a dangerous fight or claiming the remaining weekly points. Change that one decision, then assess what still stops the clear.
11. ❓ Currency Wars FAQ
❓ 11.1 Is Currency Wars permanent?
Yes. Currency Wars is a permanent Honkai: Star Rail mode. Its roster, seasonal progression and rewards can change, so permanent availability does not mean every season objective remains claimable forever.
❓ 11.2 What is the best Currency Wars team?
There is no single board that is best for every shop and patch. Aglaea Energy, Break and Phainon are useful documented templates. Choose the route your available copies, equipment and support engine can actually complete, and verify current pool eligibility.
❓ 11.3 Do I need to own the characters?
No. Available unowned characters can be recruited as trials within the mode. However, the current pool and any Expert Advisor requirements still apply. Recruiting a trial does not unlock that character permanently.
❓ 11.4 Should I always save 50 Gold?
No. Fifty is the normal maximum-interest reserve in Standard Gambit, not a survival rule. Spend below it to secure an important upgrade when needed. Overclock pays no interest, and special investment effects can change Standard incentives.
❓ 11.5 Do relics, Light Cones and Eidolons matter?
They can matter for owned characters, alongside mapping assistance and trial builds. Currency Wars equipment is an additional system. Check the character’s mode-specific description, especially off-field triggers, instead of assuming every normal-build interaction transfers unchanged.
❓ 11.6 When do Currency Wars rewards reset?
The shared Currency Wars and Simulated Universe points cycle resets each Monday at 04:00 server time under the post-4.2 rules. Ascension, collection and other season rewards use their own schedules. Check the active season notice for those deadlines.
❓ 11.7 Do Fuel Vouchers replace Trailblaze Power?
No. They skip eligible Calyx or Stagnant Shadow farming combat while the action still consumes Trailblaze Power. Fuel Vouchers are different from Fuel, which is used to replenish Power.
❓ 11.8 Why does a listed character never appear in my shop?
Check whether the unit is in the current pool, whether it needs an Expert Advisor unlock and whether your squad level offers the relevant cost tier. A lineup copied from another season may not be recruitable in the same way now.
12. 📚 Sources
Editorial method: official announcements establish unlocks, reward changes and expansion scope. In-game tutorial transcriptions and specialist references cross-check mechanics. The spending examples, diagnostic order and recommendation tables are editorial planning advice; they are not personal run logs, measured win rates or guarantees.
- 1. Official reward changes: Currency Wars & Simulated Universe: Periodic Points Consolidation Details. The authoritative correction for the shared weekly track introduced on April 22, 2026.
- 2. Official launch and expansion notes: Version 3.7 Update Details. Original entry requirements and Fuel Voucher rules.
- 2a. Official 2026 expansion: Version 4.2 Update Details. Elation expansion and confirmation of the points merger.
- 3. In-game tutorial reference: Currency Wars tutorial transcription. Interest, promotions, positions and baseline shop-planning guidance.
- 3a. Current released Overclock tutorial: Overclock Gambit: Rules. Independent release-data transcription explicitly stating that Overclock has no interest.
- 3b. Shop tutorial: Store tutorial. Default paid refresh cost, automatic refresh and locking.
- 4. General mechanics cross-check: Prydwen Currency Wars guide. Deployment, equipment and run structure. Its older biweekly reward text is superseded by official source 1.
- 5. Team-template reference: Game8 Currency Wars best teams. Source of the example developed boards; not evidence of a universal current ranking.
- 5a. Bonds and Advisor eligibility: Icy Veins Currency Wars Bonds. Cross-check for faction and school membership, including Advisor distinctions.
- 6. Shop odds and mode rules: Currency Wars: Zero-Sum Game reference. Baseline cost-tier odds; check the live tooltip for the active ruleset.
- 6a. Character rules: Currency Wars characters. Trial, inherited-build and off-field interaction cross-checks.
- 7. Progression reference: Advantage Layout. Equivalent Banknotes and the distinction between Permanent and Seasonal Advantage.
- 7a. Investment effects: Investment Strategy reference. Examples showing why a standard interest plan changes under specific effects.
- 8. Official strategy resource: Currency Wars Strategy Compendium announcement. Finding and organizing strategies by characters and Bonds.
- 9. Firefly history: Firefull Flyshine — June 19, 2024. Selected historical character debut record.
- 9a. Firefly Light Cone history: Brilliant Fixation — June 19, 2024. Selected historical Light Cone record.
- 10. Official Version 2.7 history: Version 2.7 Update Details. Sunday, Fugue and their signature Light Cones.
- 10a. Sunday historical dates: Eyes to the Stars — December 4, 2024. Historical start date and version.
- 10b. Fugue historical dates: The Long Voyage Home — December 25, 2024. Historical start date and version.
- 11. Aglaea historical dates: Tailored Fate — February 5, 2025. Historical character debut.
- 11a. Official Light Cone announcement: Version 3.0 Brilliant Fixation notice. Time Woven Into Gold historical availability.