


Last checked: November 2, 2026. Build scope: Novaflare-enhanced Firefly, introduced in Version 4.2, with E0 equipment as the baseline. Skill-specific examples use level-10 Ultimate unless stated otherwise. Banner dates below are historical records, rather than a live availability notice.
A good Firefly build in HSR gets SAM enough actions inside Complete Combustion and enough Break Effect to make those actions count. The familiar Iron Cavalry and Kalpagni setup still works, but her 2026 enhancement changes the Break Effect thresholds, target selection and value of repeated Weakness Breaks. Start with the updated targets below before spending more Trailblaze Power.
Contents
- 1 🚀 Quick Answer: What Is the Best Firefly Build?
- 2 1. 🔥 Firefly Build Overview and 2026 Changes
- 3 2. 🧩 Best Relics for Firefly
- 4 3. 🌌 Best Planar Ornaments for Firefly
- 5 4. 📊 Firefly Main Stats and Break Effect Breakpoints
- 6 5. ⚡ Firefly Speed Breakpoints: 150, 210 and Team Buffs
- 7 6. 💡 Best Firefly Light Cones
- 8 7. 🎮 Firefly Rotation and Real Battle Checks
- 9 8. 🤝 Best Firefly Teams in 2026
- 10 9. 📈 Firefly Trace Priority and Farming Route
- 11 10. 📜 Firefly Character and Light Cone Banner History
- 12 11. 💎 Firefly Pull or Save Decision Table
- 13 12. ✅ Common Firefly Build Mistakes and Final Checklist
- 14 13. ❓ Firefly Build HSR FAQ
- 14.1 13.1 🧩 What Are the Best Relics for Firefly?
- 14.2 13.2 🎯 Does Firefly Still Need 360% Break Effect?
- 14.3 13.3 ⚡ How Much SPD Does Firefly Need?
- 14.4 13.4 📊 Does Firefly Need CRIT or a Fire DMG Sphere?
- 14.5 13.5 💡 Is Firefly’s Signature Light Cone Required?
- 14.6 13.6 🤝 Does Firefly Still Need Harmony Trailblazer?
- 14.7 13.7 🦊 Should Fugue Buff Firefly or Lingsha?
- 14.8 13.8 🔋 Should Firefly Use an Energy Regeneration Rope?
- 14.9 13.9 📅 When Is Firefly’s Next Rerun?
- 15 14. 🌐 Sources & Update Notes
🚀 Quick Answer: What Is the Best Firefly Build?
Recommended starting build
Use 4-piece Iron Cavalry Against the Scourge and Forge of the Kalpagni Lantern, with ATK% body, SPD boots, ATK% sphere and Break Effect rope. Aim for 300% Break Effect in Complete Combustion and 210+ combat SPD as a conservative timing baseline. Equip Whereabouts Should Dreams Rest or F2P On the Fall of an Aeon, then add Break supports and a reliable sustain.
The 210+ recommendation assumes a stable Speed value and does not rely on her new countdown extensions. The Dahlia, timely Weakness Breaks and external action advances can change the actual number of attacks. The sections below explain when these targets are useful and when they need adjusting.
1. 🔥 Firefly Build Overview and 2026 Changes
| Build choice | Recommendation | Why it matters |
|---|---|---|
| Role / Type / Path | Break and Super Break DPS / Fire / Destruction | She needs useful Toughness reduction and repeated enhanced attacks. |
| Relic set | 4-piece Iron Cavalry Against the Scourge | Break Effect plus DEF ignore for Break and Super Break damage. |
| Planar set | Forge of the Kalpagni Lantern | SPD and conditional Break Effect that her Fire implant helps activate. |
| Main stats | ATK% / SPD / ATK% / Break Effect | Body / boots / sphere / rope. |
| First offensive targets | 300% combat Break Effect; a stable 210+ SPD in Complete Combustion | The highest enhanced A4 tier and a conservative four-action timing baseline. |
| Premium team to consider | Firefly + The Dahlia + Fugue + Lingsha | Dedicated Break amplification, Exo-Toughness and an offensive healer. |
| Accessible core | Firefly + Harmony Trailblazer + available Break support + sustain | A practical route before completing the premium roster. |
1.1 ✨ What Changed With Novaflare?
| Mechanic | Enhanced Firefly | Practical result |
|---|---|---|
| Enhanced Skill implant | Applies Fire Weakness to the main target and adjacent targets for two turns | A blast attack can prepare multiple enemies for Fire Toughness reduction. |
| Antilag Outburst | +25% Break Effect during Complete Combustion | Count it in combat, rather than expecting it on the out-of-battle panel. |
| Combustion extension | A qualifying Enhanced Basic / Enhanced Skill Weakness Break delays the countdown by 10%, up to three triggers per state | Breaking the right target can create more time for enhanced attacks. |
| Autoreactive Armor | 150% / 300% Break Effect unlocks 100% / 150% native Super Break | Older 200% / 360% thresholds describe her previous state. |
| E2 trigger | One qualifying extra-turn trigger per turn, with the count resetting at the start of SAM’s turn | Repeated Breaks and kills are more valuable, but still require a valid trigger. |
Check which version of Firefly is active
This guide uses the enhanced state. HoYoverse lets you switch to the previous state under Character Details → Character Enhancement. If your displayed Trace text still uses the old 200% / 360% Super Break thresholds, check that setting before following the targets here.
1.2 🧠 What Actually Scales Firefly’s Damage?
Firefly’s main damage comes from Weakness Break and Super Break. Character level, Break Effect, Toughness reduction, relevant DEF ignore / reduction, RES effects and Break-compatible damage-taken debuffs matter. Ordinary CRIT and Fire DMG bonuses do not scale those Break instances.
Her attacks still contain regular Fire damage, so those stats are not literally absent from her kit. They simply offer poor value for the Break build covered here. ATK is useful mainly because Core Overload converts eligible ATK above 1,800 into additional Break Effect.
If the difference between the initial Break and repeated Super Break hits is unclear, the Break Effect and Super Break explanation covers the scaling behind this build.
2. 🧩 Best Relics for Firefly
2.1 🐎 Iron Cavalry Against the Scourge
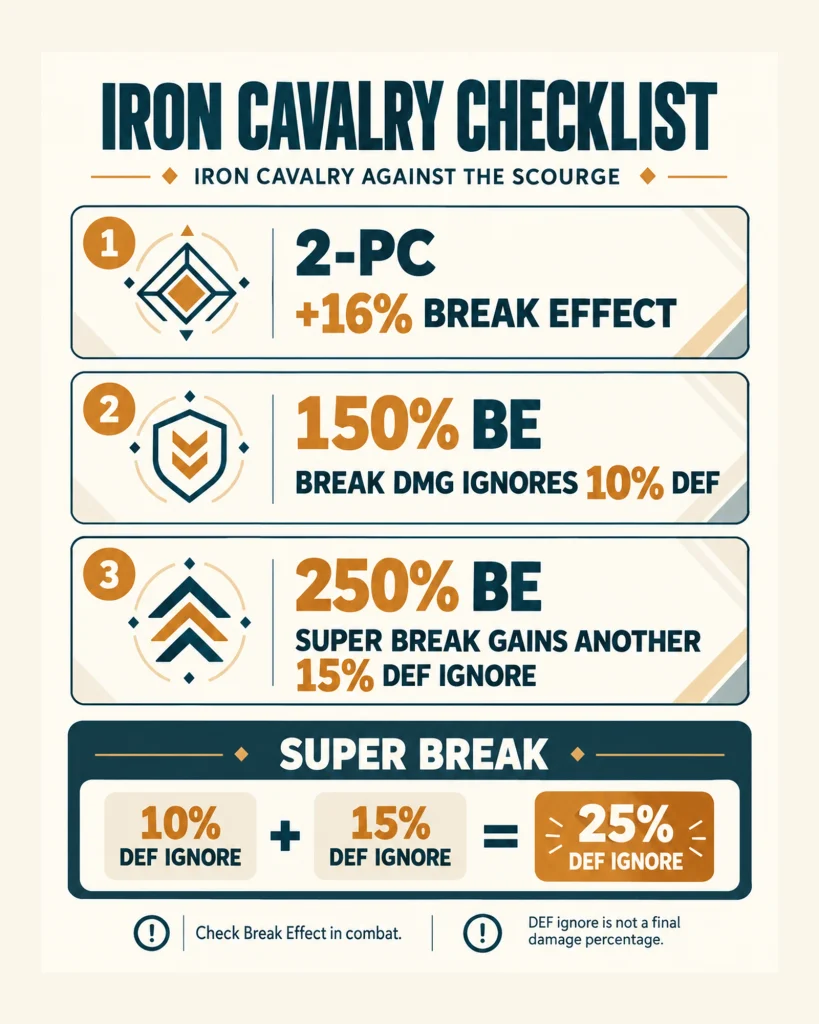
4-piece Iron Cavalry Against the Scourge is the default set. Two pieces give 16% Break Effect. At 150% Break Effect or above, the four-piece effect lets the wearer’s Break damage ignore 10% DEF. At 250% or above, Super Break gains a further 15% DEF ignore.
Practical rule
At the full condition, Firefly’s Super Break benefits from 25% DEF ignore from this set: 10% plus the additional 15%. Her ordinary Weakness Break gets the first 10%. These are DEF-ignore values, rather than guaranteed 25% or 10% final damage increases.
2.2 🔄 Temporary Sets and Farming Value
| Relic setup | When to use it | Tradeoff |
|---|---|---|
| 4-piece Iron Cavalry | The completed Break build | Requires useful main stats and the combat Break Effect conditions. |
| 2-piece Iron Cavalry + 2-piece Thief or Watchmaker | A temporary mix with better SPD and Break Effect rolls | 32% Break Effect from the two set bonuses, but no Cavalry four-piece DEF ignore. |
| 4-piece Thief of Shooting Meteor | An existing set while building Cavalry | Break Effect and conditional Energy recovery, with a lower damage ceiling for this role. |
| 2-piece Break Effect + 2-piece SPD | A temporary way to repair a missed action threshold | Useful when it genuinely adds an action; reconsider after your team’s Speed buffs are included. |
Farm Cavalry at Cavern of Corrosion: Path of Cavalier in Penacony Grand Theater. The paired set is The Wind-Soaring Valorous. Its account value depends on whether another character actually needs it; the paired drop is not automatically useful for Firefly.
For F2P players, my gearing recommendation is to secure the right main stats and a functioning action window before chasing perfect rolls. The relic scoring guide helps explain why a CRIT-heavy score can misjudge a useful Break piece.
3. 🌌 Best Planar Ornaments for Firefly
3.1 🏮 Forge of the Kalpagni Lantern vs Talia
| Planar set | Relevant effect | Recommendation |
|---|---|---|
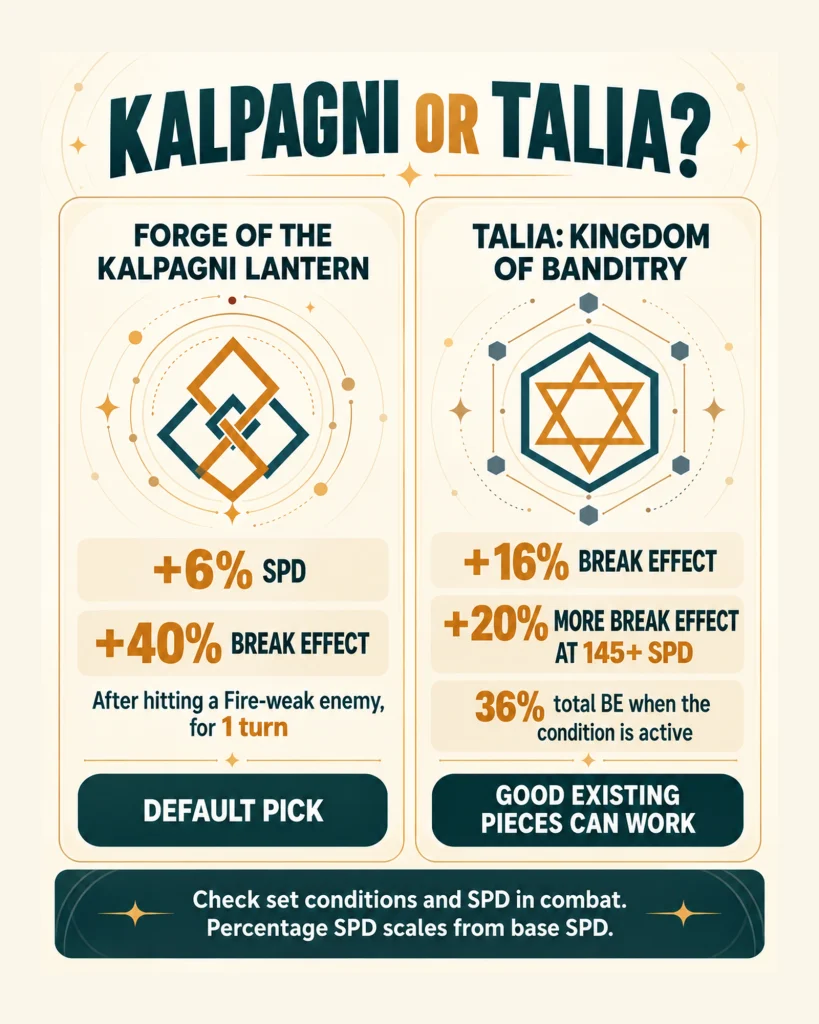
| Forge of the Kalpagni Lantern | 6% SPD; after hitting a Fire-weak enemy, +40% Break Effect for one turn | Default. Firefly’s Fire Weakness implant makes the condition convenient. |
| Talia: Kingdom of Banditry | 16% Break Effect, plus another 20% at 145 SPD or above | A usable alternative with strong substats; offers no SPD bonus. |
| Other offensive planars | Often generic damage or CRIT bonuses | Usually less useful for a dedicated Super Break build. |
Kalpagni’s 6% SPD is calculated from base Speed. Its 40% Break Effect is conditional, so do not add it to a pre-fight screenshot and call that a permanent sheet stat. Firefly’s implant helps activate the set, but the buff’s actual timing still belongs in the combat check.
Talia’s Speed condition can be met in battle. A slower pre-Ultimate panel does not automatically mean it stays inactive during Complete Combustion. Compare the full team’s Speed, then decide whether replacing good existing pieces is worth the farming cost.
Use the Planar Ornament farming route to target the correct extraction rewards instead of spending resources on an unrelated world.
4. 📊 Firefly Main Stats and Break Effect Breakpoints
4.1 🧥 Best Main Stats by Slot
| Slot | Main stat | What to look for next |
|---|---|---|
| Body | ATK% | SPD and Break Effect substats. |
| Feet | SPD | Break Effect and ATK%; ATK boots are a specialised team-tuning option. |
| Planar Sphere | ATK% | SPD and Break Effect; Fire DMG does not amplify Super Break. |
| Link Rope | Break Effect | SPD and ATK%; ERR is not the standard build. |
| Head / Hands | Fixed HP / ATK | SPD until the intended action threshold, then Break Effect and eligible ATK%. |
Substat priority
SPD until the chosen rotation works → Break Effect → ATK%. Keep enough HP, DEF and Effect RES to finish the fight. Once another SPD roll no longer improves the relevant action window, extra Break Effect may be the more useful upgrade.
4.2 🎯 Which Break Effect Numbers Matter?
| Combat Break Effect | What it activates | How to use the number |
|---|---|---|
| 150% | Enhanced Autoreactive Armor’s 100% native Super Break tier; Cavalry’s first DEF-ignore condition | An early functional threshold, rather than the completed damage target. |
| 250% | Iron Cavalry’s additional 15% Super Break DEF ignore | A useful equipment threshold before reaching the highest native Super Break tier. |
| 300% | Enhanced Autoreactive Armor’s 150% native Super Break tier | The main current Trace breakpoint to reach during Complete Combustion. |
| 360% | Cap on the Break Effect input used by the Enhanced Skill’s regular damage formula | It is no longer the highest native Super Break threshold and is not a cap on Break damage scaling. |
| Above 360% | More Break Effect continues to increase Break / Super Break damage | Further investment still has value after the listed thresholds. |
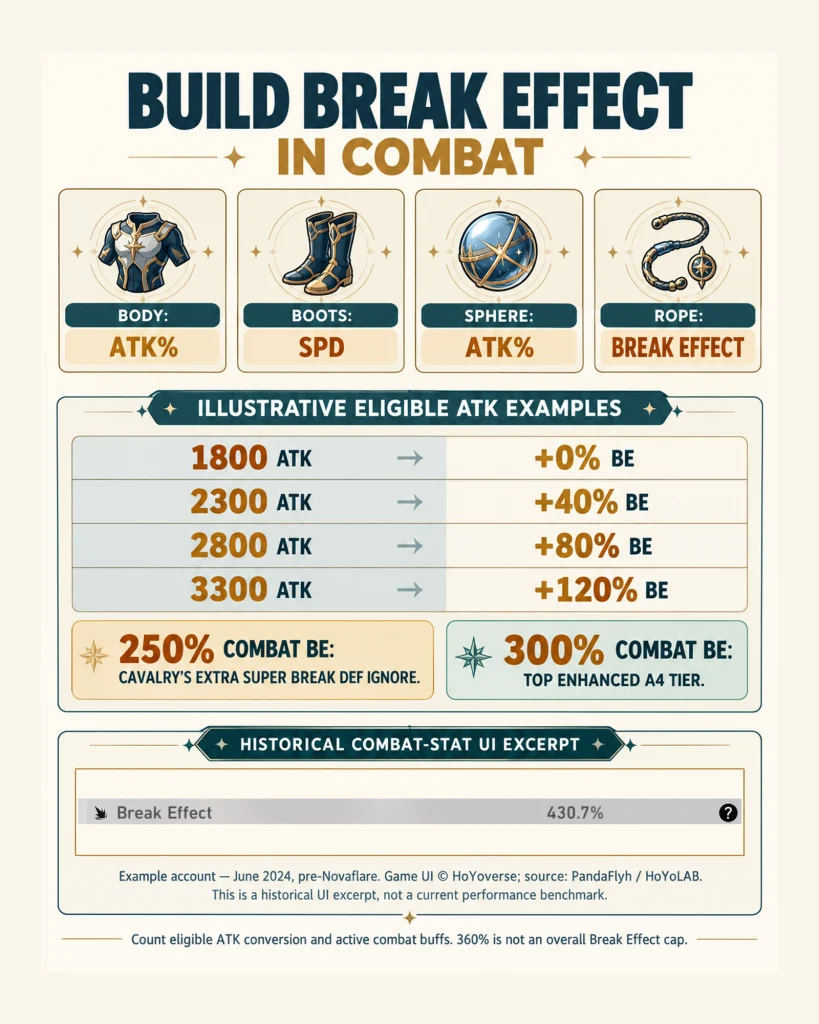
300% means the relevant in-combat value. Include Core Overload, Complete Combustion’s 25% bonus and active team / equipment buffs. There is no single out-of-battle Break Effect target that works for every Light Cone and team. A low panel can be fine with the right buffs; a large panel can still miss important timing.
4.3 🧮 How ATK Converts Into Break Effect
Core Overload grants 0.8 percentage points of Break Effect per 10 eligible ATK above 1,800. As a planning shortcut, every extra 100 eligible ATK above the threshold supplies about eight percentage points of Break Effect. The conversion is reflected in combat and can change when qualifying ATK buffs change.
| Eligible ATK used in the example | Core Overload bonus | What the example shows |
|---|---|---|
| 1,800 | 0% Break Effect | The conversion starts above this ATK threshold. |
| 2,300 | 40% Break Effect | (2,300 − 1,800) ÷ 10 × 0.8%. |
| 2,800 | 80% Break Effect | ATK% body / sphere and eligible cone effects contribute to the build. |
| 3,300 | 120% Break Effect | A larger combat ATK value can move you across a Break Effect threshold. |
Avoid circular buff calculations
Some ATK effects are derived from another stat and do not qualify for conversion. Do not assume every displayed ATK buff feeds Core Overload. Check the actual combat Break Effect when changing a support, rather than repeatedly converting an ATK bonus that the game excludes.
There is also no universal requirement to reach exactly 3,600 ATK. From a planning perspective, the useful question is whether your actual equipment reaches the Break Effect tier and action count you need. The relic main-stat and substat guide can help compare a stronger Break piece against a misleading general score.
5. ⚡ Firefly Speed Breakpoints: 150, 210 and Team Buffs
5.1 👟 A Conservative 210+ SPD Baseline
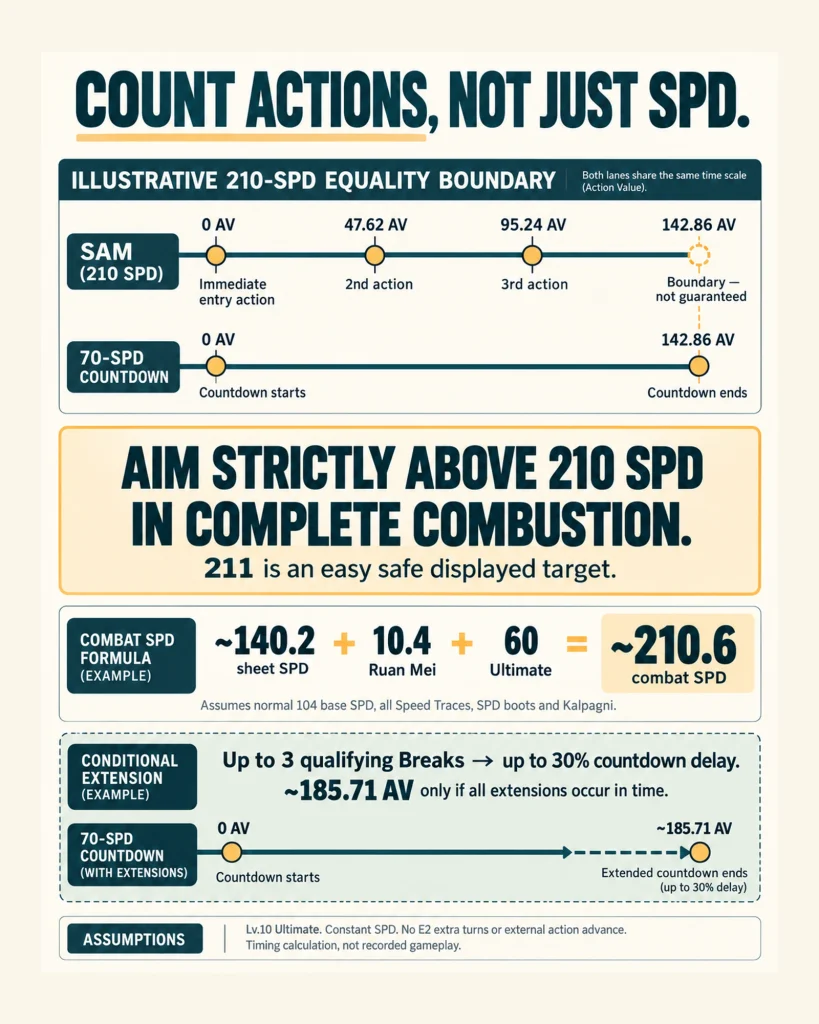
At level 10, Firefly’s Ultimate adds 60 flat SPD. Complete Combustion has a countdown with a fixed 70 SPD. Entering the state advances Firefly by 100%, giving an immediate enhanced action. With a stable 210+ SPD during the state, you can plan around that immediate action and three subsequent natural actions before the unextended countdown ends.
| Speed value | What it means | Condition |
|---|---|---|
| About 150+ before the +60 Ultimate bonus | A route to 210+ SPD during Complete Combustion | Include any active team Speed buffs; this is not always the out-of-battle panel. |
| About 140+ out of battle with Ruan Mei | Ruan Mei adds 10.4 SPD with Firefly’s normal 104 base SPD | Her 10% SPD Talent buff must be active; the Ultimate must be level 10 for +60. |
| 210+ during Complete Combustion | Conservative four-action timing baseline | Stable SPD; immediate entry action included; E2 turns and external advances excluded. |
| Higher custom targets | May add attacks before a mode cutoff or an extended countdown | Calculate the actual opening, countdown extensions and buff uptime instead of copying an isolated number. |
Where the 210 baseline comes from
A 70-SPD countdown has about 142.86 Action Value. Three natural intervals at 210 SPD also take about 142.86 AV, after the immediate entry action. Aim strictly above 210; 211 is an easy safe display target. Hidden decimals and the ordering at an exact boundary can matter.
5.2 🤝 Ruan Mei, The Dahlia and Countdown Extensions
With all Speed Traces unlocked, Firefly has approximately 109 SPD before equipment. Add SPD boots and Kalpagni and the panel reaches roughly 140.2 SPD without substat rolls. Ruan Mei’s 10.4 SPD and the Ultimate’s 60 SPD bring that example to roughly 210.6. Removing Ruan Mei changes the calculation.
The Dahlia can grant 30% SPD to an ally who implants a Weakness. With Firefly’s usual base SPD, that is 31.2 SPD while the effect is active. This creates different equipment and timing options. Check how the two-turn buff is refreshed rather than assuming a single peak-Speed screenshot proves the whole rotation.
Novaflare adds a second variable: qualifying Weakness Breaks can delay the countdown by 10%, up to three times. The unextended window is about 142.86 AV; all three timely extensions can make it about 185.71 AV. This can allow an additional attack or relax an older requirement, provided those Breaks occur before the countdown ends. It is conditional time, not a permanent Speed stat.
Do not treat 225 SPD as a guaranteed fifth enhanced action
Against the unextended countdown, five actions including the entry action require roughly 280 SPD. With all three timely extensions, the theoretical five-action threshold falls to just over 215.4 SPD. Those are simplified timing calculations with constant SPD, no external advances and no E2 extra turns. Target access, break timing and mode cutoffs still decide the real result.
For F2P players, I would keep SPD boots as the starting point. Test ATK boots only when your actual buffs and extensions preserve the actions you need. The broader Speed breakpoint guide explains why a Memory of Chaos cycle target and a transformation countdown are different timing problems.
6. 💡 Best Firefly Light Cones
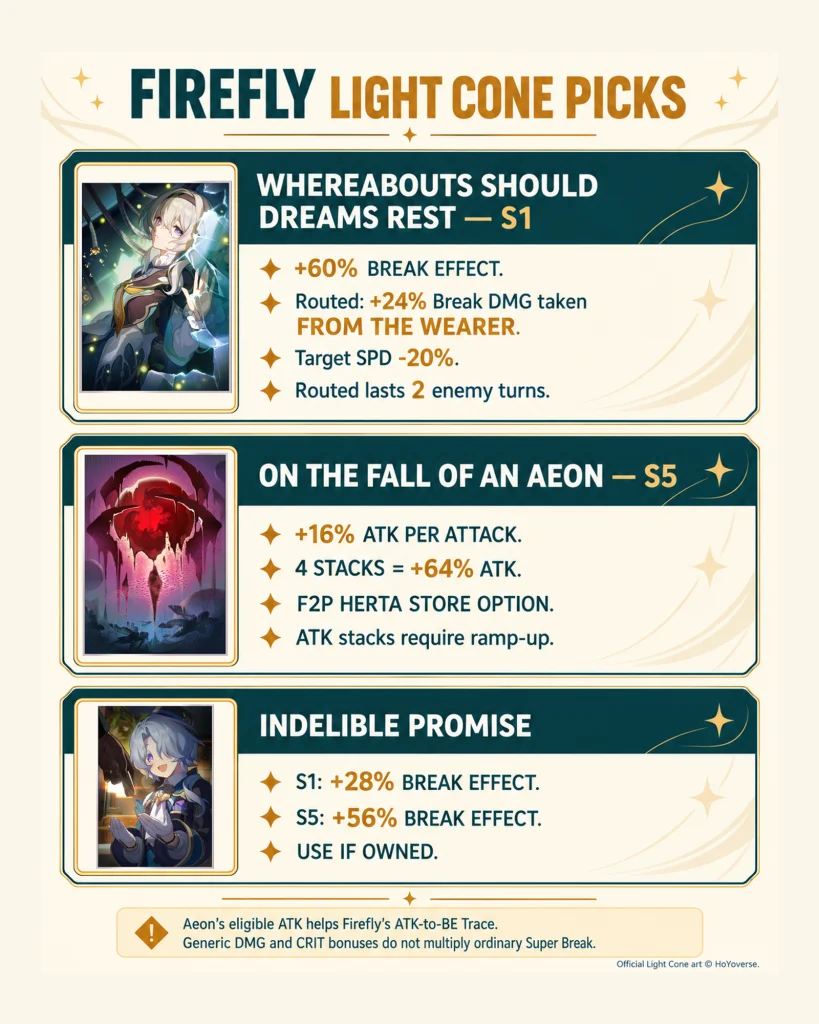
6.1 👑 Whereabouts Should Dreams Rest
Whereabouts Should Dreams Rest is Firefly’s signature and the simplest premium fit. At S1, it grants 60% Break Effect. When the wearer deals Break damage, it applies Routed for two enemy turns: the target takes 24% more Break damage from the wearer and has 20% lower SPD.
Read Routed’s target restriction
The 24% Break damage-taken effect applies to damage from the Light Cone’s wearer. Do not count it as the same 24% bonus for every teammate. Its final value also depends on other damage-taken effects and the fight’s timing.
6.2 🆓 Best F2P and Alternative Light Cones
| Light Cone | Useful effects at the stated level | Recommendation |
|---|---|---|
| Whereabouts Should Dreams Rest — S1 | 60% Break Effect; wearer-specific Routed Break vulnerability and enemy SPD reduction | Best direct premium fit; optional rather than a requirement. |
| On the Fall of an Aeon — S5 | Each attack adds 16% ATK, up to four stacks: 64% ATK at full stacks | Best standard F2P route from Herta’s Store. Its eligible ATK helps Core Overload after ramping. |
| Indelible Promise — S1 / S5 | 28% / 56% Break Effect; also grants conditional CRIT Rate | Useful if owned. The CRIT part does not amplify ordinary Break / Super Break damage. |
| Thus Burns the Dawn — S1 | +12 base SPD and 18% DEF ignore; strong base ATK | A strong spare premium option if already owned. Recalculate Speed because changing base SPD changes percentage buffs too. |
| Other Destruction cones | Value depends on base ATK and effects that actually apply to Break damage | Temporary equipment. A generic damage or CRIT passive alone is not a good reason to pull. |
Aeon also grants a generic damage bonus after the wearer inflicts Weakness Break. That bonus helps eligible regular damage but does not multiply Firefly’s Super Break. The ATK stacks are the main reason the cone works here, and the opening before full stacks can have a different Break Effect value.
For F2P players, S5 Aeon is enough to build a functional Firefly team. Check the Herta Store purchase priorities if another damage dealer needs the same cone; one owned copy cannot equip both teams at the same time.
7. 🎮 Firefly Rotation and Real Battle Checks
7.1 🔋 Opening and Complete Combustion Loop
- Prepare the team: activate the intended Break buffs, Super Break effects and sustain setup. If using The Dahlia, start combat with Firefly when you want her selected as the other Dance Partner.
- Use the normal Skill to fill Energy: at level 10 it restores a fixed 60% of Firefly’s 240 Max Energy, or 144 Energy. Her Talent raises starting Energy to 50% if it was lower, so one normal Skill can usually complete the opening refill.
- Enter Ultimate with the useful buffs ready: the 100% action advance starts the enhanced window immediately. Long unnecessary delays can waste a mode’s cycle budget, so prepare support timing before that moment.
- Use Enhanced Skill on useful targets: it implants Fire Weakness on the main and adjacent targets. Prioritise Toughness progress, a valuable Break and continued Super Break damage rather than repeatedly hitting the least useful target.
- Watch the countdown and resources: trigger available Novaflare extensions, preserve your support buffs and track SP. At E0, Enhanced Skill still costs a Skill Point.
- Prepare the next transformation: check actual Energy before the state ends. Use the normal Skill when needed after returning to the normal state; Firefly cannot recast Ultimate during Complete Combustion.
The Dahlia changes the refill plan
Her Fire-implant interaction can refund 10% of Firefly’s Max Energy: 24 Energy per qualifying attack, subject to the mechanic’s cap. Four qualifying refunds give 96 Energy; adding one level-10 normal Skill’s 144 reaches 240. This is a conditional rotation example. Hitting three enemies with one attack does not automatically give three refunds.
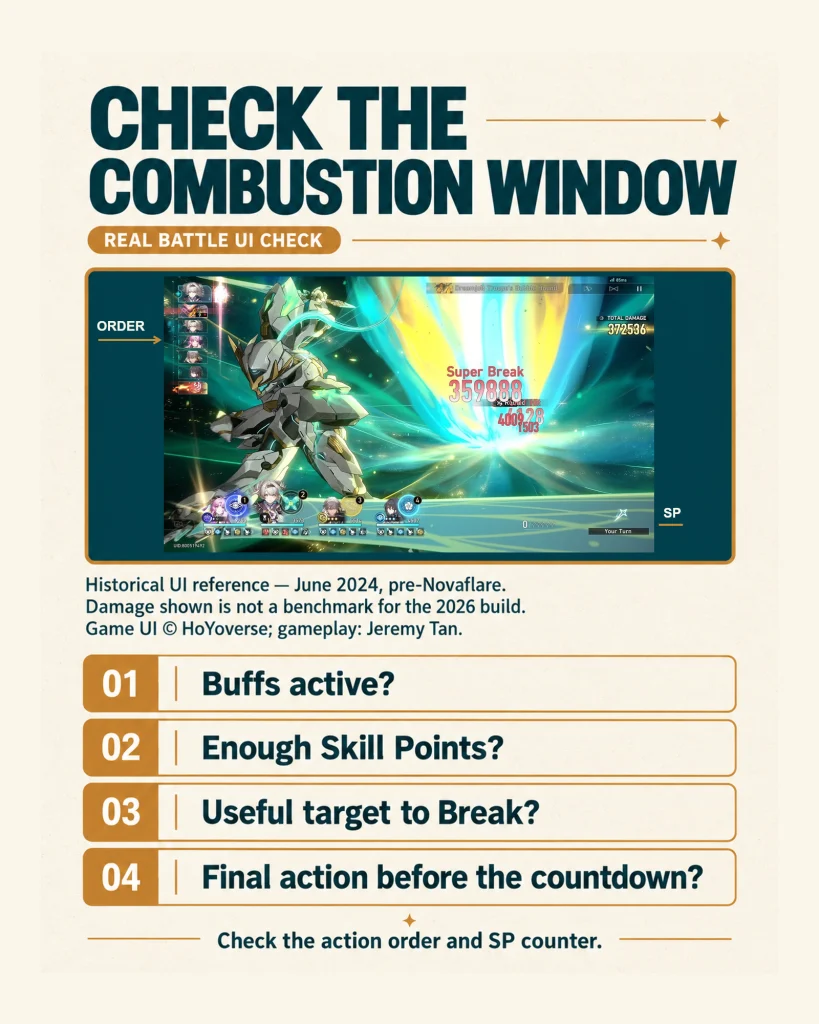
7.2 👀 What to Watch on the Actual HUD
| Visible check | What you want to confirm | Common problem it reveals |
|---|---|---|
| Action order and Combustion countdown | The final planned attack occurs before the state ends | A displayed Speed target was reached only during a short buff. |
| Enemy Toughness / phase state | Your attacks can reduce Toughness or use the intended Super Break effect | A protected boss phase is being mistaken for a bad relic build. |
| Combat Details panel | 300% Break Effect and the actual buffed SPD when relevant | Out-of-battle values were compared with combat thresholds. |
| SP counter | Enough SP for Firefly and necessary support refreshes | Every support is using Skill while E0 Firefly is taking many turns. |
| Energy after implant attacks | Expected Dahlia refunds actually occurred | A refund was counted per target, missed, or wasted at full Energy. |
| Break and kill triggers at E2 | A valid trigger before expecting another extra turn | The team ran out of breakable targets or kill opportunities. |
When a run stalls, look at the missing event first: a Break, a support refresh, an enhanced attack or the next transformation. Those are usually more useful clues than one large damage number. If he is your sustain, Gallagher’s SP-friendly setup can help keep Firefly’s enhanced attacks available.
8. 🤝 Best Firefly Teams in 2026
8.1 🌺 The Dahlia, Fugue and Lingsha Core
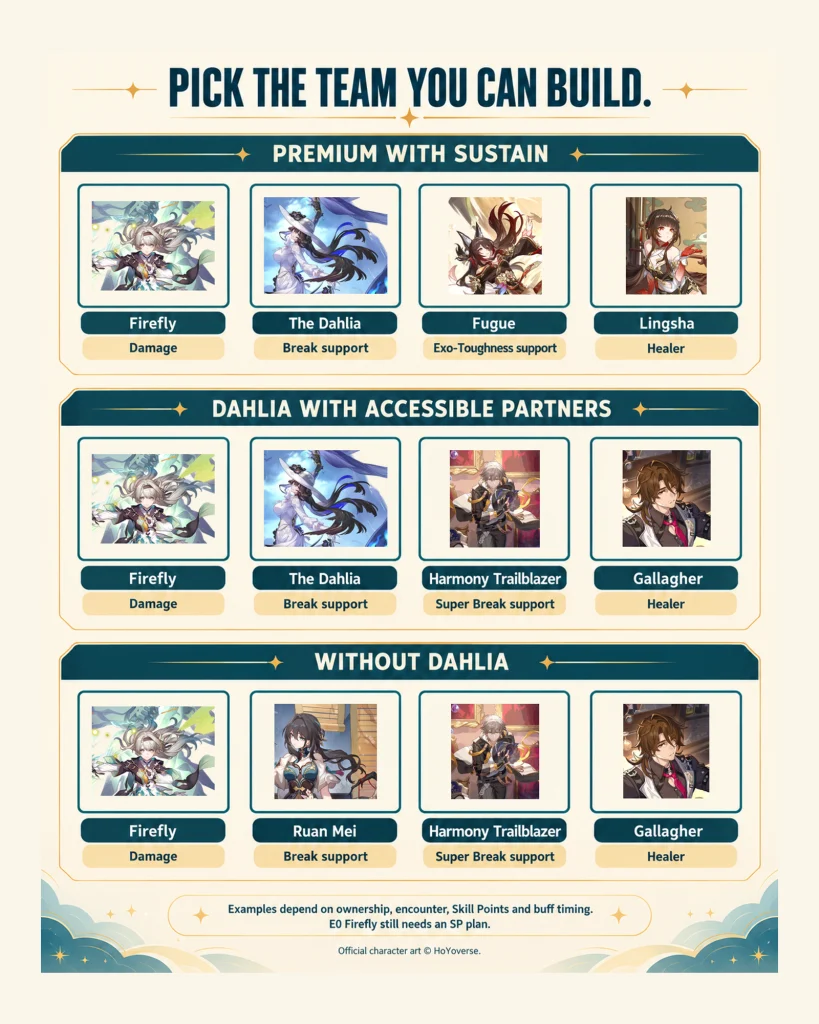
Firefly + The Dahlia + Fugue + Lingsha is the premium sustained template to consider first when you own the pieces. The Dahlia brings Break efficiency, Super Break access before an enemy is broken, implant-related Speed / Energy support and conditional SP recovery. Fugue adds Exo-Toughness and another Super Break source, while Lingsha supplies healing, cleansing and Fire Toughness pressure.
This is a recommendation based on how the released kits interact, rather than a promise that one team wins every stage. Boss phase rules, target count, Eidolons and Skill Point usage can change the better fourth slot or support choice.
| Team template | Four-character example | Best use case / limitation |
|---|---|---|
| Premium with sustain | Firefly + The Dahlia + Fugue + Lingsha | A complete modern Break engine; E0 still needs an SP plan. |
| Dahlia core with lower additional cost | Firefly + The Dahlia + Harmony Trailblazer + Gallagher | A practical route using a free Trailblazer and an owned four-star healer. |
| Established team without The Dahlia | Firefly + Ruan Mei + Harmony Trailblazer + Gallagher | Keeps an existing roster working; lacks Dahlia’s pre-break Super Break and implant-refund interactions. |
| Fugue available, Dahlia missing | Firefly + Fugue + Ruan Mei + Lingsha or Gallagher | A conventional Break team with Exo-Toughness; tune sustain and SP for the encounter. |
| No limited support required | Firefly + Harmony Trailblazer + Pela or Asta + Gallagher | A lower-cost shell around owned Firefly; four-star availability and performance still vary. |
| Advanced sustainless | Firefly + The Dahlia + Fugue + Harmony Trailblazer or Ruan Mei | A stage-specific option after proving survival; not the default progression recommendation. |
8.2 🆓 What If You Do Not Own the Premium Supports?
Harmony Trailblazer remains valuable. Their Super Break contribution and Break Effect support still add to the team; Novaflare did not remove that utility. Build the available version and unlock relevant Eidolons through progression before comparing it with a fully invested showcase.
Pela provides DEF reduction that benefits Break damage. Asta can provide Speed, eligible ATK and Fire Toughness reduction. Neither reproduces every part of The Dahlia’s kit. Plan around the role you actually have, and do not assume a four-star team has the same SP or timing requirements as a premium one.
8.3 🔧 Ruan Mei, Fugue Targets and Sustain Choices
| Character / choice | Why it helps Firefly | Practical check |
|---|---|---|
| The Dahlia | Break efficiency, pre-break Super Break, implant-related SPD and Energy, conditional SP recovery | Initiate with the intended Dance Partner. Her Talent follow-ups restore one SP per two follow-ups, not per Firefly hit. |
| Fugue | Super Break support, Break Effect and Exo-Toughness | Choose Foxian Prayer’s target based on Firefly’s thresholds, the healer’s damage and Fugue’s Eidolons. |
| Harmony Trailblazer | Accessible Super Break and Break Effect support | Keep the relevant Ultimate / buffs available during the enhanced window. |
| Ruan Mei | 50% Weakness Break Efficiency at level-10 Skill, SPD support and RES PEN | Recalculate SPD when adding or removing her; generic damage bonuses are not the main Break benefit. |
| Lingsha | Healing, cleanse, Fire AoE Toughness reduction and Break vulnerability | Coordinate necessary Skill refreshes with E0 Firefly’s SP demand. |
| Gallagher | SP-friendly healing and Fire Toughness pressure with Break damage-taken support | An effective owned sustain option; build enough survival and cleanse access for the fight. |
Who should receive Fugue’s Skill?
There is no universal “always target Lingsha” rule. Firefly can use the Break Effect and, with Fugue E1, the extra Break efficiency. Lingsha can make good use of the Weakness-type flexibility and support buffs in suitable fights. Check Firefly’s actual thresholds and the specific Eidolon setup before assigning the buff.
The Fugue build guide covers her own equipment and buff setup if she is the support you are adding next.
9. 📈 Firefly Trace Priority and Farming Route
9.1 📚 Which Upgrades Come First?
Raise Firefly to level 80. Break damage depends on character level, so leaving the carry underlevelled while farming marginal substat upgrades is an expensive trade. Level the chosen Light Cone, unlock the major Traces and collect the minor Speed nodes before judging a finished build.
| Upgrade | Priority | Reason |
|---|---|---|
| All three major Traces and minor SPD nodes | Essential | Unlocks native Super Break, ATK conversion, the enhanced Break Effect / timer effect and easier Speed tuning. |
| Ultimate to level 10 | High | The guide’s standard calculations use its +60 SPD, 50% Break efficiency and 20% Break damage-taken effect. |
| Normal Skill to level 10 | High for the stated Energy loop | Reaches the 60% / 144 fixed-Energy refill used in the four-Dahlia-refund example. |
| Talent | Raise for survival and comfort | Damage reduction and Effect RES help Firefly finish her rotation. |
| Basic ATK | Last among the four upgradeable abilities | A lower priority for the standard Enhanced Skill-focused build. |
9.2 🛠️ Where to Spend Trailblaze Power
| Goal | Stage / source | What to verify in game |
|---|---|---|
| Iron Cavalry relics | Cavern of Corrosion: Path of Cavalier — Penacony Grand Theater | Iron Cavalry Against the Scourge and The Wind-Soaring Valorous appear in the reward list. |
| Kalpagni sphere / rope | Planar Ornament Extraction: Eternal Comedy | Forge of the Kalpagni Lantern is paired with Duran, Dynasty of Running Wolves. |
| Destruction Trace materials | Calyx (Crimson): Bud of Destruction — Scalegorge Waterscape | Borisin Teeth → Lupitoxin Sawteeth → Moon Rage Fang; do not choose another Destruction material family. |
| Raging Heart ascension material | Stagnant Shadow: Shape of Ire — Dewlight Pavilion | The selected stage drops Raging Heart. |
| Lost Echo of the Shared Wish | Echo of War: Salutations of Ashen Dreams — Penacony Grand Theater | Reserve weekly attempts when this is the remaining Trace bottleneck. |
| Common ascension / Trace drops | Tatters of Thought, Fragments of Impression and Shards of Desires | Check inventory and synthesis before farming more. |
A practical farming order
Finish level, cone and necessary Traces first. Then secure the four correct main stats, a working action window and the 300% combat Break Effect tier. Spend the remaining budget improving rolls. Recheck the build after major team changes before replacing a useful piece.
Use the ascension and Trace checklist to reserve materials for the whole team; Firefly’s own gear cannot replace an unbuilt support’s missing buff uptime.

10. 📜 Firefly Character and Light Cone Banner History
The tables below record five historical runs verified for this guide. They do not establish that Firefly is available today. Dates use the Asia / UTC+8 calendar for maintenance-day openings and the advertised server dates for mid-version changes; consult the in-game timer for exact local start and end times.
10.1 🎟️ Character Banner History Table
| Version / phase | Verified date range | Character Warp | Run note |
|---|---|---|---|
| 2.3 — Phase I | June 19–July 10, 2024 | Firefull Flyshine | Debut. |
| 2.7 — Phase II | December 25, 2024–January 14, 2025 | Firefull Flyshine | First rerun. |
| 3.4 — Phase II | July 23–August 12, 2025 | Indelible Coterie | Selectable Firefly / Jingliu / Blade rerun event. |
| 3.8 — Phase I | December 17, 2025–January 7, 2026 | Firefull Flyshine | Returned alongside The Dahlia’s debut period. |
| 4.2 — Phase I | April 22–May 13, 2026 | Indelible Coterie | Selectable The Dahlia / Castorice / Firefly; Novaflare released in the same version. |
10.2 💠 Light Cone Banner History Table
Whereabouts Should Dreams Rest is a Destruction Light Cone. Its Warp name is different from Firefly’s character Warp, and multi-selection rerun formats must be checked separately.
| Version / phase | Verified date range | Light Cone Warp | Featured Firefly cone |
|---|---|---|---|
| 2.3 — Phase I | June 19–July 10, 2024 | Brilliant Fixation | Whereabouts Should Dreams Rest |
| 2.7 — Phase II | December 25, 2024–January 14, 2025 | Bygone Reminiscence | Whereabouts Should Dreams Rest |
| 3.4 — Phase II | July 23–August 12, 2025 | Coalesced Truths | Whereabouts Should Dreams Rest |
| 3.8 — Phase I | December 17, 2025–January 7, 2026 | Bygone Reminiscence | Whereabouts Should Dreams Rest |
| 4.2 — Phase I | April 22–May 13, 2026 | Coalesced Truths | Whereabouts Should Dreams Rest |
Update banner availability from official notices
Version 4.2 is the latest run verified in these tables. This historical record is not a declaration about every later Warp. Before publishing a live-banner claim or spending pulls, check HoYoverse’s newest Event Warp announcement and your server’s in-game timer. Do not predict a rerun date from the gaps between past appearances.
For overlapping reruns and other characters, the character and Light Cone banner archive provides the wider planning context.
11. 💎 Firefly Pull or Save Decision Table
A stronger Firefly account usually comes from fixing the rotation’s missing piece. Before considering duplicates, identify whether the problem is support coverage, survival, SP, equipment or damage after those needs are already met.
| Your situation | Decision to consider | Reason |
|---|---|---|
| You own Firefly but lack The Dahlia and want to keep investing in Break | Save for her next officially confirmed availability | Her Break access, implant interactions and resource support solve problems personal relic stats cannot replace. |
| Your team is underlevelled or lacks key Traces / main stats | Build the existing roster first | Farmable upgrades can solve the bottleneck without another limited pull. |
| You have a functional team and S5 Aeon | Save, or compare S1 with a specific support / Eidolon goal | The signature is useful; it is not required for Firefly to function. |
| E0 Firefly repeatedly runs out of SP | Consider E1 within a planned budget | Enhanced Skill becomes SP-free and ignores 15% DEF. |
| You want a deliberate vertical-investment endpoint | Consider E2 after understanding its trigger conditions | The enhanced extra-turn rule rewards valid Breaks / kills. From E0, E2 requires two further character copies. |
| Aeon is needed by another team, or you want a direct personal upgrade | Consider Whereabouts Should Dreams Rest S1 | Provides immediate Break Effect and wearer-specific Routed effects without Aeon’s ATK stack ramp. |
| Your other endgame team or sustain slot is the larger weakness | Save for the missing role | Roster coverage and reliable clears can matter more than a Firefly duplicate. |
| Only an unconfirmed rerun rumour is available | Keep saving and wait for the official notice | Past banner intervals do not establish a release date. |
11.1 🪙 Supports, E1, E2 or Signature?
E1 is especially attractive when SP is the observed bottleneck. The Dahlia’s conditional SP recovery helps E0, but it does not make every Enhanced Skill free. E2 adds conditional extra turns and is a larger commitment if you start at E0. It should be a planned endpoint, rather than an assumption that the next copy alone unlocks it.
S1 is an optional personal upgrade and can free Aeon for another carry. Its value is not a fixed percentage across all teams. Consider the support or second-team character you would delay, and remember that character Eidolons and Light Cones use different Warp rules.
From a planning perspective, write down the stopping point before opening the Warp screen. Check your actual guarantee and budget with the pity and pull planning guide before committing to a signature or duplicate.
12. ✅ Common Firefly Build Mistakes and Final Checklist
| Mistake | Better check |
|---|---|
| Using a CRIT body or Fire DMG sphere for the standard build | Start with ATK% body / sphere, SPD boots and Break Effect rope. |
| Reading the old 360% threshold as the enhanced A4 requirement | Use 300% combat Break Effect for the enhanced top native Super Break tier. |
| Treating 300% or 360% as a cap on Break damage | Additional Break Effect continues to scale Break / Super Break damage. |
| Calling 210 panel SPD necessary on every team | Separate sheet SPD, team buffs, the +60 Ultimate bonus and conditional extensions. |
| Calling 225 SPD a guaranteed fifth enhanced action | Check the actual countdown and extension triggers. |
| Counting Routed as the same bonus for every ally | Its Break vulnerability applies to damage from the cone’s wearer. |
| Counting one Dahlia Energy refund per adjacent target | Track qualifying attacks and actual restored Energy. |
| Ignoring E0 Skill Point demand | Budget necessary support Skills and Firefly’s repeated Enhanced Skills. |
| Using a Fire implant to explain damage through every boss protection | Read the encounter’s Toughness and phase rules. |
| Farming more relics while the team’s core Traces are missing | Finish guaranteed upgrades and useful buff uptime first. |
Ready-to-play checklist
- ☐ Firefly is level 80 and the chosen cone is levelled.
- ☐ Novaflare-enhanced state, all major Traces and minor SPD nodes are active.
- ☐ Main stats are ATK% / SPD / ATK% / Break Effect, unless a tested team plan justifies a change.
- ☐ The intended combat setup reaches the Cavalry conditions and 300% Break Effect tier.
- ☐ The final planned enhanced attack lands before the countdown ends.
- ☐ Buffs, Dance Partner selection, Energy refunds and SP have been checked on the actual team.
- ☐ The sustain slot can handle the encounter’s damage and cleanse requirements.
- ☐ Any pull decision uses an official current notice rather than an inferred rerun date.
13. ❓ Firefly Build HSR FAQ
13.1 🧩 What Are the Best Relics for Firefly?
Use 4-piece Iron Cavalry Against the Scourge with Forge of the Kalpagni Lantern as the default. Cavalry gives Break-focused DEF ignore, while Kalpagni helps Speed and conditional Break Effect. A strong temporary mix is acceptable while obtaining the right main stats and action timing.
13.2 🎯 Does Firefly Still Need 360% Break Effect?
The Novaflare-enhanced top native Super Break tier activates at 300% Break Effect in combat. The old 360% A4 requirement belongs to her previous state. A 360% limit remains inside the Enhanced Skill’s regular damage formula, but additional Break Effect can still improve Break and Super Break damage beyond that value.
13.3 ⚡ How Much SPD Does Firefly Need?
A stable value just above 210 SPD during Complete Combustion is a conservative four-action baseline with level-10 Ultimate. It includes the immediate entry action and excludes E2 / external advances. This often means about 150 SPD before the Ultimate bonus, or roughly 140 sheet SPD with Ruan Mei. The Dahlia and timely countdown extensions can change the ideal target.
13.4 📊 Does Firefly Need CRIT or a Fire DMG Sphere?
Use ATK% body and sphere for the standard Break build. Her regular attack portions can use CRIT or Fire DMG bonuses, but her main Break / Super Break damage does not scale with those bonuses. Eligible ATK instead helps her convert more ATK into Break Effect.
13.5 💡 Is Firefly’s Signature Light Cone Required?
No. On the Fall of an Aeon at S5 is a valid F2P choice, especially once its ATK stacks are active. Whereabouts Should Dreams Rest is a useful direct upgrade, but support coverage, SP and survival can be more valuable reasons to save pulls.
13.6 🤝 Does Firefly Still Need Harmony Trailblazer?
Harmony Trailblazer remains an effective accessible support, but is not mandatory in every 2026 team. Enhanced Firefly has stronger native Super Break, and The Dahlia / Fugue provide other Break support combinations. Keep Trailblazer when their damage contribution, buffs or low pull cost suit your roster.
13.7 🦊 Should Fugue Buff Firefly or Lingsha?
Choose according to the team’s actual needs. Firefly can benefit from Break Effect and Fugue E1’s Break efficiency; Lingsha can use the Weakness-type flexibility and support effects in suitable encounters. Check Firefly’s combat thresholds and the exact Eidolons before treating either target as automatic.
13.8 🔋 Should Firefly Use an Energy Regeneration Rope?
Break Effect is the default rope. Her level-10 normal Skill restores a fixed 144 Energy, which ERR does not increase, while enhanced attacks have no inherent Energy generation. A different rope needs a specific demonstrated rotation benefit, rather than the assumption that every expensive Ultimate requires ERR.
13.9 📅 When Is Firefly’s Next Rerun?
A future rerun date should be treated as unconfirmed until HoYoverse announces it. The latest run verified in this guide’s historical tables is Version 4.2, April 22–May 13, 2026. Check the current official Event Warp notice and your server’s timer for live availability.
14. 🌐 Sources & Update Notes
Fact-check date: November 2, 2026. This guide uses the released Novaflare-enhanced kit. Official character and item descriptions supply the numerical effects; specialist guides provide a build cross-check. The timing examples are calculations from the stated Speed / countdown rules, not recorded damage benchmarks or a claim of fresh hands-on testing.
Official kit, enhancements and equipment:
- HoYoverse: Novaflare — Firefly, Huohuo, Seele and Welt Buffed — April 22, 2026 availability, default enhanced state, the version toggle and corrected enhancement graphics.
- Official Version 4.2 update details — confirms the released enhancement event and version context.
- Official HoYoWiki: Firefly — enhanced ability and Trace text, base stats, Energy, Eidolons, materials and official artwork. The page retains both previous and enhanced descriptions; this guide uses the enhanced state.
- Official HoYoWiki: The Dahlia — Dance Partner selection, Zone, implant-related SPD / Energy and conditional SP support.
- Official HoYoWiki Relic and Planar directory — set effects and equipment references.
- Official HoYoWiki: Whereabouts Should Dreams Rest — S1 Break Effect, Routed restrictions and official cone artwork.
- Official HoYoWiki: On the Fall of an Aeon — per-attack ATK stacks and the conditional generic damage bonus.
- Official HoYoWiki: Indelible Promise — Break Effect and CRIT effects at the stated superimpositions.
- Official HoYoWiki: Thus Burns the Dawn — base SPD change and DEF ignore.
Banner records and mechanical cross-checks:
- Official Version 4.2 Event Warp Phase I notice — the April 22–May 13 Firefly and signature selections. The official HSR account’s announcement also carries the dates and selections.
- Official Version 3.8 Event Warp Phase I notice — the December 17, 2025–January 7, 2026 Firefly / signature period.
- Official Version 2.7 character Warp notice — Firefly’s December 25, 2024 rerun.
- Official Version 3.4 Phase II Warp announcement — the July 23, 2025 selectable rerun period.
- HSR Wiki: Firefly availability records — cross-check for all five listed character runs. Coalesced Truths, July 2025 and Brilliant Fixation, June 2024 cross-check the signature’s historical formats.
- Prydwen: Firefly — equipment and team cross-check; its review / calculations identify Version 4.2 and the profile is dated May 31, 2026. Its model-specific DPS percentages are not used as universal gains here.
- HSR Wiki: Core Overload gameplay notes — exclusions for ATK obtained through certain cross-stat conversions.
- HSR Wiki: Forge of the Kalpagni Lantern — conditional set effect and Eternal Comedy source.
Official art and real interface references for the visible image cards:
- Official HoYoWiki Firefly and SAM splash artwork — verified character layer for IMAGE 01; preserve the character design and credit HoYoverse.
- Official Keeping Up With Star Rail — Firefly — historical visual reference. Its notice flags incorrect Toughness-reduction effects in the 2024 video, so it is not used to prove current numerical mechanics.
- Jeremy Tan: Firefly gameplay post and the linked gameplay video — verified genuine battle-HUD reference for IMAGE 07. It is June 2024 footage with temporary gear, not a benchmark for the enhanced 2026 build.
- Beebom: Firefly materials and real Calyx screenshot — the verified Scalegorge Waterscape menu for IMAGE 09. The 2024 account balance and event counter are historical examples; retain the game-UI and publisher credits.