

The best Mortenax Blade build turns him into an HP-scaling Nihility hybrid who combines team amplification, DEF reduction, frequent debuff application, defensive utility, and substantial AoE follow-up damage.
Mortenax Blade is a separate playable form of Blade rather than a direct upgrade for the original Wind Destruction character. He is a 5-star Fire Nihility character, so his equipment, team requirements, and rotation are completely different. His most important stats are Max HP, CRIT, Speed, and Energy Regeneration Rate rather than ATK.
His strongest teams are not limited to one fixed lineup. E0 Acheron accounts often prefer a second Nihility teammate, while Ashveil, Tribbie, Hyacine, and other frequent attackers can create higher-action dual-DPS teams. This guide separates those use cases instead of presenting one lineup as universally best.
Image: Honkai: Star Rail © HoYoverse
Contents
- 1 ⚡ Quick Answer: What Is the Best Mortenax Blade Build?
- 2 🧩 Mortenax Blade Builds by Playstyle
- 3 🔥 How Mortenax Blade Works
- 4 🛡 Best Relics and Planar Ornaments
- 5 💡 Best Mortenax Blade Light Cones
- 6 📊 Best Stats and Speed Breakpoints
- 7 🌟 Trace and Eidolon Priority
- 8 👥 Best Mortenax Blade Teams
- 9 🎮 Mortenax Blade Rotation and Gameplay
- 10 🏆 Best Mortenax Blade Build by Game Mode
- 11 🎫 Is Mortenax Blade Worth Pulling on a Rerun?
- 12 ❌ Common Mortenax Blade Build Mistakes
- 12.1 1. Building ATK Instead of HP
- 12.2 2. Calling 134 SPD a Universal Minimum
- 12.3 3. Building Effect Hit Rate Without Checking the Light Cone
- 12.4 4. Treating 67% EHR as a Universal Resolution Target
- 12.5 5. Assuming More DEF Reduction Has Lower Returns
- 12.6 6. Overcapping CRIT Rate
- 12.7 7. Using an HP Rope Before Solving Energy
- 12.8 8. Presenting One Acheron Team as Universally Best
- 12.9 9. Forcing 170 SPD Without Lies Dance
- 12.10 10. Holding the Enhanced Ultimate Until the Zone Expires
- 13 ❓ Mortenax Blade Build FAQ
- 13.1 What is the best Relic set for Mortenax Blade?
- 13.2 Should Mortenax Blade use Vonwacq or Bone Collection?
- 13.3 What is Mortenax Blade’s best Light Cone?
- 13.4 What is his best F2P Light Cone?
- 13.5 Does Mortenax Blade need Effect Hit Rate?
- 13.6 Is 134 SPD required?
- 13.7 Should he use an HP Sphere or Fire DMG Sphere?
- 13.8 Should he use an ERR Rope or HP Rope?
- 13.9 What is the best Mortenax Blade team for E0 Acheron?
- 13.10 Can E0 Acheron use Ashveil with Mortenax Blade?
- 13.11 Is Mortenax Blade good without Acheron?
- 13.12 Is Mortenax Blade the same as the original Blade?
- 13.13 Can Mortenax Blade use The Unreachable Side?
- 13.14 When will Mortenax Blade rerun?
- 14 📝 Sources and Update Methodology
⚡ Quick Answer: What Is the Best Mortenax Blade Build?
The best general Mortenax Blade build uses 4-piece Divine-Querying Master Smith. Choose Sprightly Vonwacq when early Zone activation and support consistency matter most, or Bone Collection’s Serene Demesne when you want higher personal damage.
Reforged in Hellfire S1 is his best all-purpose Light Cone because it improves Max HP, opening Energy, and team damage. Before the Tutorial Mission Starts S5 is his most accessible Energy-focused option, while Resolution Shines As Pearls of Sweat S5 is useful when its DEF reduction will not exceed the team’s effective limit.
Use a CRIT Rate Body, SPD Boots, HP% Sphere, and Energy Regeneration Rate Rope for the standard hybrid build. Effect Hit Rate Body is mainly for Light Cones that require additional debuff accuracy.
Aim for 6,000+ HP, approximately 100% CRIT Rate in combat, 130%+ CRIT DMG, and a Speed target chosen around the team. 134 SPD is a common baseline rather than a universal minimum. Faster support builds may pursue 160 SPD, while Lies Dance on the Breeze specifically encourages a 170 SPD setup.
His strongest premium shells include Acheron + Mortenax Blade + Ashveil + Hyacine for high attack frequency, or Acheron + Mortenax Blade + a second Nihility debuffer + sustain for E0 Acheron accounts that want to preserve her full Nihility Trace bonus.
📅 Current availability: Mortenax Blade debuted during Version 4.3 Phase I and left the Event Warp on June 24, 2026, at 11:59 server time. His first rerun has not been officially announced.
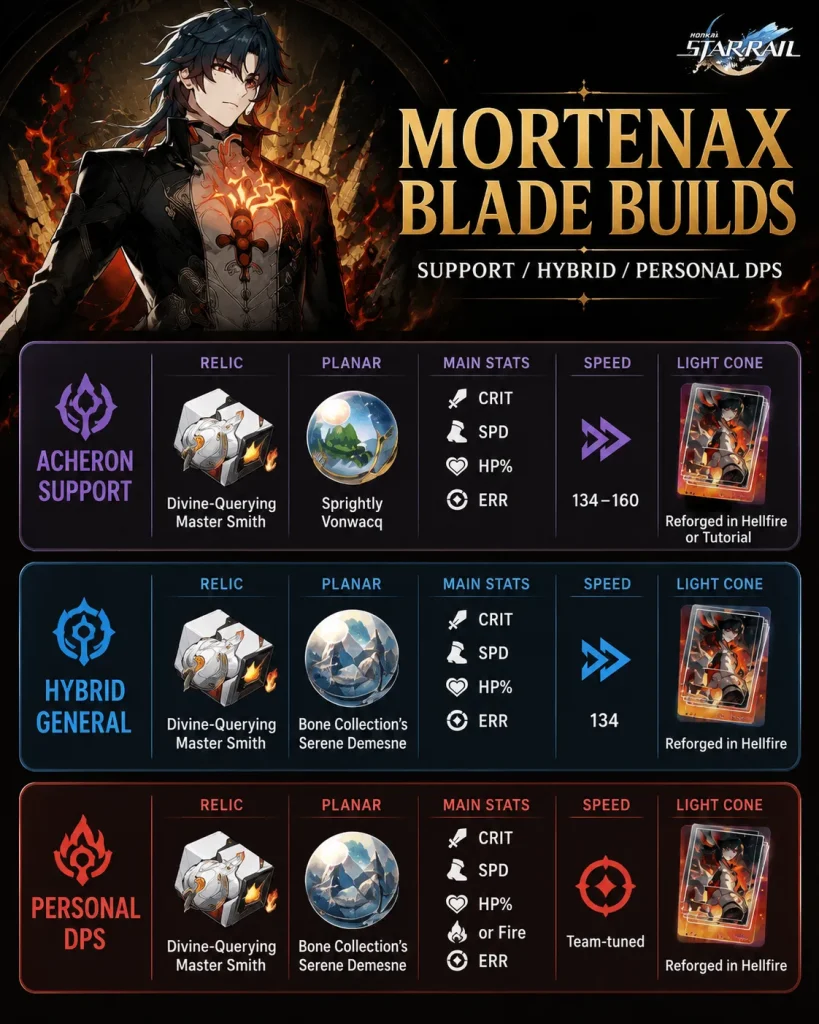
Image: Honkai: Star Rail © HoYoverse
🧩 Mortenax Blade Builds by Playstyle
Mortenax Blade does not have one universal setup. His ideal Planar Ornament, Body stat, Speed target, and Light Cone depend on whether he is primarily supporting Acheron, contributing balanced hybrid damage, or receiving dedicated buffs as a personal carry.
| Build | Relic and Planar | Body and Boots | Sphere and Rope | Speed Goal | Best Use |
|---|---|---|---|---|---|
| Acheron Support | Master Smith + Vonwacq | CRIT Rate or EHR + SPD | HP% + ERR | 134 or 160; 170 with Lies Dance | Fast Zone setup, debuff uptime, and reliable Acheron stack generation |
| Hybrid General | Master Smith + Bone Collection | CRIT Rate + SPD | HP% + ERR | 134 as a common baseline | Balanced personal damage, amplification, Energy, and team flexibility |
| Personal DPS | Master Smith + Bone Collection | CRIT Rate + SPD or HP% | HP% or Fire DMG + ERR or HP% | Team-specific tuning | Higher personal damage after Energy and Zone uptime are already solved |
💡 Best starting point: Begin with the Hybrid General build. Move toward the support or personal-DPS lane only after testing whether your current team can activate and maintain the Zone at the required time.
🔍 How this guide was prepared: Recommendations are based on Mortenax Blade’s released Version 4.3 kit, official character and Warp notices, current post-release calculations, Light Cone requirements, and practical rotation constraints. Beta values and unconfirmed rerun information were excluded. No unsupported first-hand testing claims are presented.
🔥 How Mortenax Blade Works
Mortenax Blade is best described as a hybrid amplifier, debuffer, aggro controller, and HP-scaling sub-DPS. He does not follow the usual Nihility pattern of applying one debuff and waiting for another carry to do all the damage.
Instead, he compresses several functions into one team slot:
- Applies Balefire Bind and reduces enemy DEF.
- Increases the damage enemies receive.
- Creates a Zone that amplifies allied damage.
- Causes allied attacks to apply his debuff during the Zone.
- Generates Charge from frequent allied attacks.
- Launches additional HP-scaling follow-up Skills.
- Draws enemy attacks toward himself and reduces incoming damage.
- Contributes AoE damage without consuming normal Skill Points.
Players unfamiliar with role compression can review how Paths and Elements shape HSR team roles. Mortenax Blade is a strong example of a Nihility character functioning as both an amplifier and a secondary damage dealer.
Practical role: He is usually more valuable as a team engine who also contributes damage than as a conventional hypercarry receiving every available buff.
💥 Zone and Infinite Fury
Mortenax Blade’s first Ultimate, Fornax Ex Corpore, applies Balefire Bind to all enemies, consumes part of his HP, deploys his Zone, and activates Infinite Fury.
While Infinite Fury is active, he gains additional CRIT Rate and CRIT DMG, unlocks his Skill, enhances his Basic ATK, and gains access to the damaging Ultimate Tenax Per Ignem.
The Zone is controlled by a countdown in the Action Order. When that countdown takes its turn, the Zone disappears and Infinite Fury ends. His gameplay therefore revolves around using the team’s largest attacks before that window closes.
Generate Energy → Deploy Zone → Allies Attack → Apply Debuffs → Build Charge → Trigger Follow-Up Skill → Use Enhanced Ultimate
⚔ Charge and Follow-Up Attacks
While the Zone is active, each allied attack against an enemy applies Balefire Bind to the relevant target and grants Mortenax Blade one Charge. After reaching the required Charge threshold, he consumes the stacks, regenerates Energy, and automatically performs an extra Skill use that counts as a follow-up attack.
This mechanic makes attack frequency extremely important. A teammate who attacks several times through turns, follow-ups, companions, or Ultimates may contribute more to Mortenax Blade’s rotation than a character who provides a larger written buff but rarely acts.
His Skill consumes HP and deals AoE plus additional bounce damage. It does not consume a standard Skill Point, but it can only be used during Infinite Fury and cannot be activated when he is already at one HP.
⚠ Do not treat him like a normal Skill user: Mortenax Blade does not need to spend one Skill Point every turn. His regular pre-Zone action is usually a Basic ATK, while his Skill becomes available only after Infinite Fury begins.
🛡 Energy and Survival
Mortenax Blade’s A2 Trace allows him to store overflow Energy and restores him to 75% Energy when combat begins or when the Zone disappears if his Energy is below that point. This significantly reduces the time needed to activate or restore his Zone.
His A4 Trace increases his chance of being attacked during the Zone, reduces incoming damage, improves healing received, and generates another Charge when he is struck. This is why he can function as an aggro controller without being a Preservation character.
His A6 Trace changes value according to the team:
- All allies gain a large general damage increase while the Zone is active.
- If another Nihility character is present, allied Ultimate damage receives an additional increase.
- If no other Nihility character is present, Mortenax Blade receives additional personal damage instead.
This distinction matters when comparing an E0 Acheron double-Nihility team with an Ashveil dual-DPS team. Both are valid, but they emphasize different parts of Mortenax Blade’s kit.
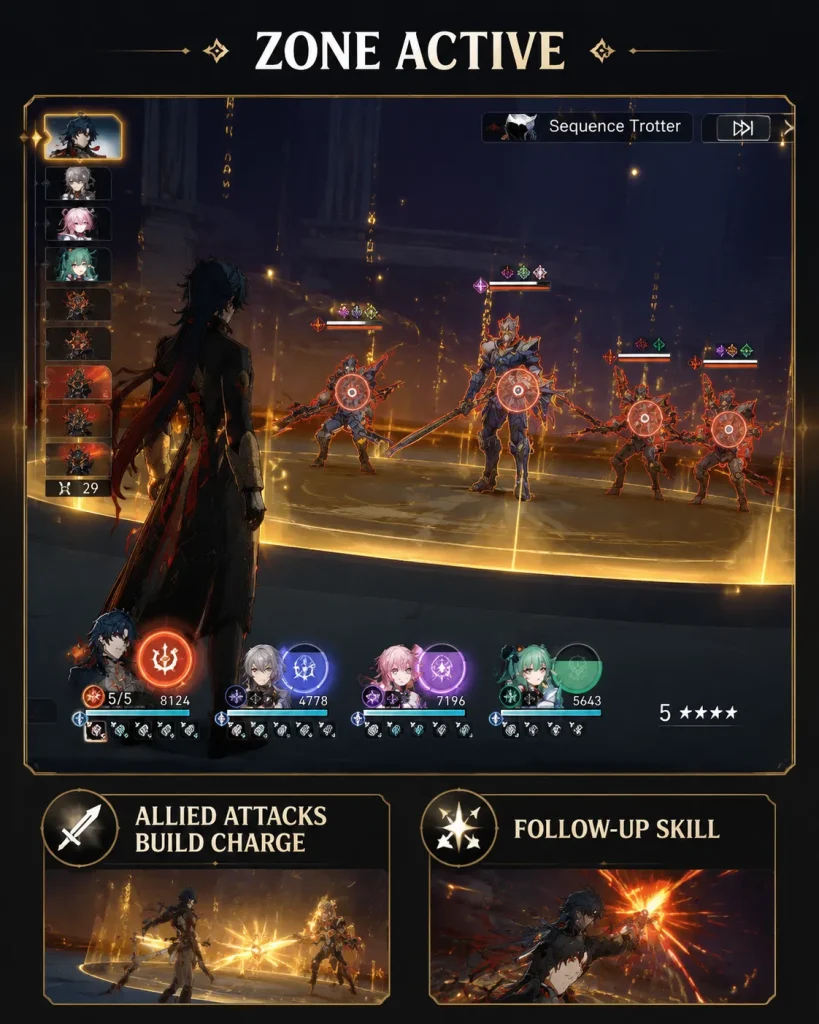
Image: Honkai: Star Rail © HoYoverse
🛡 Best Relics and Planar Ornaments
🔨 Best Cavern Relic Sets
| Rank | Relic Set | Best Use | Why It Works |
|---|---|---|---|
| 1 | Divine-Querying Master Smith | All builds | Improves Max HP, personal damage against DEF-reduced enemies, and teamwide damage after Mortenax Blade applies DEF reduction. |
| 2 | Eagle of Twilight Line | Advanced cycle optimization | Ultimate-related Action Advance can create additional turns or reach specific Action Value breakpoints. |
| 3 | Longevous Disciple | Temporary personal-DPS setup | Provides useful HP and CRIT effects but lacks Master Smith’s superior team amplification. |
| 4 | 2-piece HP + 2-piece SPD or HP | Transitional build | Worth using when the individual pieces have much stronger SPD, CRIT, and HP substats. |
Why Divine-Querying Master Smith Is the Default
Divine-Querying Master Smith supports both halves of Mortenax Blade’s role. Max HP improves his damage and durability, while the 4-piece effect rewards him for attacking enemies affected by DEF reduction and provides additional team damage after he applies that reduction.
Unlike a purely offensive set, it does not force you to choose between supporting the main carry and improving Mortenax Blade’s own damage. That makes it the safest farming target for Acheron support, hybrid, and personal-DPS builds.
For broader farming comparisons, see the ranking of the best Relic sets in Honkai: Star Rail.
💡 Relic replacement rule: Do not equip four weak Master Smith pieces only to activate the set bonus. A transitional build with substantially better Speed, HP, and CRIT rolls can remain stronger until the new set is properly upgraded.
🌌 Best Planar Ornaments
| Planar Set | Best For | Main Advantage | When to Choose It |
|---|---|---|---|
| Sprightly Vonwacq | Support and early setup | Energy Regeneration Rate and opening Action Advance | Use when Mortenax Blade must act early and establish the Zone before allied burst turns. |
| Bone Collection’s Serene Demesne | Hybrid and personal damage | Max HP and CRIT DMG | Use when the opening rotation is already stable and personal damage has more value. |
| Lushaka, the Sunken Seas | Supporting an ATK-scaling carry | Energy Regeneration Rate and an ATK buff for the first ally | Use only when the main carry benefits meaningfully from ATK. |
Simple choice: Use Vonwacq for earlier Zone setup and support consistency. Use Bone Collection when Energy and action order are already solved and you want more personal damage.
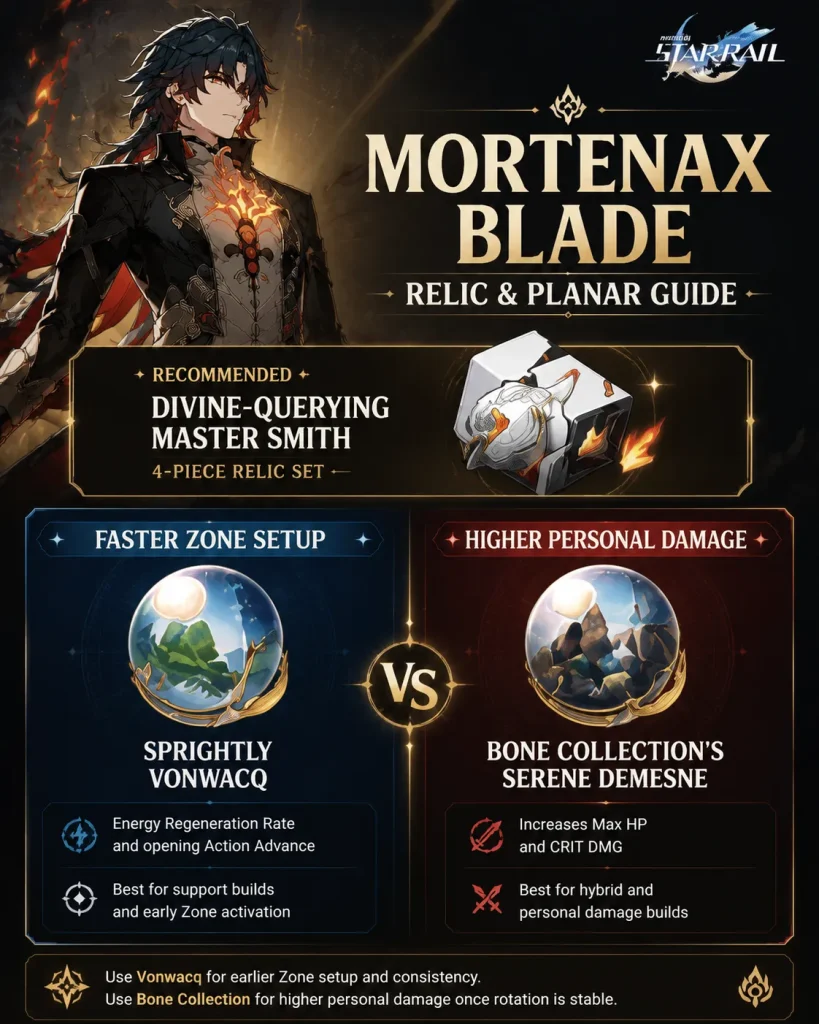
Image: Honkai: Star Rail © HoYoverse
💡 Best Mortenax Blade Light Cones
Light Cone rankings must be read together with their assumed Superimposition levels. A limited 5-star at S1 is not being compared under the same conditions as an event, Warp, or Nameless Honor Light Cone at S5.
| Rank | Light Cone | Assumed Superimposition | Build Type | Requirement or Limitation | Availability |
|---|---|---|---|---|---|
| 1 | Reforged in Hellfire | S1 | Hybrid support and damage | Best overall; provides the smoothest first-turn Zone setup | Limited 5-star signature |
| 2 | Lies Dance on the Breeze | S1 | Pure support | Requires approximately 170 SPD and around 40% Effect Hit Rate | Limited 5-star |
| 3 | Before the Tutorial Mission Starts | S5 | Energy and F2P utility | Needs a DEF-reduced target to activate its Energy effect | Event Light Cone and Herta’s Store |
| 4 | Resolution Shines As Pearls of Sweat | S5 | DEF-reduction support | Needs approximately 67% EHR against enemies with 40% Effect RES; debuff lasts one turn | 4-star Warp Light Cone |
| 5 | Holiday Thermae Escapade | S5 | Balanced amplification | S5 requires long-term Nameless Honor investment | Nameless Honor |
🔥 Reforged in Hellfire S1
Reforged in Hellfire is the best general option because it solves multiple problems at once. It increases Max HP, restores fixed Energy at the start of the wearer’s turn once per wave, and applies Purgatory after the wearer attacks with a Skill.
Purgatory increases the CRIT DMG received by affected enemies and provides an additional personal CRIT DMG received modifier for Mortenax Blade. More importantly, the opening Energy works with his A2 Trace and first Basic ATK to produce a reliable first-turn Ultimate.
This makes the signature valuable for rotation consistency, not only for damage-per-screenshot comparisons.
🌬 Lies Dance on the Breeze S1
Lies Dance on the Breeze is a specialized support option. It adds Speed and can apply teamwide DEF reduction, with an additional effect unlocked at 170 SPD.
However, its 170 SPD and Effect Hit Rate requirements consume a large number of substat rolls. It should not automatically be ranked above easier options simply because it is a limited 5-star Light Cone.
🎯 Before the Tutorial Mission Starts S5
Before the Tutorial Mission Starts is the most accessible Energy-oriented alternative. It provides Effect Hit Rate and restores Energy when Mortenax Blade attacks an enemy whose DEF is already reduced.
It does not always duplicate the signature’s exact first-turn sequence by itself. Another character may need to apply DEF reduction before Mortenax Blade attacks, depending on the team’s opening order.
🔗 Resolution Shines As Pearls of Sweat S5
Resolution Shines As Pearls of Sweat can add valuable DEF reduction, especially in teams deliberately stacking multiple DEF reduction and DEF Ignore effects.
The commonly cited Effect Hit Rate target applies to S5 Resolution against an enemy with 40% Effect RES. Lower Superimposition levels have a lower base chance and therefore require more Effect Hit Rate for comparable consistency.
⚠ Check your total DEF reduction: DEF reduction generally becomes more valuable as more of it is stacked, up to the effective 100% limit. Resolution loses value only when its debuff would push the team beyond that limit, when its one-turn duration cannot be maintained, or when the required Effect Hit Rate forces too many stat sacrifices.
🏛 Holiday Thermae Escapade S5
This Nameless Honor Light Cone provides personal damage and applies a two-turn Vulnerability effect after the wearer attacks. It is easier to maintain than Resolution’s one-turn debuff, but reaching S5 requires several Nameless Honor selections.
For a broader explanation of Path restrictions and Light Cone selection, use the complete Honkai: Star Rail Light Cones guide.
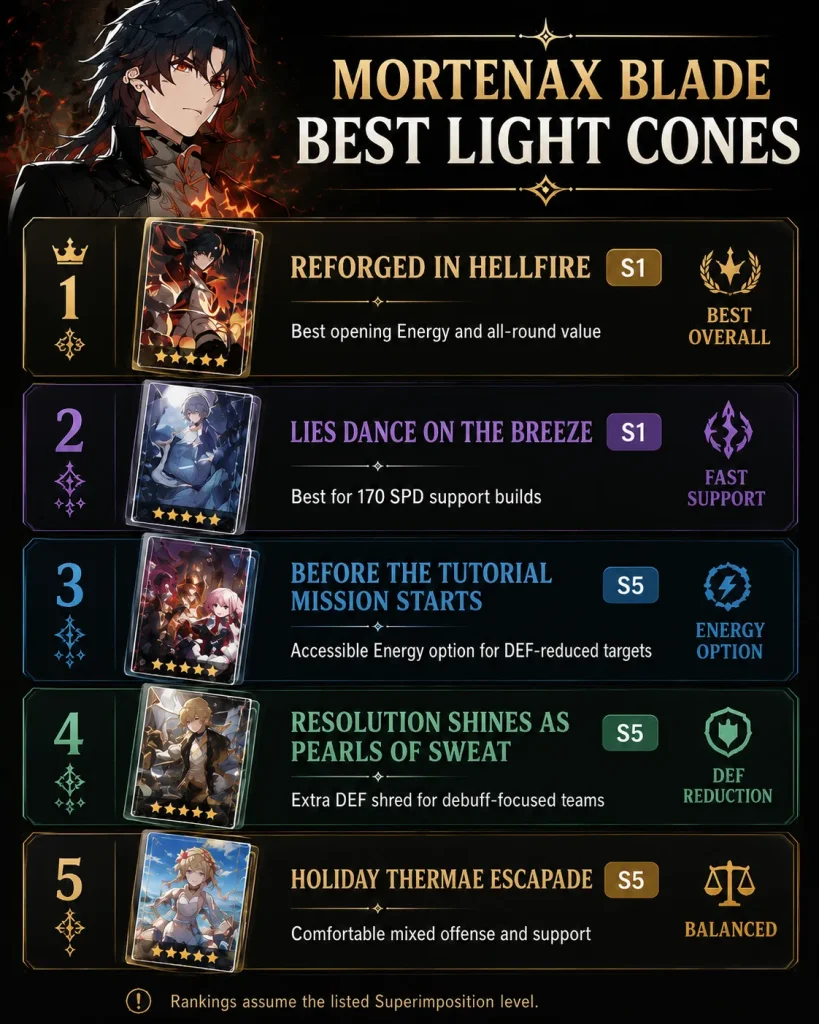
Image: Honkai: Star Rail © HoYoverse
📊 Best Stats and Speed Breakpoints
📌 Recommended Main Stats
| Relic Slot | Default Choice | Alternative | When to Use the Alternative |
|---|---|---|---|
| Body | CRIT Rate | Effect Hit Rate | Use EHR when the equipped Light Cone cannot reach its required application rate through substats. |
| Boots | SPD | HP% | Use HP% only when Action Advance, external Speed, or specific tuning already solves his action order. |
| Planar Sphere | HP% | Fire DMG | Use Fire DMG when it has clearly stronger substats or the team supplies substantial external Max HP. |
| Link Rope | Energy Regeneration Rate | HP% | Use HP% only after confirming that Zone uptime remains reliable without ERR. |
📈 Substat Priority
CRIT Rate = CRIT DMG > SPD > HP%
Effect Hit Rate is conditional rather than a universal priority. It moves ahead of offensive substats only when the chosen Light Cone needs more accuracy to apply its debuff reliably.
ATK% has low value because Mortenax Blade’s important damage multipliers scale from Max HP.
⏱ Speed Targets Explained
| Speed Target | Build Type | What It Does | Important Limitation |
|---|---|---|---|
| Below 134 | Slow tuned or Action Advance setup | Allows more HP and CRIT investment | Must be supported by a deliberate team rotation rather than accidental low Speed. |
| 134 SPD | General-purpose baseline | Provides a practical starting breakpoint for many normal rotations | Not a universal minimum and not automatically optimal for every mode. |
| 160 SPD | Fast support | Creates more actions, Energy generation, and debuff opportunities | Costs HP and CRIT substats. |
| 170 SPD | Lies Dance support | Activates the Light Cone’s higher-Speed condition | Should not be forced on signature, Tutorial, or personal-DPS builds without a clear rotation benefit. |
134 SPD is a common general-purpose breakpoint, not a universal requirement. Vonwacq, Action Advance, encounter length, game mode, and team-specific Speed tuning can make a slower or faster build preferable.
Use the HSR Speed breakpoints guide when planning exact Action Value targets rather than copying a Speed number without considering the team.
🎯 Recommended Endgame Targets
- HP: 6,000 or more as a practical target.
- CRIT Rate: Approximately 100% in combat.
- CRIT DMG: 130% or more.
- SPD: 134, 160, or 170 according to the selected build and Light Cone.
- Effect Hit Rate: 0% for normal CRIT builds, around 40% for Lies Dance, or approximately 67% for Resolution S5 against 40% Effect RES.
⚠ Avoid CRIT Rate overcap: Infinite Fury provides 20% CRIT Rate. Evaluate the in-combat total rather than forcing 100% on the character sheet before the Zone activates.
🔴 HP Sphere or Fire DMG Sphere?
Use HP% Sphere when the two pieces have similar substats. HP improves both damage and durability, making it the most consistent default.
Use Fire DMG Sphere when it has clearly better CRIT and Speed rolls, or when teammates already provide large Max HP bonuses. Do not discard a strong Fire Sphere simply because HP% is listed first in a build table.
🔄 ERR Rope or HP Rope?
Use Energy Regeneration Rate Rope until the Zone is available at the correct point in the rotation. An HP Rope becomes attractive only after the signature Light Cone, teammates, enemy attacks, and encounter structure already provide enough Energy.
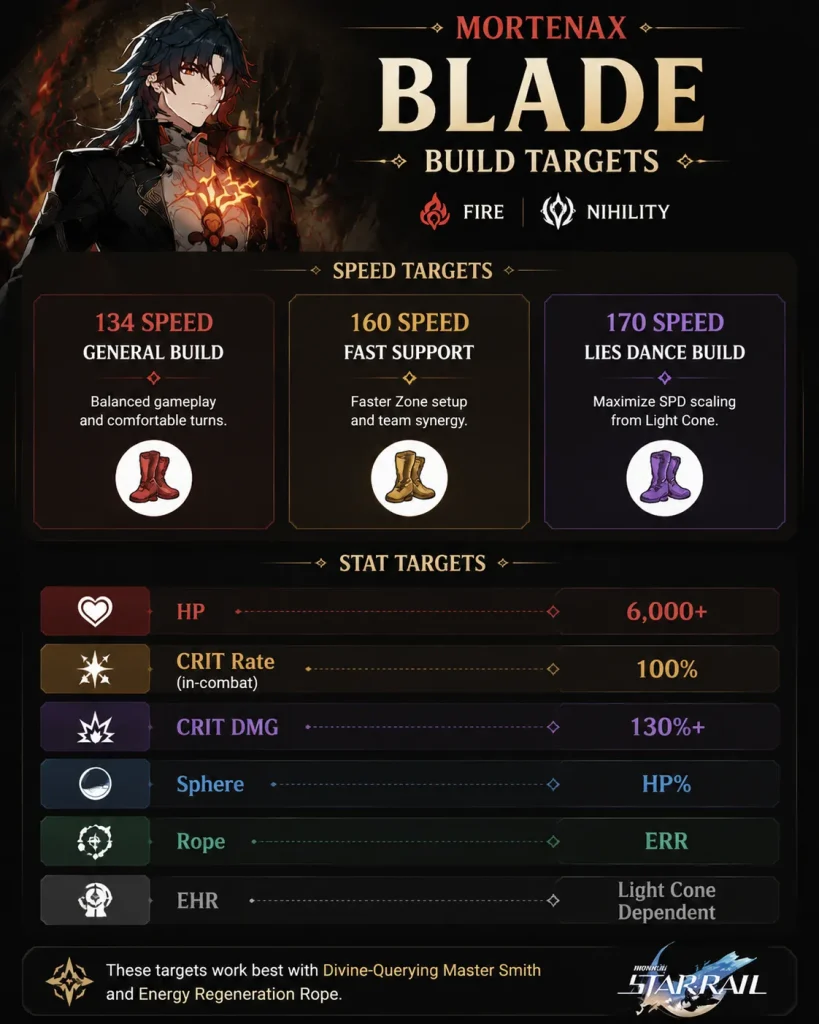
Image: Honkai: Star Rail © HoYoverse
🌟 Trace and Eidolon Priority
🧬 Trace Priority
Ultimate > Skill = Talent > Basic ATK
Ultimate is the highest priority because it controls Balefire Bind, the Zone, Infinite Fury, and access to his enhanced combat state.
Skill and Talent should be developed together. The Skill improves his HP-scaling AoE damage, while the Talent controls Charge conversion, Energy recovery, and extra follow-up Skill activations.
Basic ATK remains useful for opening Energy and Taunt application but provides less overall value per resource invested.
🧠 Major Trace Priority
- Bone, Hardened ad Nauseam: Enables Energy overflow and restores Energy at battle start or when the Zone ends.
- Soul, Tempered ad Mortem: Adds aggro, damage reduction, incoming healing, reactive debuffing, and Charge generation.
- Heart, Refined ad Infinitum: Adds major team damage and changes its secondary bonus according to whether another Nihility character is present.
The HSR Ascension Planner can help sequence Trace and ascension farming without spending materials on low-priority nodes too early.
✨ Mortenax Blade Eidolon Value
E0 – Complete core kit: E0 already provides the Zone, DEF reduction, damage amplification, aggro control, follow-up Skill, and Energy engine. This is the correct stopping point for most accounts.
E1 – Strong teamwide upgrade: E1 reduces all enemies’ All-Type RES during the Zone and delays the Infinite Fury countdown after his extra Skill. It improves both amplification and Zone uptime.
E2 – Major follow-up breakpoint: E2 makes damaging allied Ultimates count as follow-up attacks, increases allied follow-up damage, and reduces the Charge requirement for his extra Skill. It is his most transformative Eidolon for Ashveil and Ultimate-heavy teams.
E4 and E6 – Luxury investment: E4 adds more team damage, while E6 accelerates Charge generation whenever Mortenax Blade loses HP and substantially increases his enhanced Ultimate damage.
👥 Best Mortenax Blade Teams
Mortenax Blade works best with characters who attack frequently, rely on damaging Ultimates, benefit from repeated debuffs, or interact with HP consumption and follow-up attacks.
His best lineup depends on Eidolons and account goals. The principles in this HSR team-building guide are especially important here: preserve the carry’s required Trace conditions before replacing a teammate simply because another character attacks more often.
| Team Type | Recommended Lineup | Best For | Key Consideration |
|---|---|---|---|
| E0 Acheron Stable Team | Acheron + Mortenax Blade + Cipher, Pela, Welt, or Silver Wolf + Sustain | Preserving Acheron’s full double-Nihility Trace condition | Usually the safest E0 Acheron structure. |
| High-Frequency Acheron Dual Core | Acheron + Mortenax Blade + Ashveil + Hyacine | Attack frequency, Charge generation, debuff application, and team damage | E0 Acheron gives up the second additional Nihility teammate. |
| E2 Acheron Premium Team | Acheron + Mortenax Blade + Ashveil or Tribbie + Hyacine | Accounts with reduced dependence on a second Nihility teammate | Allows more flexible amplification and follow-up options. |
| Premium Follow-Up Team | Ashveil + Mortenax Blade + Tribbie or Feixiao + Hyacine | Frequent attacks and multi-DPS output | Benefits from characters repeatedly feeding one another’s mechanics. |
| Castorice Alternative | Castorice + Mortenax Blade + Tribbie + Hyacine | Accounts whose preferred Castorice support is used elsewhere | Mortenax Blade is functional here but not automatically Castorice’s best-in-slot support. |
| Mortenax Carry Team | Mortenax Blade + Tribbie + Sunday + Hyacine | Players investing in his personal damage | Some ATK-focused buffs provide less value because he scales from HP. |
| Budget Team | Mortenax Blade + Pela + Asta + Gallagher | Lower-cost accounts without additional premium teammates | Provides Speed, DEF reduction, healing, and frequent attacks. |
⚡ E0 Acheron: Why the Second Nihility Slot Matters
E0 Acheron gains different damage multipliers depending on whether the team contains one or two additional Nihility characters. In an Acheron, Mortenax Blade, Ashveil, and Hyacine lineup, Mortenax Blade is the only additional Nihility character.
The lineup can still perform extremely well because Ashveil and Hyacine attack frequently, generate more Charge, and help Mortenax Blade apply more debuffs. However, it should be described as a high-frequency alternative, not as an unconditional upgrade over every double-Nihility Acheron team.
For stable E0 planning, use:
- Acheron + Mortenax Blade + Cipher + Sustain for strong amplification.
- Acheron + Mortenax Blade + Pela + Sustain for an accessible double-Nihility setup.
- Acheron + Mortenax Blade + Welt + Sustain when delay and additional Nihility synergy are useful.
- Acheron + Mortenax Blade + Silver Wolf + Sustain for focused single-target debuffing.
💡 E2 Acheron changes the decision: Once Acheron’s Eidolons reduce her dependence on a second Nihility teammate, Ashveil, Tribbie, and other non-Nihility amplifiers become easier to include without sacrificing the same Trace value.
💥 Follow-Up and High-Attack-Count Teams
Ashveil and Mortenax Blade form a natural pairing because both reward teammates for attacking frequently. Ashveil supports follow-up damage and contributes additional attacks, while Mortenax Blade increases general damage, applies DEF reduction, and converts allied attacks into Charge.
Tribbie adds AoE amplification and follow-up activity. Feixiao can generate a high number of attacks but provides less direct team amplification, so her value depends on whether the lineup needs another damage dealer or another support.
Hyacine is especially effective because she supplies Max HP support, healing, high Speed, and companion attacks that continue feeding Mortenax Blade’s Charge mechanic.
💜 Castorice, Personal Carry and Budget Teams
Mortenax Blade can support Castorice because his HP consumption contributes to HP-loss mechanics and he fits naturally beside Tribbie and Hyacine. However, he should be presented as a flexible alternative rather than Castorice’s automatic best support.
As a personal carry, he benefits from Tribbie’s amplification, Sunday’s action and Energy support, and Hyacine’s Max HP buffs. Some of Sunday’s ATK-related value is wasted, but his action control, CRIT support, and Energy remain useful.
For F2P players, Pela, Asta, and Gallagher provide a functional foundation. Pela supplies DEF reduction, Asta improves Speed and attacks frequently, and Gallagher provides sustain plus another enemy debuff.
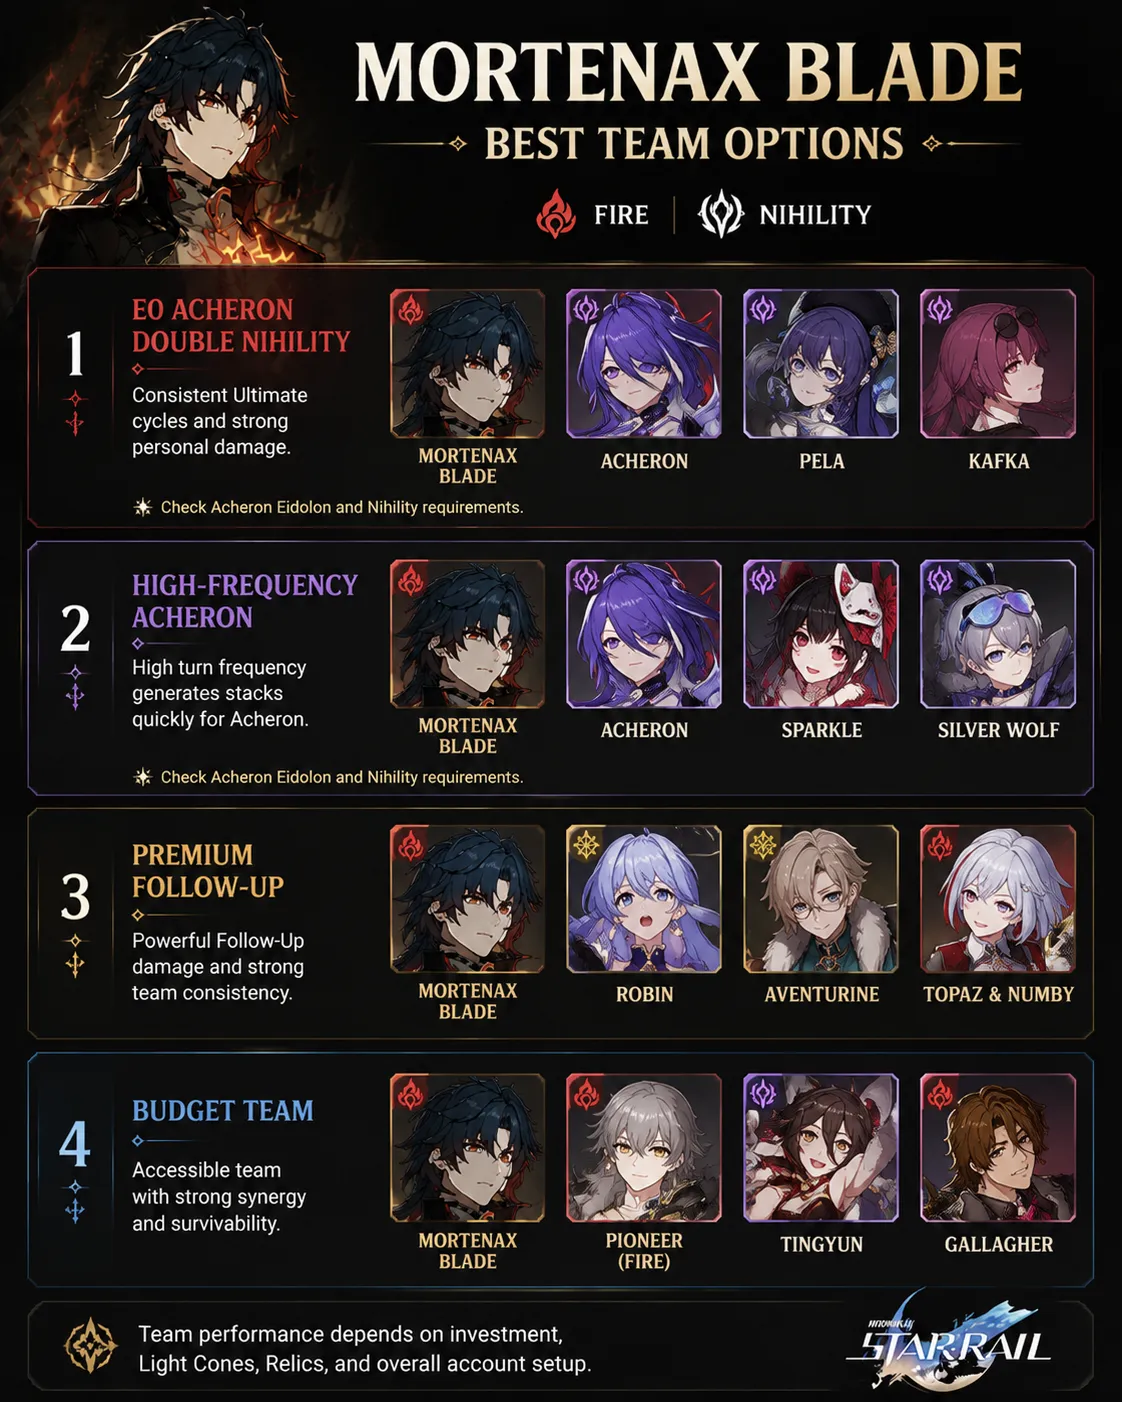
Image: Honkai: Star Rail © HoYoverse
🎮 Mortenax Blade Rotation and Gameplay
▶ Standard Combat Flow
- Use his Technique before entering combat when practical to Taunt enemies and gain major early damage reduction.
- Generate enough Energy for Fornax Ex Corpore.
- Deploy the Zone before the team’s main damage window.
- Use frequent allied attacks to apply Balefire Bind and build Charge.
- Use his unlocked Skill during Infinite Fury. It costs HP but no normal Skill Point.
- Trigger the extra follow-up Skill when Charge reaches the required threshold.
- Use Tenax Per Ignem during active buffs and debuffs.
- Prepare Energy for the next Zone before the countdown ends.
🔥 Reforged in Hellfire Opening
At battle start, Mortenax Blade’s A2 Trace restores him to 75% of his 160 Energy maximum, giving him 120 Energy. Reforged in Hellfire then restores 20 Energy at the start of his turn, and his Basic ATK generates the remaining Energy.
Start at 120 Energy → Signature adds 20 → Basic ATK adds 20 → First-turn Zone becomes available
This guaranteed sequence is the signature’s most important practical advantage.
🎯 Tutorial S5 Opening
Before the Tutorial Mission Starts restores Energy only after Mortenax Blade attacks a DEF-reduced enemy. If another teammate applies DEF reduction before his action, Tutorial can accelerate the opening or later Ultimate cycles.
If no DEF reduction is active when he attacks, the Light Cone does not provide that Energy. Team order therefore matters more than it does with the signature.
🔗 Resolution S5 Opening
Resolution can apply Ensnared when Mortenax Blade attacks, but it does not provide the fixed opening Energy of Reforged in Hellfire. Its value comes from damage amplification rather than guaranteeing the same first-turn Zone sequence.
Because the debuff lasts only one turn, faster builds and frequent attacks are important when the team wants reliable coverage.
✅ Rotation Checklist
- ☐ Enter combat with his Technique when possible.
- ☐ Confirm whether the selected Light Cone enables a first-turn Zone.
- ☐ Activate the Zone before the carry’s main Ultimate.
- ☐ Keep frequent attackers active during Infinite Fury.
- ☐ Avoid reducing Mortenax Blade to one HP before he needs to use Skill.
- ☐ Monitor the countdown instead of holding the enhanced Ultimate indefinitely.
- ☐ Avoid wasting stored Energy after the Zone expires.
⚠ Common rotation loss: Waiting too long for an ideal Tenax Per Ignem target can cause the Zone to expire before the enhanced Ultimate is used. A good attack inside the active damage window is usually better than losing the attack entirely.
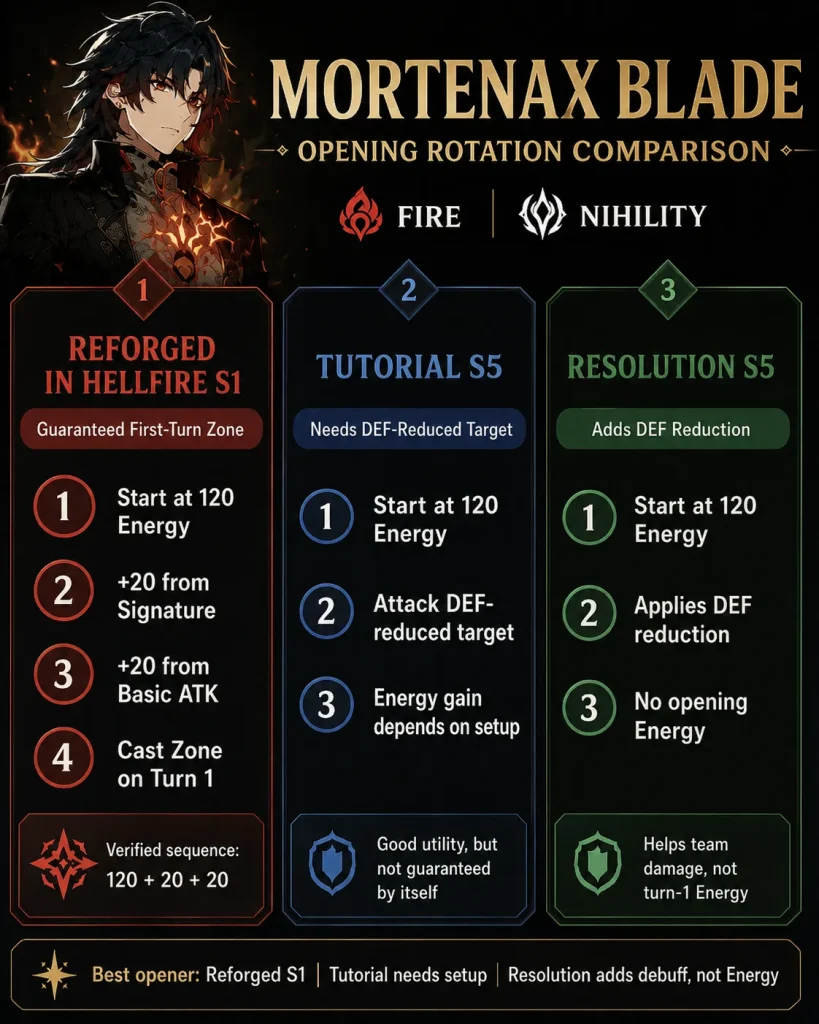
Image: Honkai: Star Rail © HoYoverse
🏆 Best Mortenax Blade Build by Game Mode
The ideal build can change according to encounter length, enemy count, seasonal buffs, and whether the team is trying to minimize cycles or maximize safe consistency. The recommendations below are general guidance rather than permanent rules for every season.
| Game Mode | Preferred Setup | Main Reason | What to Recheck Each Season |
|---|---|---|---|
| Memory of Chaos | Vonwacq or tuned Eagle | Early Zone activation and cycle control are often more valuable than maximum sheet damage. | Wave structure, cycle target, and whether the team already has Action Advance. |
| Pure Fiction | Bone Collection hybrid build | Additional personal AoE damage becomes more valuable against repeated enemy waves. | Whether enemies die before debuffs and follow-ups produce full value. |
| Apocalyptic Shadow | Vonwacq or stable ERR hybrid | Reliable Zone uptime and frequent attacks are usually more important than forcing one Speed breakpoint. | Boss mechanics, weakness phases, and downtime between damage windows. |
| Anomaly Arbitration | Defensive hybrid setup | Survival, Energy consistency, and repeatable rotations matter more than a fragile damage ceiling. | Enemy pressure, sustain requirements, and whether HP Rope is still safe. |
💡 Do not rebuild for every mode immediately: A strong Master Smith set with SPD Boots, HP Sphere, and ERR Rope is flexible enough for most content. Change Planar Ornament or advanced Speed tuning only when it solves a specific problem.
🎫 Is Mortenax Blade Worth Pulling on a Rerun?
Mortenax Blade is most valuable for accounts that already own a capable main damage dealer and need a flexible amplifier rather than another conventional hypercarry.
His strongest account-level selling points are frequent debuff application, Acheron synergy, DEF reduction, Ultimate amplification, high attack-count team support, and role compression.
| Account Situation | Recommendation | Reason |
|---|---|---|
| You regularly use Acheron | High-priority rerun target | He is one of her strongest Nihility partners and provides frequent debuffs plus major amplification. |
| You own Ashveil, Tribbie, or Hyacine | Strong consideration | Your account already contains frequent attackers and amplifiers that support his Charge engine. |
| You need a flexible support and sub-DPS | Good pull | He compresses amplification, debuffs, aggro control, and personal damage. |
| You need a primary DPS first | Consider saving | He can carry, but his best account value normally comes from supporting an established damage core. |
| Your account lacks reliable sustain | Prioritize sustain | A stable healer or shielder may unlock more teams immediately. |
| You have no compatible carry or frequent attackers | Wait and reassess | His mechanical advantages are less valuable without a team that can exploit them. |
| You want to equip the original Blade’s Light Cone | Do not pull for that reason | Mortenax Blade is Nihility and cannot activate Destruction-only Light Cone effects. |
💎 E0, S1 or E1?
E0: The best stopping point for most players. His complete Zone, debuff, amplification, Energy, and follow-up kit is already available.
E0S1: Best for players who value simple gearing and a reliable first-turn Zone. The signature also adds Max HP and CRIT-based amplification.
E1S0: Best when you already own a strong alternative Light Cone and want All-Type RES reduction plus improved Zone duration.
E2: A luxury breakpoint for dedicated follow-up, Ashveil, and Ultimate-heavy teams. It is powerful but unnecessary for standard endgame clears.
Use an HSR pull tracker to check pity, guarantee status, and the number of pulls available before planning a rerun investment.
⚠ Banner update rule: Do not add a rerun date to this guide until HoYoverse publishes an official Event Warp notice. Leaks, estimated patch schedules, and community speculation should not be presented as confirmed availability.
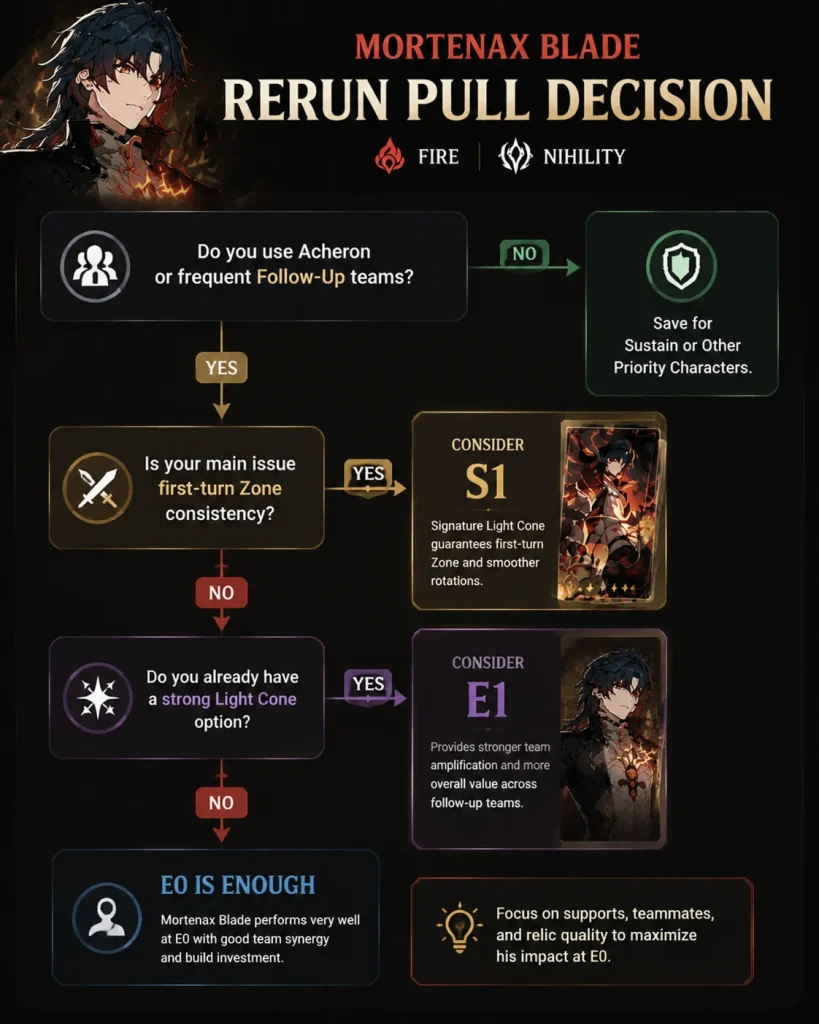
Image: Honkai: Star Rail © HoYoverse
❌ Common Mortenax Blade Build Mistakes
1. Building ATK Instead of HP
Mortenax Blade’s important attacks scale from Max HP. ATK% may increase a generic Relic score but contributes little to his actual damage.
2. Calling 134 SPD a Universal Minimum
134 SPD is a common baseline, not a mandatory floor. Vonwacq, Action Advance, encounter length, and team tuning can justify a slower or faster setup.
3. Building Effect Hit Rate Without Checking the Light Cone
Signature and normal CRIT builds do not need a large Effect Hit Rate investment. EHR becomes important when Lies Dance, Resolution, or another debuffing Light Cone requires it.
4. Treating 67% EHR as a Universal Resolution Target
The approximate 67% target assumes Resolution S5 against enemies with 40% Effect RES. Lower Superimposition levels require more accuracy because their base chance is lower.
5. Assuming More DEF Reduction Has Lower Returns
DEF reduction generally becomes more valuable as it is stacked before reaching the effective 100% limit. The real risks are overcapping, poor debuff uptime, and sacrificing too many stats to apply Resolution.
6. Overcapping CRIT Rate
Infinite Fury supplies 20% CRIT Rate. Build toward approximately 100% in combat rather than automatically forcing 100% before the Zone activates.
7. Using an HP Rope Before Solving Energy
HP Rope may increase personal damage, but delayed or inconsistent Zone activation usually costs more team damage than the extra HP provides.
8. Presenting One Acheron Team as Universally Best
E0 Acheron may prefer a second Nihility teammate. Ashveil and Hyacine can compensate through attack frequency and team damage, but the correct choice depends on Acheron’s Eidolons and the rest of the account.
9. Forcing 170 SPD Without Lies Dance
Chasing 170 SPD on every build can remove too much HP and CRIT. Use it when a specific Light Cone or rotation requires it, not because it is the highest listed breakpoint.
10. Holding the Enhanced Ultimate Until the Zone Expires
Tenax Per Ignem should be used during active amplification and before the countdown ends. Waiting for a theoretically perfect target is not worth losing the attack.
✅ Final verdict: The strongest Mortenax Blade build is the one that activates the Zone at the correct time, reaches the selected Light Cone’s requirements, avoids CRIT and DEF-reduction overcap, and gives frequent attackers enough time to generate Charge. Start with Master Smith, SPD Boots, HP Sphere, and ERR Rope, then specialize the Planar Ornament and Speed target around the team.
❓ Mortenax Blade Build FAQ
What is the best Relic set for Mortenax Blade?
Divine-Querying Master Smith is his best general Relic set. It improves Max HP, personal damage against DEF-reduced enemies, and teamwide damage after he applies DEF reduction.
Should Mortenax Blade use Vonwacq or Bone Collection?
Use Sprightly Vonwacq for earlier actions, Energy Regeneration Rate, and faster Zone setup. Use Bone Collection’s Serene Demesne when the rotation is already stable and personal damage has more value.
What is Mortenax Blade’s best Light Cone?
Reforged in Hellfire S1 is his best overall Light Cone. It increases Max HP, supplies fixed opening Energy, improves CRIT-based amplification, and guarantees a smoother first-turn Zone sequence.
What is his best F2P Light Cone?
Before the Tutorial Mission Starts S5 is the most accessible Energy-focused option. Its Energy effect requires Mortenax Blade to attack a DEF-reduced enemy, so opening turn order matters.
Does Mortenax Blade need Effect Hit Rate?
Not in a standard CRIT or signature build. He needs additional Effect Hit Rate mainly when using Light Cones such as Lies Dance on the Breeze or Resolution Shines As Pearls of Sweat.
Is 134 SPD required?
No. It is a common general-purpose breakpoint rather than a universal minimum. A slower build may work with Action Advance or specific tuning, while support builds may prefer 160 or 170 SPD.
Should he use an HP Sphere or Fire DMG Sphere?
HP% is the reliable default because it improves damage and durability. Fire DMG is competitive when it has clearly better substats or when teammates already provide substantial Max HP buffs.
Should he use an ERR Rope or HP Rope?
Use an ERR Rope until Zone uptime is consistently solved. Switch to HP% only after real rotation testing confirms that the signature, teammates, and encounter already provide enough Energy.
What is the best Mortenax Blade team for E0 Acheron?
A stable E0 Acheron structure is Acheron + Mortenax Blade + a second Nihility debuffer + sustain. Cipher, Pela, Welt, and Silver Wolf are possible second Nihility options.
Can E0 Acheron use Ashveil with Mortenax Blade?
Yes. Acheron, Mortenax Blade, Ashveil, and Hyacine can generate many attacks, Charges, and debuffs. However, E0 Acheron loses the full benefit associated with bringing two additional Nihility teammates, so the tradeoff should be evaluated rather than ignored.
Is Mortenax Blade good without Acheron?
Yes. He works in Ashveil follow-up teams, Tribbie AoE teams, Castorice alternatives, and personal-carry setups. Acheron is one of his strongest partners, but she is not required for his kit to function.
Is Mortenax Blade the same as the original Blade?
He is an alternate playable form of the same character but functions as a separate unit. Mortenax Blade is Fire and Nihility, while the original Blade is Wind and Destruction.
Can Mortenax Blade use The Unreachable Side?
He can equip it, but its Destruction-only passive will not activate because Mortenax Blade follows the Path of Nihility. A Nihility Light Cone should be used instead.
When will Mortenax Blade rerun?
His first rerun has not been officially announced. His debut Event Warp ended on June 24, 2026, at 11:59 server time. Future dates should remain unconfirmed until HoYoverse publishes an official notice.
📝 Sources and Update Methodology
This guide uses the released Version 4.3 kit rather than pre-release beta values. Time-sensitive information should be rechecked whenever HoYoverse announces a balance adjustment, new Relic set, new Light Cone, new endgame season, or official rerun.