

Update Note: This HSR Anomaly Arbitration guide is updated around the current 4.3.1 phase, The Humming Laughter. Team recommendations can change after each Anomaly Arbitration refresh, so always check the live in-game enemy traits before locking your teams.
Contents
- 1 ⚡ Quick Answer: What Is Anomaly Arbitration in HSR?
- 2 ⚔️ Best Teams for the Current Anomaly Arbitration Phase
- 3 ♟️ What Is Anomaly Arbitration?
- 4 🔓 How to Unlock Anomaly Arbitration
- 5 🧠 HSR Anomaly Arbitration Mechanics Explained
- 6 🧬 Best Team Archetypes for Anomaly Arbitration
- 7 💎 F2P Team Examples for Anomaly Arbitration
- 8 🎁 Anomaly Arbitration Rewards and Priority
- 9 🎲 Should You Pull for Anomaly Arbitration?
- 10 ✅ HSR Anomaly Arbitration Clear Tips and Checklist
- 11 ❓ HSR Anomaly Arbitration FAQ
- 11.1 What is Anomaly Arbitration in HSR?
- 11.2 How do you unlock Anomaly Arbitration?
- 11.3 How many teams do you need for Anomaly Arbitration?
- 11.4 What are the best teams for Anomaly Arbitration?
- 11.5 What rewards does Anomaly Arbitration give?
- 11.6 What is Interference Key used for?
- 11.7 Is Anomaly Arbitration F2P-friendly?
- 11.8 Should you pull a character just for Anomaly Arbitration?
- 11.9 Are 0-cycle clears necessary?
⚡ Quick Answer: What Is Anomaly Arbitration in HSR?
Anomaly Arbitration is a permanent HSR endgame mode with three Knight stages and one final King in Check stage. To clear it consistently, build three separate Knight teams, save your strongest team for King in Check, match each team to the current enemy traits, and prioritize practical rewards such as Interference Key, Self-Modeling Resin, and Lone Stardust over cosmetic frames.
Fast Advice: If you are F2P or low-spender, do not chase 0-cycle clears first. Aim for stable Knight clears, then push King in Check once your best sustain, support core, and relic sets are not all trapped on one team.
Current Phase Summary:
- Current Phase: 4.3.1 — The Humming Laughter
- Knight I Focus: God-Devourer Offspring, Fire / Lightning pressure, Depowered + Flow Break mechanics
- Knight II Focus: Alloy Mechatron: King Pom-Pom, Fire / Imaginary pressure, slower damage race
- Knight III Focus: The Giver, Ice / Quantum pressure, fatal HP drain from Hemovore
- King in Check Focus: Starcrusher Swarm King: Skaracabaz, Physical / Imaginary / Ice pressure, Hemovore + Flow Break
- Main Reward Priority: Interference Key → Self-Modeling Resin → Lone Stardust → cosmetic frame upgrades
⚔️ Best Teams for the Current Anomaly Arbitration Phase
For the current 4.3.1 Anomaly Arbitration phase, the most important thing is not simply owning one strong carry. You need to place your best teams where their mechanics matter most. In my experience, many failed clears happen because the account can clear one Knight comfortably, but the second or third team has no reliable sustain, weak debuff support, or badly shared relic pieces.
Practical Note: If your first Knight team clears easily but your second or third Knight team needs repeated resets, do not farm more relics for your main DPS first. Check whether your second sustain, second debuffer, and backup support are underbuilt.
🧩 Current Phase Best Teams Table
| Stage | Current Enemy / Trait Focus | Best Team Direction | F2P / Lower-Cost Direction | Clear Notes |
|---|---|---|---|---|
| Knight I | God-Devourer Offspring. Fire / Lightning recommended. Depowered cuts Energy, while Flow Break rewards frequent Follow-Up or Elation-style pressure. | Ashveil + Mortenax Blade + Tribbie + Hyacine Silver Wolf LV.999 + Yao Guang + Sparxie + Huohuo Firefly + Fugue + The Dahlia + Lingsha | Harmony Trailblazer + Gallagher + Xueyi / Firefly substitute + Pela / Asta | Use teams that do not collapse when Energy is delayed. Follow-Up, Elation, debuff, or Super Break cores are safer than slow Ultimate-dependent teams. |
| Knight II | Alloy Mechatron: King Pom-Pom. Fire / Imaginary recommended. Flow Break lowers ally damage but also reduces incoming damage. | Silver Wolf LV.999 + Yao Guang + Sparxie + Huohuo Evanescia + Yao Guang + Trailblazer (Elation) + Huohuo Ashveil + Mortenax Blade + Tribbie + Hyacine | Qingque / Xueyi + Tingyun + Pela + Gallagher / Lynx | This stage is more about consistency than one huge burst window. Use stable sustain and avoid teams that need perfect first-cycle Energy flow. |
| Knight III | The Giver, Master of Legions, Lance of Fury. Ice / Quantum recommended. Hemovore causes allies to lose 500 HP at the start of their turns and this HP loss can be fatal. | Castorice + Evernight + Cyrene + Hyacine Evernight + Remembrance Trailblazer + Cyrene + Hyacine Silver Wolf LV.999 + Yao Guang + Sparxie + Huohuo | Herta + Serval / Xueyi + Asta + Lynx / Gallagher | Do not bring a fragile speed-heavy team without healing. Hemovore punishes teams that take many turns while sitting at low HP. |
| King in Check | Starcrusher Swarm King: Skaracabaz. Physical / Imaginary / Ice recommended. Hemovore + Flow Break combine HP drain with damage reduction mechanics. | Ashveil + Mortenax Blade + Tribbie + Hyacine Silver Wolf LV.999 + Yao Guang + Sparxie + Huohuo Phainon + Cyrene + Cerydra + Dan Heng • Permansor Terrae | Use your strongest surviving boss team after clearing Knights. For F2P accounts, this is usually your best sustain + best support + most invested DPS, not a copied whale team. | Save your most complete team here. If you clear all three Knights but fail King, your team allocation was probably too aggressive earlier. |
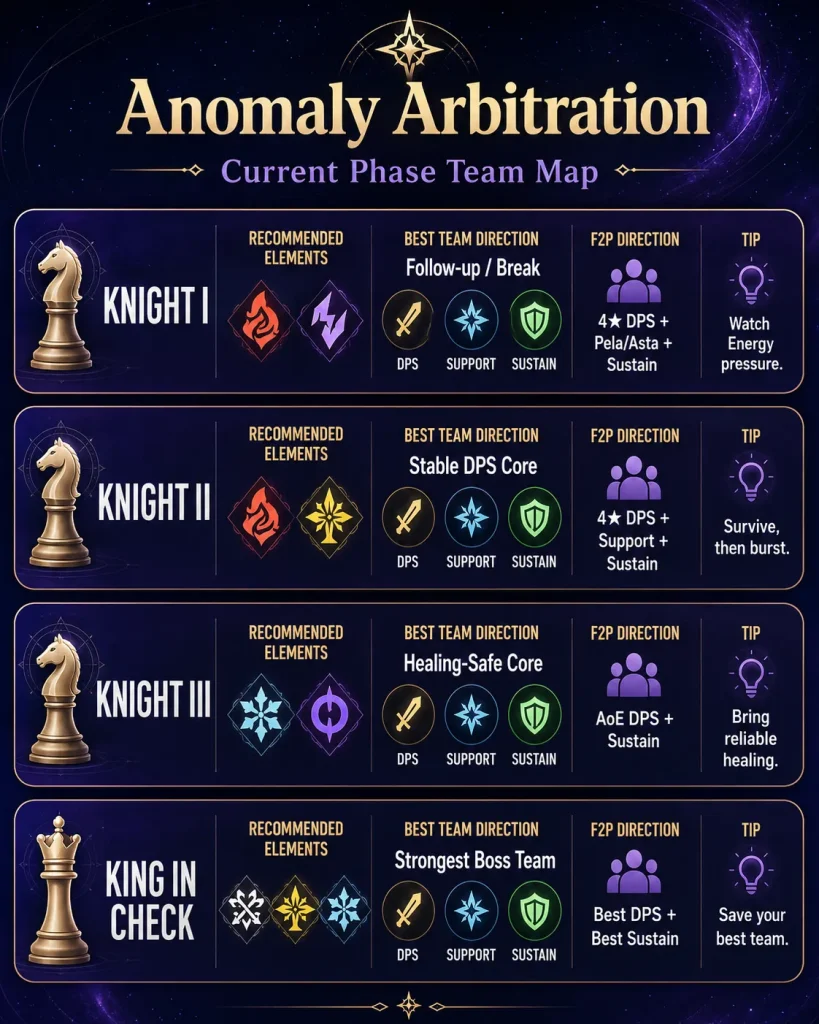
Image: Honkai: Star Rail © HoYoverse
👑 Which Team Should You Save for King in Check?
Save the team that has the best mix of damage, survival, and mechanic coverage. In this phase, King in Check combines HP pressure with Flow Break-style damage reduction, so a team that looks fast on paper can still fail if it cannot heal through repeated turns.
My Rule: Do not spend your best sustain on an easy Knight if your King team needs that sustain to survive Hemovore. A slightly slower Knight clear is better than reaching King with a broken final team.
If your issue is not damage but team allocation, it is worth reviewing how to distribute carries, supports, and sustain units in a broader HSR team building guide before spending resources on a single character.
♟️ What Is Anomaly Arbitration?
Anomaly Arbitration is a high-difficulty permanent endgame mode in Honkai: Star Rail. It sits alongside other late-game challenges but plays differently because it checks roster depth, not just your strongest team.
The basic structure is:
- Three Knight stages come first.
- Each Knight stage requires a separate team setup.
- Light Cones and Relics cannot be reused between Knight teams.
- After the Knights, you challenge King in Check with one final team.
- Higher performance gives more Lone Stardust and cosmetic progression, while practical rewards include Interference Key and Self-Modeling Resin.
Simple Explanation: Memory of Chaos checks whether two teams can beat strict fights. Anomaly Arbitration checks whether your whole account has enough real builds to survive multiple high-pressure stages.
🔓 How to Unlock Anomaly Arbitration
To unlock Anomaly Arbitration, you need to complete Trial of Equilibrium: Part Six and have at least one historical 3-star clear record in Memory of Chaos Stage 12, Pure Fiction Stage 4, and Apocalyptic Shadow Difficulty 4.
| Unlock Requirement | Exact Meaning | Why It Matters |
|---|---|---|
| Trial of Equilibrium: Part Six | Your account has reached late-game progression. | Enemies in Anomaly Arbitration are tuned around high-level builds, traces, relics, and Light Cones. |
| Memory of Chaos Stage 12 3-star record | You have proven two-team single-target / boss-stage performance. | Anomaly Arbitration assumes you already understand cycle pressure and boss damage windows. |
| Pure Fiction Stage 4 3-star record | You have proven wave-clearing and AoE scoring ability. | Some Knight stages punish accounts that only built one single-target carry. |
| Apocalyptic Shadow Difficulty 4 3-star record | You have proven boss-mechanic and burst-window execution. | King in Check feels closer to a boss execution test than a normal farming fight. |
Do Not Rush It: If you just unlocked the mode, treat it as a long-term account check. You do not need to full-star it immediately, especially if your second and third teams are still using half-built relics.
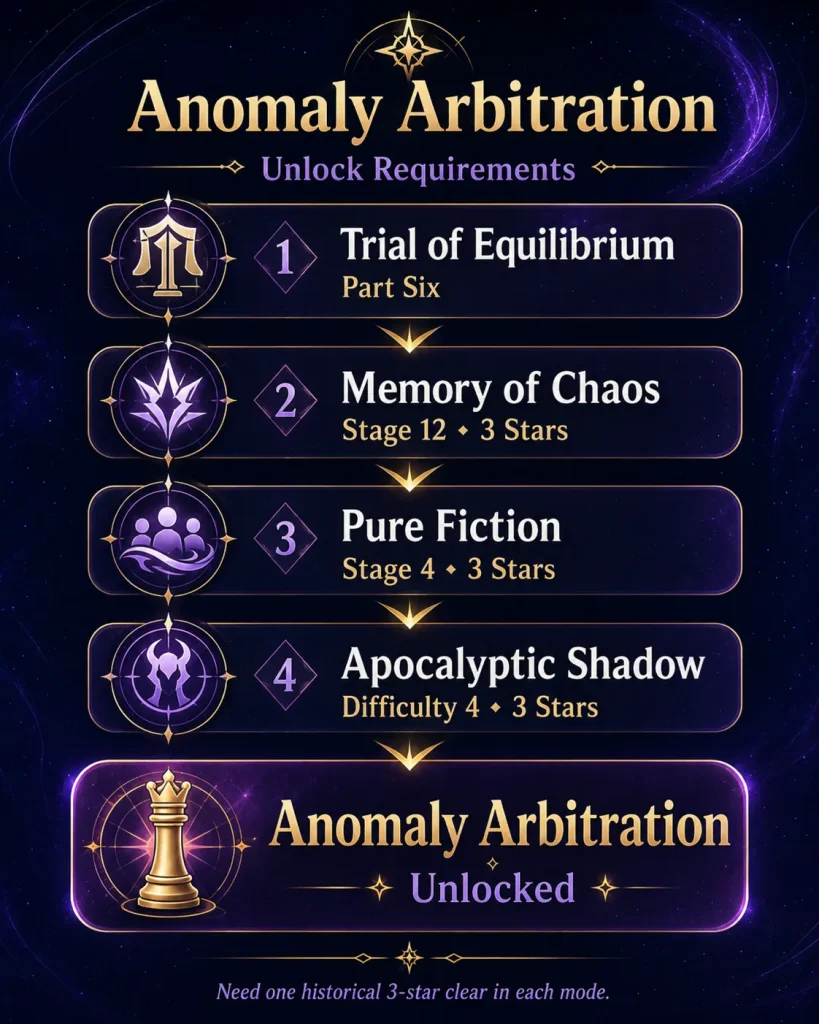
Image: Honkai: Star Rail © HoYoverse
🧠 HSR Anomaly Arbitration Mechanics Explained
Anomaly Arbitration has several rules that make it stricter than a normal endgame stage. If you understand these rules first, the mode becomes a team-planning puzzle instead of a random damage check.
🛡️ Unique Team, Relic and Light Cone Rules
| Mechanic | What It Means | Why Players Fail | How to Handle It |
|---|---|---|---|
| Separate Knight Teams | The three Knight stages require different team lineups. | Players build one premium team and then run out of supports or sustain options. | Plan all three Knight teams before entering the first stage. |
| No Relic / Light Cone Reuse Between Knights | You cannot simply move the same relic set or Light Cone across multiple Knight teams. | A “second team” looks built in the character screen but loses its actual gear in practice. | Prepare real backup relics and usable Light Cones for each Knight team. |
| Enemy Traits | Each stage has its own negative or special mechanic. | Players reuse last phase’s teams and ignore the current trait. | Read the trait first, then pick the team archetype. |
| First Cycle Action Value | The first cycle is longer than normal, but wave transitions do not reset it. | Players waste early burst timing and enter wave 2 with poor Energy or buff uptime. | Plan opener, Ultimate timing, and wave transition before chasing damage. |
| Middlegame Mayhem | Longer fights can grant stacking final DMG buffs after later cycles begin. | Players reset too quickly when a run is still recoverable. | If the team survives and the enemy is low, continue the run before resetting. |
Practical Note: If two teams need the same 5-star Light Cone or the same relic set, they are not actually two teams for Anomaly Arbitration. Fix the gear overlap before judging the character lineup.
👑 Knight Stages vs King in Check
| Stage Type | Team Rule | Main Goal | Best Strategy |
|---|---|---|---|
| Knight I / II / III | Three separate teams, no repeated characters, Light Cones, or Relics between Knight teams | Clear stages and collect up to 9 Knight stars | Use the weakest team that still clears safely, so your best core stays available later |
| King in Check | One final team | Beat the final boss and claim the key practical rewards | Use your most reliable team, not necessarily the team that cleared a Knight fastest |
If you are already comfortable with boss-focused timing from Apocalyptic Shadow, that experience transfers well to King in Check. The difference is that Anomaly Arbitration makes you spend roster resources before the final fight.
🔥 What Is Plight Difficulty?
King in Check: Plight is the high-pressure version of the final stage. It has stronger enemies, stricter cycle pressure, and is mainly for highly invested accounts or players who want to push prestige clears.
F2P Warning: Do not treat Plight as the normal expectation. If your account can clear the regular King in Check after clearing all three Knights, that is already meaningful progress.
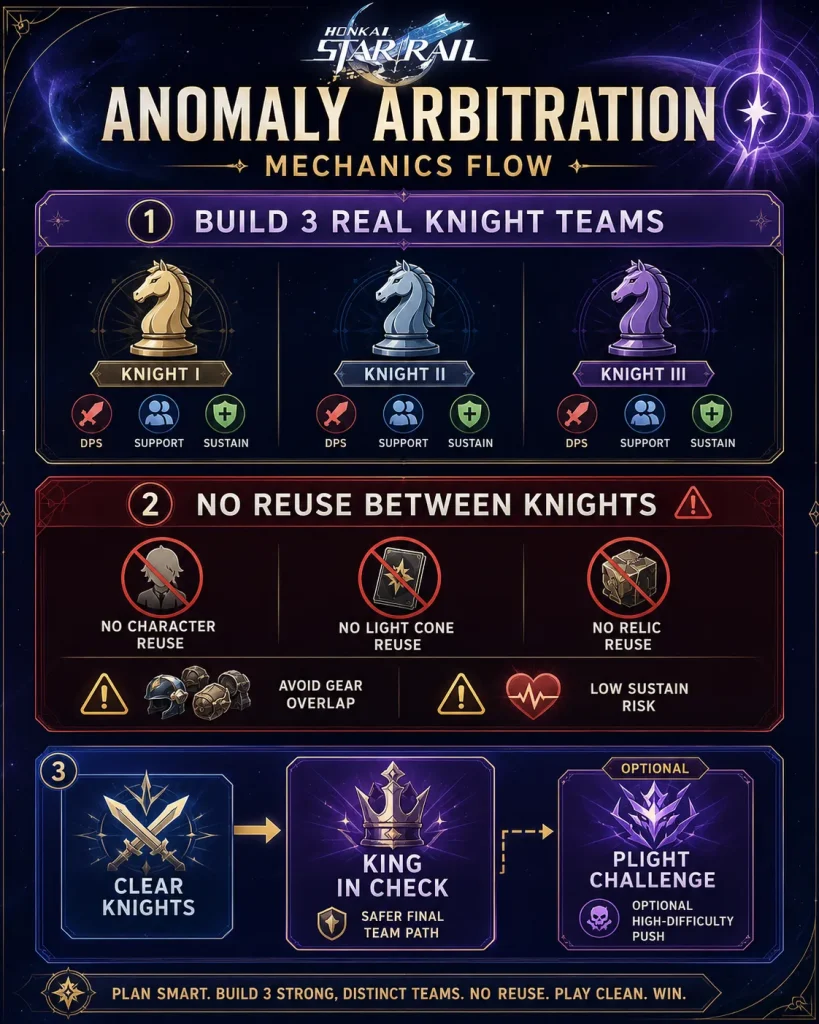
Image: Honkai: Star Rail © HoYoverse
🧬 Best Team Archetypes for Anomaly Arbitration
After you check the current stage table, use this archetype table to understand why certain teams work. This section should support the current phase recommendations, not replace them.
| Team Archetype | Best Used When | Example Core | Strength | Risk |
|---|---|---|---|---|
| Elation / Follow-Up | The phase rewards frequent hits, Aha Instant, or Flow Break removal. | Sparxie, Silver Wolf LV.999, Yao Guang, Trailblazer (Elation), Ashveil-style cores | High action density and strong synergy with current 4.3 mechanics | Can be support-hungry and may need premium sustain |
| Break / Super Break | Enemies have favorable weakness and the stage does not punish break timing. | Firefly + Fugue / Harmony Trailblazer + sustain | Can ignore some Crit-focused penalties and push damage after break | Bad if weakness access is poor or enemies delay break windows |
| Remembrance / Summon | Ice / Quantum pressure, HP-scaling, or summon-friendly windows matter. | Castorice + Evernight + Cyrene + Hyacine | Excellent for high-end King or dangerous Knight stages | Often expensive and not realistic for every account |
| Hypercarry | The stage rewards one strong carry with clean buff alignment. | Phainon + Cyrene + Cerydra + sustain / Dan Heng PT | Strong boss damage and simple team identity | Can consume your best supports too early |
| DoT / Debuff | Enemy pressure allows sustained damage and debuff stacking. | Kafka + Black Swan + Hysilens + sustain | Good damage uptime and flexible target pressure | Needs strong investment and may struggle into the wrong trait |
| Durable Control | The stage kills fragile teams before they can finish. | Reliable sustain + debuffer + safer DPS | Consistent clears for lower-investment accounts | May miss strict 2-cycle or 4-cycle star targets |
Team Planning Tip: Do not rank teams only by damage screenshots. For Anomaly Arbitration, a team that clears one Knight while preserving your premium support for King in Check may be more valuable than the faster team.
If you need a broader meta comparison before investing in a new carry, check the HSR character tier list, but always adjust for the current phase trait.
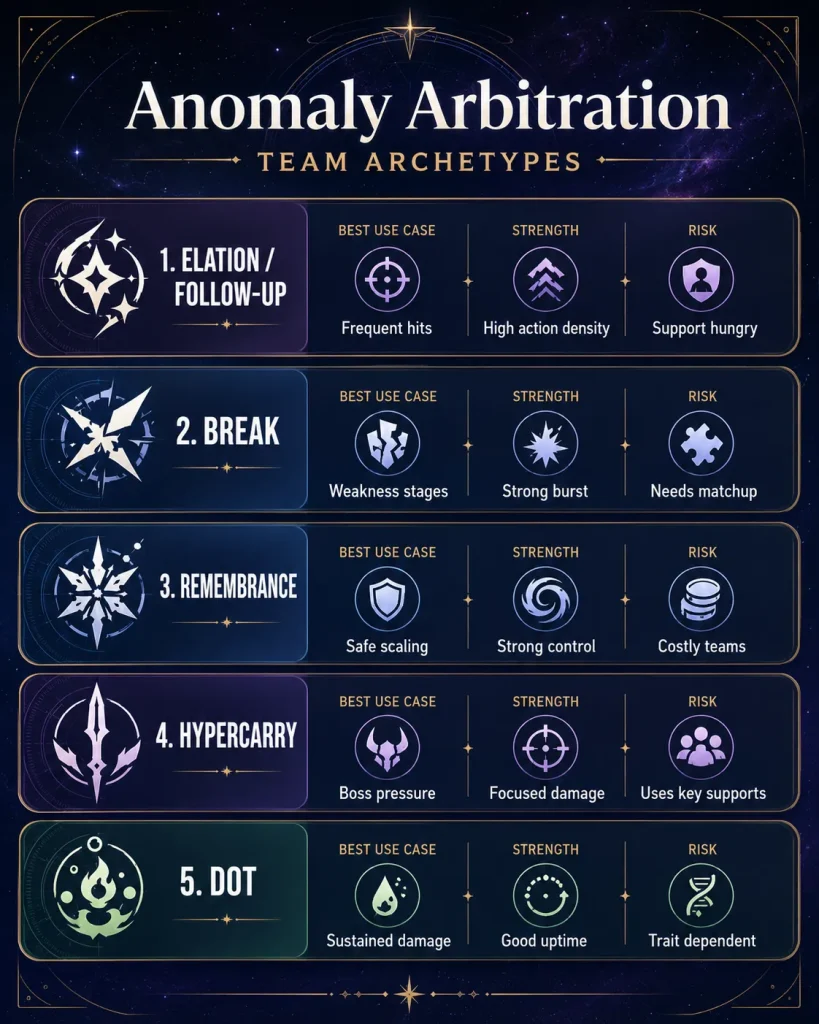
Image: Honkai: Star Rail © HoYoverse
💎 F2P Team Examples for Anomaly Arbitration
For F2P players, the realistic goal is not copying a premium 4.3 team with every limited support. The goal is building enough role redundancy to clear at least the practical reward path.
💎 Low-Investment Team Templates
| Team Type | Example Team | Best For | Upgrade Path |
|---|---|---|---|
| Budget Break | Harmony Trailblazer + Gallagher + Xueyi + Pela / Asta | Weakness-friendly Knight stages where Break damage can bypass some Crit-based penalties | Replace Xueyi with Firefly / Rappa / Boothill-style limited carry, then upgrade support |
| Budget AoE | Herta + Serval + Asta + Lynx / Gallagher | Multi-wave Knight stages where clearing adds matters more than one boss nuke | Upgrade to The Herta / Himeko-style AoE core when available |
| Budget Hypercarry | Qingque / Xueyi + Tingyun + Pela + sustain | Single-target or two-elite stages where one carry can do most of the work | Replace carry first, then replace support with a premium buffer |
| Budget Sustain Core | Gallagher / Lynx / Natasha + defensive relics + speed support | Hemovore or attrition stages where survival is the first problem | Upgrade to a premium sustain when your damage is already enough |
F2P Reality Check: If you cannot build three real teams yet, do not spend all resources forcing one phase. Build a second sustain, a backup debuffer, and at least one flexible support first.
For accounts that still lack multiple premium cores, the Best F2P Teams in HSR guide is a better next step than copying a high-investment Anomaly Arbitration showcase.
🎁 Anomaly Arbitration Rewards and Priority
Anomaly Arbitration is not mainly a Stellar Jade mode. Its value comes from long-term account tools, shop currency, and prestige cosmetics. From a planning perspective, the most important reward is usually the Interference Key, because it connects directly to relic optimization.
📦 Reward Sources and Practical Value
| Reward Source | Reward | Why It Matters | Priority |
|---|---|---|---|
| King Stage 1 Star | Lone Stardust x100 + Interference Key x1 | This is the most important practical milestone because Interference Key helps with high-end relic reroll planning. | Very High |
| King Stage 2 Stars | Lone Stardust x100 | Useful shop currency, but less important than the first clear milestone. | Medium |
| King Stage 3 Stars | Lone Stardust x100 | Mainly for stronger clears and prestige progression. | Medium / Optional |
| Knight 3 Total Stars | Lone Stardust x100 + Self-Modeling Resin x1 | Excellent long-term relic value for all accounts. | High |
| Knight 6 Total Stars | Lone Stardust x100 + Self-Modeling Resin x1 | Strong reward if your second and third teams are close to stable. | High |
| Knight 9 Total Stars | Lone Stardust x100 + Self-Modeling Resin x1 | Great value, but not worth destroying your pull plan if your account is not ready. | High, but not urgent |
| Mirror’s Gift | Lone Stardust x100 for clearing 1 / 2 / 3 Knight stages | Good baseline reward for partial progress. | Medium |
| Cosmetic Frame Rewards | Temporary or phase-related frame upgrades | Prestige only. Nice to have, but not account power. | Optional |
Reward Priority: For most players, the best target order is King 1-star reward first, then Knight star milestones, then cosmetic upgrades only if your account is already comfortable.
Because Interference Key is tied to relic reroll planning, it pairs naturally with the HSR Variable Dice guide. Do not use it on a mediocre relic just because you finally earned one.
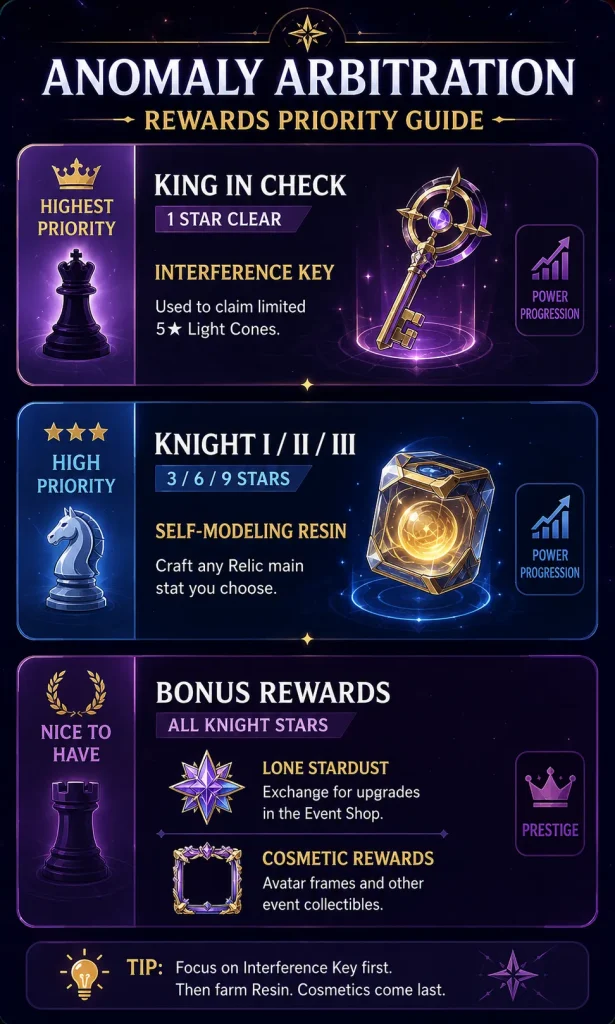
Image: Honkai: Star Rail © HoYoverse
🎲 Should You Pull for Anomaly Arbitration?
You should not pull only because one Anomaly Arbitration phase feels hard. A good pull should improve Anomaly Arbitration and at least one other mode, such as Memory of Chaos, Pure Fiction, or Apocalyptic Shadow.
🧭 Pull or Save Decision Table
| Account Situation | Pull or Save? | Reason | Recommended Action |
|---|---|---|---|
| You cannot build three real Knight teams | Pull selectively | Roster depth is the main gate. | Prioritize flexible supports, sustain units, or carries that open a new archetype. |
| Your King team dies to Hemovore | Consider sustain first | More DPS does not solve fatal HP drain if the team cannot stay alive. | Upgrade sustain, defensive relics, and speed tuning before chasing signature damage. |
| The banner unit helps Anomaly, MoC, and AS / PF | Consider Pull | Multi-mode value is safer than phase-only value. | Check pity, guarantee, and upcoming banners before committing. |
| The unit only fixes one current Knight stage | Usually Save | Anomaly Arbitration traits rotate. | Use substitutes, lower-star rewards, or wait for a more universal upgrade. |
| You want a signature Light Cone but lack a third team | Usually Save | A new team often gives more account value than vertical investment. | Build roster breadth first, then consider signatures later. |
| You already clear the practical rewards | Save unless you want prestige | Extra pulls may only improve comfort or cosmetic frame results. | Save Stellar Jade for future characters with broader value. |
Before pulling for an Anomaly-only upgrade, plan your pity and Stellar Jade around the next two banners, not just the stage that is blocking you today.
👥 Character Banner History Snapshot
| Version / Phase | Featured Character | Path / Element | Anomaly Arbitration Pull Value | Planning Note |
|---|---|---|---|---|
| Version 4.3 Phase 1 | Mortenax Blade | Nihility / Fire | High if you want Fire debuff, Zone, or current-phase synergy | Stronger if he also improves your MoC / AS plan, not just one Knight stage. |
| Version 4.3 Phase 1 | Yao Guang | Physical | High for several current Elation / offensive support setups | Good value if your current teams already use her support profile. |
| Version 4.3 Phase 2 | Cyrene | Ice | High for Remembrance / Castorice / Phainon-style teams | Best when she supports multiple endgame teams, not only Anomaly. |
| Version 4.3 Phase 2 | Phainon | Physical | Consider if you need a strong hypercarry direction | Pull value depends on your support core and whether he helps other modes. |
For older and upcoming reruns, use the HSR Banner History page as a reference, then judge whether the character actually solves your Anomaly Arbitration bottleneck.
🔆 Light Cone Banner History Snapshot
| Version / Phase | Light Cone | Path | Worth Pulling for Anomaly? | Safer Advice |
|---|---|---|---|---|
| Version 4.3 Phase 1 | Reforged in Hellfire | Nihility | Consider if Mortenax Blade is a core part of several teams | Skip if you still lack team depth or a third sustain option. |
| Version 4.3 Phase 1 | When She Decided to See | Character-specific rerun Light Cone | Depends on owner account and team usage | Only pull if the character is already used in multiple modes. |
| Version 4.3 Phase 2 | This Love, Forever | Character-specific rerun Light Cone | Consider only if it upgrades a core team | Roster breadth usually beats signature vertical investment for Anomaly. |
| Version 4.3 Phase 2 | Thus Burns the Dawn | Character-specific rerun Light Cone | Depends on your Phainon / hypercarry plan | Compare against F2P or existing Light Cone options first. |
Light Cone Warning: Signature Light Cones can improve clear comfort, but Anomaly Arbitration usually punishes narrow accounts more than imperfect Light Cone choices. If your third team is incomplete, build the team first.
If you are unsure whether a signature is actually needed, compare your options in a general HSR Light Cones guide before pulling.
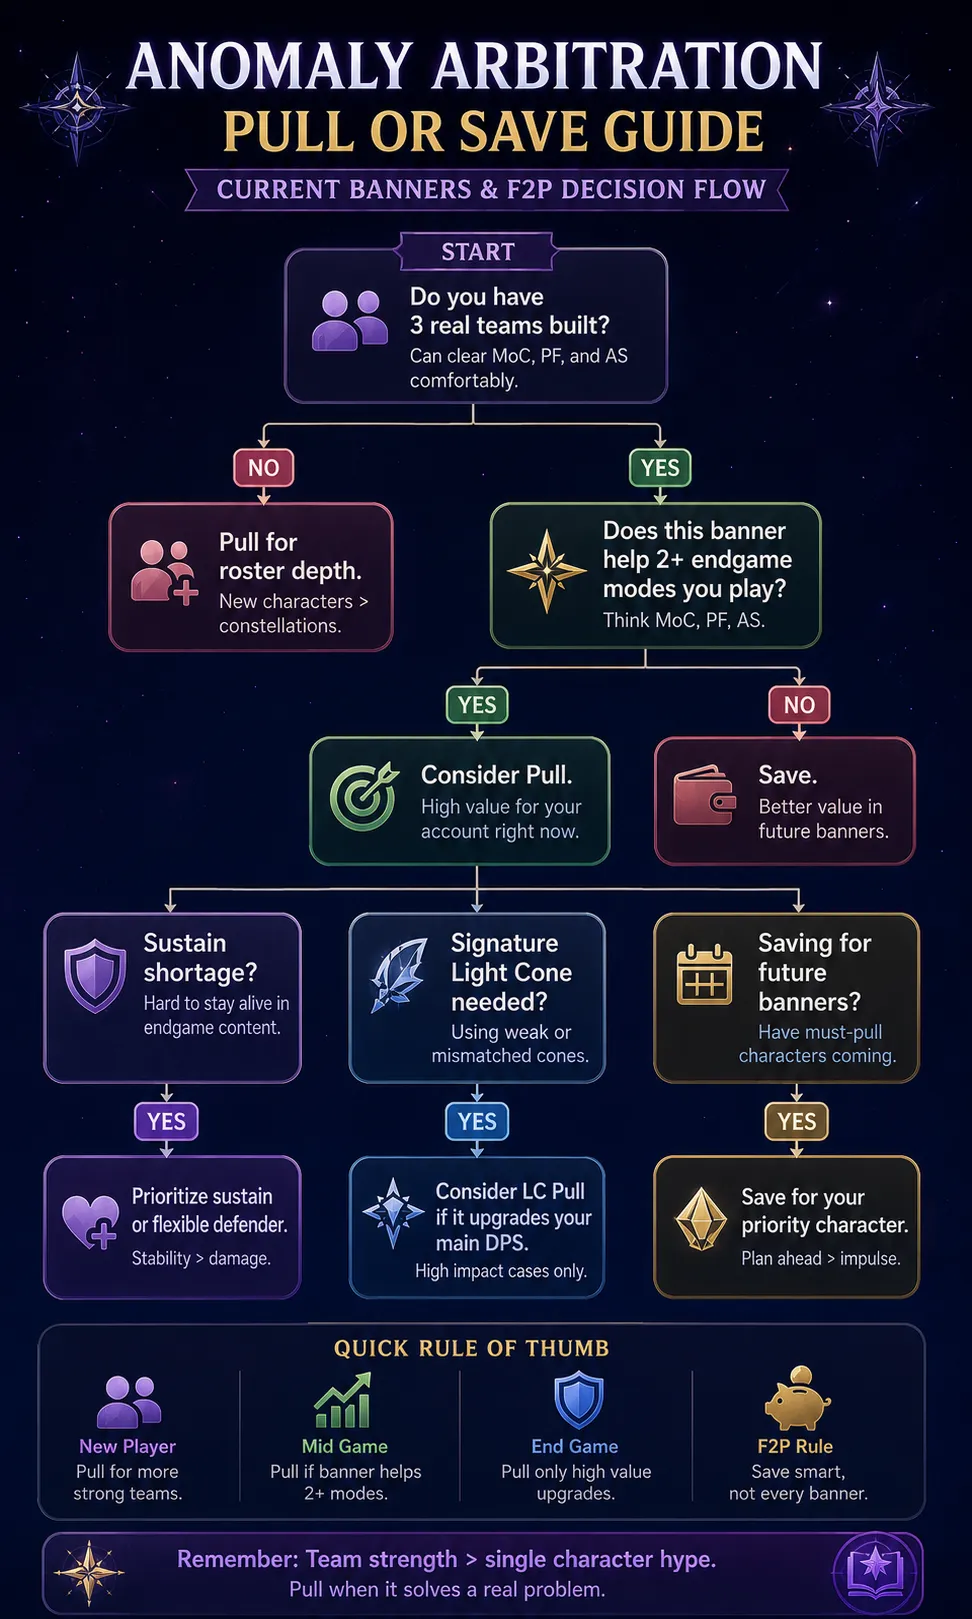
Image: Honkai: Star Rail © HoYoverse
✅ HSR Anomaly Arbitration Clear Tips and Checklist
Use this section before spending more Trailblaze Power or pulling a banner only because one stage feels unfair.
🧪 Pre-Clear Checklist
- Read the current enemy traits first. Do not use last phase’s team plan blindly.
- Plan King in Check first. Save the safest boss team for the final stage.
- Check relic and Light Cone overlap. If two Knight teams need the same gear, rebuild the weaker team.
- Assign sustain by stage danger. Hemovore and fatal HP loss deserve stronger healing than a normal damage race.
- Do not overcommit premium supports to easy Knights. A slower Knight clear can still be correct if it protects your King team.
- Check speed order. If buffs expire before the carry acts, your damage problem may actually be a speed problem.
- Target practical rewards first. King 1-star and Knight milestones matter more than cosmetic flex rewards.
- Review failed runs by cause. Was it damage, survival, Energy, weakness, action delay, or gear overlap?
🧠 Common Failure Points
| Problem | Likely Cause | Fix |
|---|---|---|
| Second or third Knight team cannot clear | Your roster is not deep enough, or key supports are already used elsewhere. | Build a backup support and sustain before improving your main DPS again. |
| Team dies in Knight III or King | Hemovore HP loss is outpacing healing. | Use stronger sustain, defensive relics, or a safer team with better healing cadence. |
| Damage falls off after repeated hits | Flow Break is reducing damage taken / Crit damage taken. | Use Follow-Up, Elation, Break, or teams that can reset or bypass the penalty better. |
| King in Check fails after all Knights are done | Your strongest team was spent too early. | Plan backward from King and downgrade the easiest Knight team. |
| You miss a star by one action | Speed tuning, Ultimate timing, or wave transition is inefficient. | Adjust SPD, opener, and buff order before farming a full new set. |
If the issue is turn order, check HSR Speed Breakpoints before assuming your DPS needs a completely new relic set.
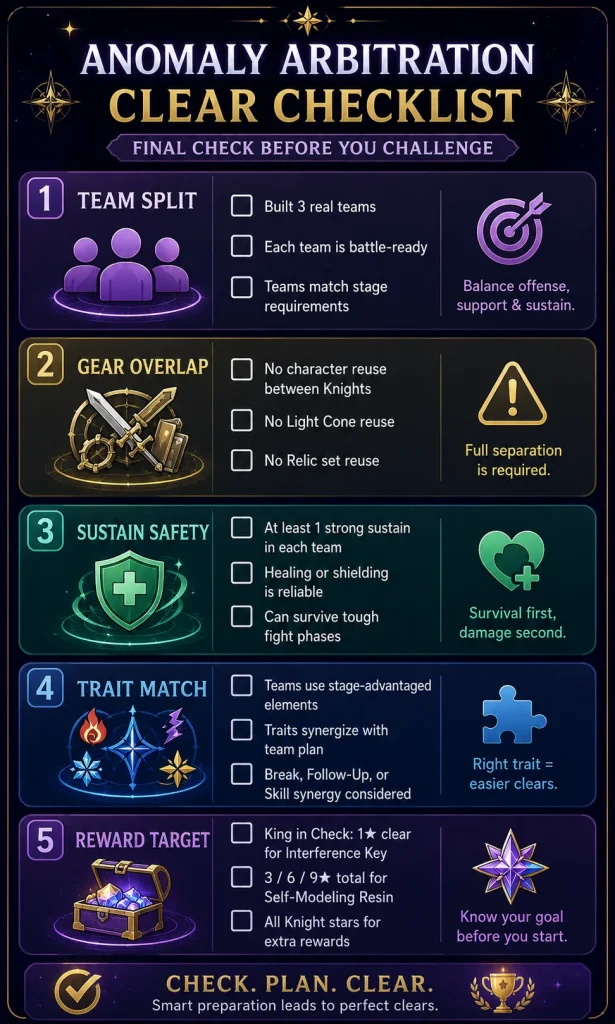
Image: Honkai: Star Rail © HoYoverse
❓ HSR Anomaly Arbitration FAQ
What is Anomaly Arbitration in HSR?
Anomaly Arbitration is a permanent high-difficulty endgame mode in Honkai: Star Rail. It has three Knight stages that require separate teams, followed by one final King in Check stage with stronger mechanics and better prestige pressure.
How do you unlock Anomaly Arbitration?
You need to complete Trial of Equilibrium: Part Six and have historical 3-star clear records in Memory of Chaos Stage 12, Pure Fiction Stage 4, and Apocalyptic Shadow Difficulty 4.
How many teams do you need for Anomaly Arbitration?
You need three separate Knight teams. For King in Check, you use one final team, but you should plan that final team before assigning your Knight teams.
What are the best teams for Anomaly Arbitration?
The best teams depend on the current phase. In the 4.3.1 phase, strong options include Elation / Follow-Up teams, Mortenax Blade setups, Castorice / Evernight / Cyrene / Hyacine-style Remembrance teams, and Firefly / Fugue Break teams when the stage matchup supports them.
What rewards does Anomaly Arbitration give?
Important rewards include Lone Stardust, Interference Key, Self-Modeling Resin, and cosmetic frame rewards. The most practical targets are the King 1-star Interference Key and the Knight star milestones that give Self-Modeling Resin.
What is Interference Key used for?
Interference Key is used with Variable Dice when rerolling a fully enhanced 5-star relic. It allows you to block one selected substat from being enhanced during the reroll, making it valuable for high-end relic optimization.
Is Anomaly Arbitration F2P-friendly?
It is possible for developed F2P accounts, but it is not beginner-friendly. F2P players should focus on practical rewards, build three real teams over time, and avoid pulling only to solve one temporary phase.
Should you pull a character just for Anomaly Arbitration?
Usually no. Pull if the character also helps other endgame modes or fixes a long-term roster weakness. If the character only helps one current Anomaly Arbitration stage, saving is often safer.
Are 0-cycle clears necessary?
No. 0-cycle clears are prestige goals and often require high investment. Most players should prioritize stable clears, key rewards, and account-wide improvements before chasing showcase results.
Final Takeaway: Anomaly Arbitration is not only a damage check. It is a roster-depth check, gear-allocation check, sustain check, and pull-planning check. Clear the Knights efficiently, save your best team for King in Check, and treat Interference Key and Self-Modeling Resin as the real account-progress rewards.
1 Comment